iPod 5th Generation Headphone Jack & Hold Switch Replacement
Duration: 45 minutes
Steps: 17 Steps
Ready to tackle the challenge of removing the headphone jack from your 5th Gen iPod Video? Let’s dive in! Follow these steps, and you’ll be one step closer to giving your device a fresh start. Remember, if you hit a snag, you can always schedule a repair for some extra support!
Step 1

Before you start, make sure your iPod’s hold switch is locked in place. To do this, slide the switch all the way to the right – it should be fully engaged when your iPod is facing you, screen-side down. This is a crucial step to prevent any accidental turns-on during the repair process. If you need help, you can always schedule a repair
Step 2

Popping open the iPod can be a bit tricky, but don’t sweat it! It might take a couple of attempts to get the hang of it, so take your time and keep at it—you’ve got this!
– Pop loose the first clip at the bottom of the iPod with the iPod opening tool. Be sure the tool’s edge is angled toward the metal back to keep the plastic front safe from scratches!
Step 3

– Check out this picture of the OPENED iPod to find the spots where the retaining clips are located—there are 4 on each side, 1 on the top, and 2 at the bottom. This handy reference will save you some headaches and help keep that plastic cover scratch-free!
Step 4


Get ready to crack open your device! There are four sneaky retaining clips on each side, and we’ll use a trusty iPod opening tool to carefully separate the plastic front from the metal back. Don’t worry, it’s easier than it sounds!
– Slide the iPod opening tool into the left side of your iPod, making sure the edge is aimed at the metal back. You’ve got this!
– A small guitar pick can be your best buddy for this task. Just pop it in and glide it around the case to release those pesky clips and make things easier.
– Gently wiggle the iPod opening tool to widen the gap a bit more, moving it to the left. Keep it smooth and steady!
– Keep at it until the whole left side of the iPod is feeling loose and ready to go.
– Now, carefully insert another iPod opening tool to the right of the Hold button. Just a heads up, the display is super delicate, so take your time!
Step 5


The iPod casing is open, but hold off on pulling the two halves completely apart. There are still two ribbon cables keeping the back panel tethered to the rest of the iPod.
– Carefully slide the iPod opening tool along the top of the display to release those pesky retaining clips.
– The other sides of your iPod should now be ready to pop off with ease! If they’re a bit stubborn, just use the opening tools on the right side, just like you did on the left.
– Gently pull the front of the iPod away from the back, creating about an inch (or a couple of centimeters) of space. You’re doing great!
Step 6


Be careful not to lift too high, or you might accidentally pull the battery connector right out of the logic board – that’s a repair you don’t want to have to make!
When removing the connector, make sure to slide it straight up. It’s a bit fragile, so try not to wiggle it back and forth. You’ll notice it has little hooks at the bottom to keep the cable in place. If you do happen to break one of these arms, don’t worry – just gently place the cable back in the slot and push the brown holder into position to keep it from slipping out.
– Grab your angled tweezers or an iPod opening tool and gently pop up the brown connector latch that’s holding down the orange battery ribbon cable. Pro tip: go for both sides of the latch at the same time—it’s a team effort! You only need to lift it up about 1-2mm to release the cable. Seriously, don’t go yanking it too high or trying to take it off completely, or you might end up pulling the white connector with it—nobody wants that kind of drama!
– Now, carefully slide the cable out of the connector like a total pro. Nice work!
Step 7

You don’t absolutely have to separate the case to replace the battery, but it can make the whole process smoother. Just keep in mind, you might need to unplug an extra cable, and while it’s not a huge deal, there’s a tiny chance of a mishap during the removal. Take it slow and steady, and you’ll be fine!
– By now, you should see one orange ribbon cable holding the front case and back case together. It’s like the last little bridge between them!
– Feeling adventurous? You can go ahead and swap out those trusty blue rubber bumpers now or keep the momentum rolling with separating the case. Either way, you’ve got this!
Step 8

If those hard drive bumpers decide to wander off, just pop them back in place with the notches lined up like the picture shows. Easy peasy!
– Gently lift the hard drive to reveal the headphone jack ribbon connector, which is highlighted in the yellow box.
Step 9


– Grab your trusty iPod opening tool and gently nudge that brown tab of the headphone ribbon cable connector. Give it a little lift, and watch it rotate up a cool 90 degrees to release the ribbon cable like a pro.
– Now, using your fingers, simply pull out the headphone jack ribbon cable with style.
Step 10

– The front and back of the iPod should now be fully apart, like a well-deserved break for your device!
Step 11


Take it slow and steady here—keep those headphone and battery ribbon cables intact while you work on this step. They’re delicate, so handle with care!
– Slide your iPod opening tool between the metal frame and the battery, exactly where the picture shows—you’re in the right spot!
– Give that tool a little wiggle while gently applying pressure to sneak it further between the battery and the back panel. The adhesive will loosen its grip, and voilà! The battery will pop away from the rear panel like a charm.
Step 12

Be very careful when handling your logic board to avoid any damage to it.
– Gently pull back the tape that’s keeping the ribbon cables snug in place.
Step 13

– Let’s get started! Remove the two black Phillips screws that hold the headphone jack in place on the lower casing. This is a breeze, and you’re one step closer to fixing your device!
Step 14

Pro Tip: When putting your iPod back together, try dabbing a tiny bit of white glue on the end of your screwdriver – it’s a total game-changer for keeping those teeny screws in place!
– Alright, let’s get started by removing these two screws:
– First up, a black Phillips screw holding the hold switch near the iPod’s corner—let’s set that free!
– Next, a silver Phillips screw anchoring the other side of the hold switch—you’re doing great!
Step 15

If you’re taking out the Hold switch and headphone jack to swap the back panel, you can chill out here!
– Gently lift the Hold switch out of its cozy home on the rear panel.
– Carefully slide the headphone jack out from its snug spot on the rear panel.
– Now, lift the headphone jack and Hold switch assembly out of the iPod, like you’re gently picking up a little treasure.
Step 16

Got a replacement headphone jack that comes with the white plastic hold switch? Awesome—just pop it in and you’re good to go! If your new part is missing the plastic hold switch, hang tight—follow the next steps to shuffle that plastic hold switch onto your shiny new headphone jack.
Want to give the rear panel a solo performance? No worries, skip Steps 15 and 16!
– Take out the single Phillips screw closest to the hold switch. Heads up: There might be some sneaky adhesive keeping the back of that screw snug in place.
– Gently lift the plastic piece of the Hold switch, making sure to separate it from the orange ribbon cable below.
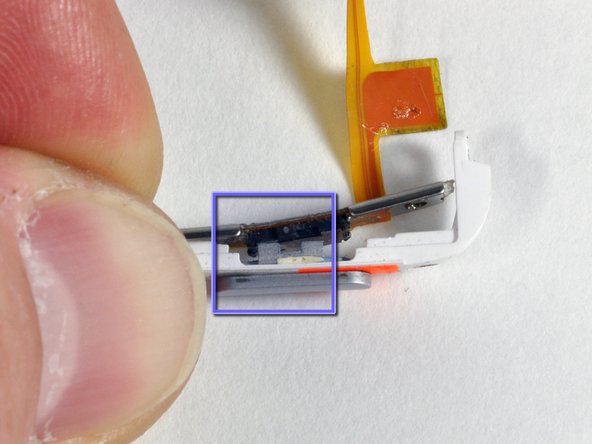
– When reassembling, double-check that the black notch aligns perfectly with the gray slider. Trust me, it’ll save you some hassle later (see picture 2).
Step 17

– Grab that trusty small iPod opening tool and gently coax the orange ribbon cable and the black Hold switch away from the metal backing. Take your time, finesse is key here!
– When it’s time to pop that new Hold switch back into place, just make sure those two little posts on the back are snugly fitting into their respective holes in the metal backing. It’s a match made in repair heaven!
Success!