
Xbox One Teardown
Duration: 45 minutes
Steps: 22 Steps
After eight years, Microsoft has finally introduced the long-awaited successor to the Xbox 360—the Xbox One. Is this the one console to unite them all? Join us as we take a deep dive into the design and inner workings of Microsoft’s latest gaming machine—straight out of scenic New Zealand. Check out our updates on Instagram, stay tuned for teardowns on Twitter, and connect with us on Facebook!
Step 1


– Here it is, folks! The one we’ve all been eagerly waiting for—the Xbox One.
– Think we’re kidding about all this New Zealand shenanigans? Just check out the background of this Xbox New Zealand release photo—there’s our very own Samantha Lionheart (rocking red) and Optimus Goldberg (in orange).
– Tech Specs:
– 8-core x86 processor
– HDMI pass-through
– 8 GB of RAM
– 500 GB storage capacity
– Blu-ray/DVD drive
Step 2

If anyone ever doubts that Salvation Repair can’t appreciate a bit of toilet humor, just point them to this teardown.
– Before we start diving into the nitty-gritty of this teardown, let’s snap a few test photos to warm up.
– We have to admit, this might just be the most artistic shot of a roll of toilet paper we’ve ever managed to take—or maybe it’s just way too early in the morning.
– To all the toilet paper companies out there, take notes: this is how you become a star on camera.
– Full resolution available, in case you’re feeling inspired to make it your new wallpaper.
Step 3


– The Day One Edition comes with a special controller, proudly displaying the inscription: “Day One 2013.” right in the center.
– Also making an appearance from the box is the Kinect 2.0 unit along with a compact yet powerful Xbox One power brick.
– The Xbox One controller takes the solid design of the Xbox 360 controller and spruces it up with some fresh updates.
– According to a Microsoft rep, the development cost for the Xbox One controller was over $100 million! Some prototypes even had wild features like built-in displays, cameras, a cartridge for releasing scents, and a projector. How cool is that?
Step 4

– Let’s take a look around the back of the console. What do we find here?
– On the left side, we’ve got a sneaky third USB 3.0 port flying solo.
– Next up, we have the Power Inlet – the console’s energy source.
– Now we’ve got an HDMI Out on the left and an HDMI In on the right – perfect for connecting to your TV or other devices.
– Here’s the Digital Optical Audio Out, great for high-quality sound.
– We’ve also got not one, but two more USB 3.0 ports for all your accessory needs.
– The Kinect Port is here, ready for motion-sensing action.
– Last but not least, there’s the Infrared Output and Ethernet Port, keeping you connected.
Step 5

The Xbox One sips 180 Wh of energy when it’s in action and takes a cozy 20 Wh while it’s chilling in standby mode.
– As we dig down to the bottom, let’s check out those tags—wait, power ratings in Spanish? Interesting find!
– This Xbox One is rocking the model number 1540, courtesy of the creative minds at Microsoft Corporation in Redmond, WA.
– Turns out, our Xbox One rolled off the production line on October 14, 2013, straight out of China.
– And, in a friendly note on the back, Microsoft gives a warm shoutout with ‘Hello From Seattle.’
Step 6


– Hoping to uncover some screws or a secret way in, we embrace our inner dentist and gently pry up the rubber feet from the console using a metal spudger—think of it as a cleaning tool for your tech.
– Unfortunately, much like a dentist’s chair visit, this doesn’t yield any happy discoveries. No screws, no easy access. Someone pass the Novocaine!
Tools Used


Step 7


This part is pretty similar to taking apart the Bottom Vent on an Xbox 360. You’ve got this!
– Stay cool; we’ve got this covered!
– Even without screws, we can still get in there using a plastic opening tool—just gently pry up the grille.
Step 8

– Say the magic word and let’s dive in! With the right password and a few clip maneuvers, we’re cracking open the Xbox One’s shell.
– Off comes the top case, giving us a glimpse into the hidden chambers within. Time to explore what secrets lie beneath!
– The first look doesn’t give away too much, but we’re ready to journey deeper into the circuits and uncover the mysteries inside.
Step 9


– Our Pro Tech Screwdriver Set is just as eager to dive into this console as we are.
– Getting the Pro Tech set through customs was a breeze compared to our backup opening tools.
– While we can’t say how they fare against orcs, our screwdrivers are fantastic for tackling the tiny screws that keep the Wi-Fi board secure.
– With a swift flick of our spudger, the Wi-Fi board is out and ready for a closer look.
– Marvell Avastar 88W8897 2×2 MIMO Wi-Fi Combination Radio Chip supports 802.11ac, NFC, Bluetooth, and Wireless Display.
– Marvell Avastar 88W8782U WLAN SOC with USB 2.0 Interface support.
Tools Used
Step 10


– Well, isn’t this a fun surprise? We’ve stumbled upon a speaker tucked away inside the Xbox One. Or maybe it’s an early version of an arc reactor—who knows? But for sure, it’s a speaker!
– The best part? This speaker is secured with a handy plastic bracket, so you won’t need any tools to get it out. Easy peasy!
Step 11

That’s a little over two and a half inches of threaded excitement!
Who says small, light, and thin can’t be fixed? We’ve seen it done!
– You’ll find eight sturdy 64 mm T9 Torx screws holding the upper metal shield snugly to the chassis. Time to get those out!
– Game consoles are one of the few places where we haven’t gone all out on making things smaller and lighter—and honestly, we’re totally fine with that. We appreciate a device with a bit of heft, especially when it means we can easily access standard fasteners like these screws. It’s a win for repairability!
Step 12


– Here’s your first peek inside the Xbox One.
– That was pretty smooth! The whole Xbox One assembly lifts off easily from the lower case.
– We all love a good mystery, but when it comes to repairs, we’d rather things be a little more straightforward. No hobbit holes, please!
– And as for that Hobbit Hole breakfast at Denny’s? Eh, not as important right now.
Step 13


– Here’s a nice surprise for repair enthusiasts: the Blu-ray/DVD drive hooks up to the motherboard via a straightforward SATA data connector. Score one for repairability!
– As much as we’d love to marathon the entire LOTR trilogy on Blu-ray, our mission to dismantle the One Xbox at the teardown table takes priority. Let’s keep moving!
– Flipping the optical drive over, we spot some interesting components, including a couple of ICs and a broad ribbon cable:
– Microsoft MS0DDDSPB1 1326-BTSL ATNGS501
– Texas Instruments 37T AVY7
Step 14


Newegg has some pretty positive feedback about this drive.
– The Xbox One isn’t designed with a replaceable hard drive in mind, but hey, we like a good challenge. Let’s get that drive out of there!
– Heads up: swapping the hard drive does void the warranty, but the silver lining is it’s a standard 2.5-inch SATA II drive. Bummer alert: unformatted hard drives aren’t compatible with the Xbox One.
– Inside our Xbox One, we uncovered a Samsung Spinpoint M8 ST500LM012 500 GB 5400 RPM with 8MB Cache SATA II 3.0Gb/s hard drive.
Step 15

– Teardown update: We popped the Xbox One’s hard drive into one of our tech writer’s spare hard drive bays. Surprise! We found five NTFS partitions waiting for us:
– Unfortunately, we couldn’t test the reverse—no spare hard drive in New Zealand meant we couldn’t pop one into the Xbox One. Guess that experiment’s on hold for now!
– Temp Content: 44 GB capacity, with 27.1 GB free space (from an Xbox we never powered up).
– User Content: Whopping 391.9 GB capacity, completely untouched.
– System Support: 42.9 GB capacity, with 34.1 GB free and ready to go.
– System Update: 12.8 GB capacity, leaving 11.8 GB free for updates.
– System Update 2: 7.52 GB capacity, practically full with 7.47 GB free.
Step 16


– Gently pull the RF Module board away from the lower case—it should come off without much resistance.
– On the back of the RF Module board, you’ll find a single IC chip labeled 9160F1MS03 1327 2317B057. This little guy is likely an Audio User Interface chip from Nuvoton.
Step 17


The notorious red ring of death had its moment, so it’s no shocker that this Xbox comes geared up with a solid cooling system.
– The magic spot! The heat sink and fan assembly are snugly fastened to the motherboard with a handful of T9 Torx screws. Get ready to unscrew with style!
Step 18

– Curious about what our teardown team munches on while diving into repairs? Here’s the scoop: Arnott’s Shapes Chicken Crimpy (baked, not fried) are a must-have! We also enjoy some Hello Panda biscuits, a couple of Yan Yan packs, and of course, Griffin’s MallowPuffs for that sweet touch.
Step 19

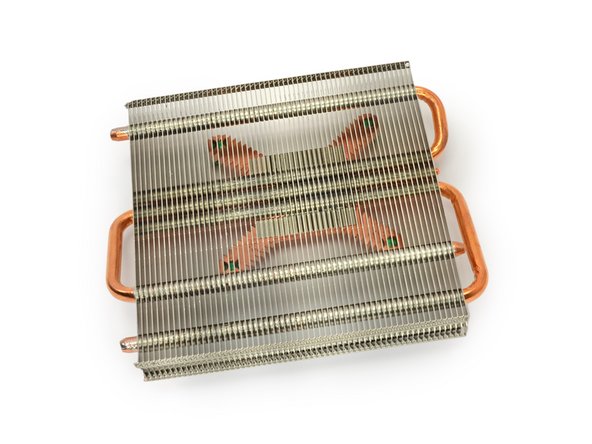

Just a tiny tweak for you to make, but a huge leap towards making repairs easier for everyone.
– Good news! If your new Xbox One is feeling a bit too warm, swapping out the fan or heat sink is a breeze.
– Just grab your trusty spudger and give it a gentle flick to detach the 112 mm diameter fan from the heat sink.
Tools Used
Step 20

– What treasures lie before us? A league of integrated circuits! Here’s the star lineup:
– X887732-001 DG3001FEG84HR (featuring AMD ‘Jaguar’ 8-core CPU + AMD Radeon Graphics GPU)
– 16x SK Hynix H5TQ4G63AFR 4 Gb (512 MB) DDR3 SDRAM (for a total of 16 x 512 MB = 8 GB)
– X861949-005 T6WD5XBG-0003
– SK Hynix H26M42003GMR 8 GB eMMC NAND Flash
– ON Semiconductor NCP4204 GAC1328G Integrated Power Control IC
– Realtek RTL 8151GNM Ethernet Controller
– Texas Instruments TPS2590 3-V to 20-V High Current Load Switch
Step 21


– The back of the motherboard is like a beautiful, green landscape, completely free of any integrated circuits.
– A huge shoutout to the amazing folks at Chipworks for helping us identify the little gadgets we discovered inside the Xbox One!
– If you haven’t already, be sure to check out their detailed analysis of the PS4!
Step 22

– And with that, it’s time to wrap up! Let’s take a moment to give this console its well-deserved repairability score.