How to Replace Nintendo Switch Lite Right Speaker – Guide
Duration: 45 minutes
Steps: 17 Steps
Get ready to breathe new life into your Nintendo Switch Lite by replacing that faulty right speaker. Don’t worry, we’ve got you covered – even if you only have a Phillips screwdriver handy, it’ll do the trick in a pinch. Just be gentle, as you don’t want to strip those screws. A word to the wise: this procedure requires disconnecting the battery, so you’ll need to remove the shield plate first. It’s bonded to the heat sink with thermal paste, which you’ll need to clean off and reapply when you’re putting everything back together. If you need help, you can always schedule a repair.
Step 1
Before you dive into this repair adventure, ensure that your device is totally powered down.
As you tackle this repair, keep an eye on each screw and make sure it finds its way back to its original home. You’ve got this!
– Grab your trusty Y00 screwdriver and go to town on those four screws holding the back panel in place – they’re 6.3 mm long and ready to be removed!
Step 2
To keep those pesky screws from getting stripped, press down firmly, take your time, and if they’re stubborn, try switching up your screwdriver. You’ve got this!
– Grab a JIS 000 driver or an official Salvation Repair PH 000 driver to tackle the screws holding the back panel in place:
– Two 3.6 mm screws at the top of the device
– Two 3.6 mm screws at the bottom of the device
Step 3
Keep that opening tool just where you need it—no need to go too deep! We want to avoid any mishaps with the speaker module, so stay steady and careful.
– Grab your trusty opening tool and slide it into the left speaker grille at the bottom of the device. Easy does it!
– Give that tool a little twist to pop the clips holding the back panel in place. You’re doing great!
Step 4
– Gently glide the opening tool around the bottom-left corner to pop those clips free on the left side of your device! You’ve got this!
Step 5
Keep it cool, but careful—don’t push the opening tool in too deep or you’ll risk messing with the speaker module.
– Let’s get started! Insert an opening tool into the right speaker grille on the bottom of your device – it’s time to begin the repair process.
– Now, gently twist the opening tool to release the clips. You’re making great progress!
Step 6
– Gently slide and wiggle the opening tool around the bottom-right corner to pop those clips loose on the right side of your device. You’ve got this!
Step 7
– Keep gliding and gently prying the opening tool along the top gap of your device to pop those clips free!
Step 8
– Gently lift the bottom edge of the back panel, swinging it open like a charming little book.
– Carefully detach the back panel and set it aside with a smile.
Step 9
– Grab your trusty JIS 000 driver or the official iFixit PH 000 driver and let’s tackle those screws! You’ll need to remove four of them:
– Three screws measuring 3.1 mm
– One screw that’s 4.5 mm
Step 10
You might feel a bit of pushback here—don’t worry, that’s totally expected. The shield plate is clinging to the heat sink with a little thermal paste love.
– Grab your trusty spudger or just your fingers and gently lift that shield plate right up and out of your device. You’ve got this!
– Time to say goodbye to the shield plate. Give it a careful removal!
– Let’s get that old thermal paste off! Use some isopropyl alcohol and a microfiber cloth to clean the shield plate and heat sink. Don’t forget to apply a fresh layer of thermal paste to the heat sink before you put everything back together!
Tools Used
Step 11
– Grab your trusty opening tool or even just your fingernail, and gently pop up the tiny hinged locking flap on the ZIF connector for the motherboard interconnect cable. Easy does it!
Step 12
Avoid using metal tweezers! Some folks say that metallic tweezers can cause a short circuit in the ribbon cable or connector. It’s probably a good idea to stick with nylon-tipped or ceramic-tipped tweezers for a safer experience.
– Grab your trusty tweezers and gently wiggle that interconnect cable free from its cozy spot in the motherboard connector. You’ve got this!
Tools Used
Step 13
– Gently use the tip of a spudger to pop the battery connector straight up and disconnect it from the motherboard. Keep it smooth and steady!
Tools Used
Step 14
Give those wires some TLC—pulling on them directly might lead to a messy breakup with the connector!
– Gently grab the right speaker cable with your trusty tweezers or your fingers and carefully lift it straight up and out of its cozy little socket on the motherboard. You’ve got this!
Tools Used
Step 15
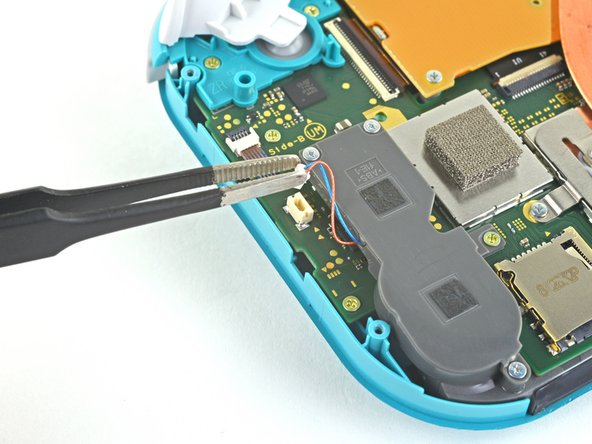
– Grab a JIS 000 driver or a trusty official PH 000 driver from your toolkit to remove these four screws:
– Three 2.5 mm screws
– One 4.5 mm screw
Step 16
– Use your fingers to gently pop off and lift the cover for the right speaker module.
Step 17
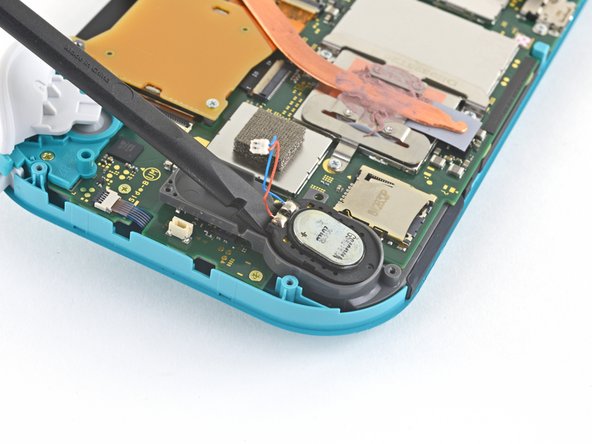
Be mindful of those tiny speaker wires while you slide the spudger into the gap—slow and steady wins the race!
The speaker is lightly glued in place inside the speaker module, so you’ll need a little muscle to pop it out.
– Ready to put it all back together? Just follow these steps in reverse—easy peasy!
– Got some old parts lying around? Make the planet happy and drop them off at an R2 or e-Stewards certified recycler.
– Having a hiccup? Give basic troubleshooting a shot or tap into our Nintendo Switch Lite Answers community for some solid advice.
– Still stuck? No worries—schedule a repair and we’ll get it sorted for you.
Tools Used
Success!


