Nintendo Switch Teardown Guide: Step-by-Step Repair Tutorial
Duration: 45 minutes
Steps: 24 Steps
The wait is over! Nintendo’s brand new console, the Nintendo Switch, is finally here. Let’s dive in and take a closer look at the hardware. Join us as we break it down step by step. If you need to take a break, you can find us on Facebook, Instagram, or Twitter to learn more. When you’re ready, let’s get started on this step-by-step repair guide. If you get stuck or need help, you can always schedule a repair.
Step 1


– Get ready to dive into the Nintendo Switch’s awesome hardware features!
– Inside, you’ll find a powerful NVIDIA customized Tegra processor that makes your games and apps run smoothly
– Check out the stunning 6.2 inch multi-touch LCD screen with 1280 × 720 resolution – and don’t forget, it can output 1920 × 1080 on an external display via HDMI for an even more epic experience
– The Switch comes with 32 GB of internal storage, but don’t worry if that’s not enough – you can add up to 2 TB more with a microSDHC or microSDXC card
– Stay connected with 802.11 a/b/g/n/ac Wi-Fi, Bluetooth 4.1, a USB Type-C charge port, and a 3.5 mm audio jack on the console, plus three standard USB ports on the Switch Dock
– Immerse yourself in the Switch’s awesome stereo speakers
– The rechargeable lithium-ion battery gives you 2.5 – 6.5 hours of play time, so you can keep gaming on the go
– Detachable wireless Joy-Cons make it easy to switch up your gameplay (pun intended)
Step 2


Looks like we’ve got a hefty battery on our hands!
– Teardowns can be tricky, so to save us some time, the team over at Creative Electron gave us a hand by X-raying the whole box.
– We couldn’t resist going for a closer look, so we popped the console out of its packaging and dock, and grabbed another X-ray image just because.
– Alright, time to put the X-rays aside and break out the tools!
Step 3


– Before we dive into the nitty-gritty, let’s size up what Nintendo’s got in the box: the console itself, two Joy-Cons, a dock, and the Joy-Con Grip. A solid little kit, ready to rock.
– With the Joy-Cons strapped on, the Switch console is about 9.4 inches wide, 4 inches tall, and just half an inch thick—a sleek and portable setup for all your gaming adventures.
– Even with all the extra gadgetry, the Joy-Con-equipped console tips the scales at only 0.88 pounds—lighter than the Wii U GamePad, which weighed in at 1.1 pounds. Talk about compact power!
Step 4


The fan blows out through the top of the device, and early reports suggest that the Switch relies pretty heavily on that cooling system when it’s docked and cranking out 1080p graphics.
– Alright, let’s get this teardown rolling!
– First up, we spot an unusual Domino’s-like logo paired with the model number—HAC-001. Interesting choice, Nintendo.
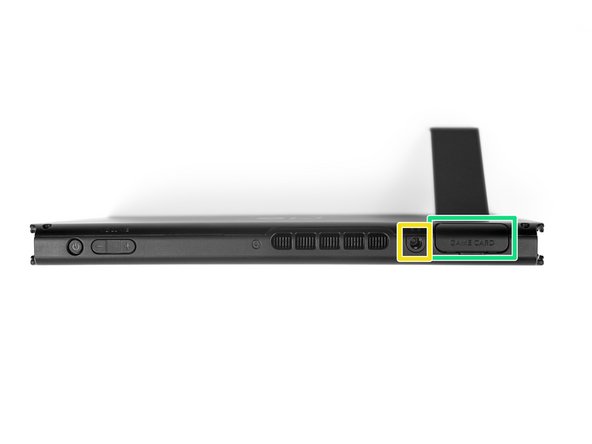
– Spinning it around, here’s what we find in the port department:
– A MicroSD slot tucked under a surprisingly stiff kickstand.
– A USB-C port (used for the dock).
– A standard 3.5 mm headphone jack—classic.
– And finally, a proprietary Nintendo game card slot.
Step 5


– Tri-point screws are like the bouncers of the Switch’s inner world, but don’t worry—we only need a little finesse to get through.
– Peeking inside, we find…not much. Just a metal shield hanging out and keeping things mysterious.
– Once uncased, the modular microSD card board pops right out, making future storage upgrades a breeze. Cheers to that!
– Those tri-point screws might as well say ‘Keep out,’ but once you’re past them, the back cover lifts off smoothly—no clips, no adhesive, no drama.
Step 6

The Switch has a clear focus on two main things: battery life and keeping things cool.
This setup helps spread out the heat, so no worrying about overheating or burning your fingers. Pretty smart, right?
– And here we go, folks! It’s time for the grand unveiling of the internal components. Let’s see what’s inside!
– Well, would you look at that? It’s a computer! We’ve got the battery, heat pipe, thermal paste, and fan all present and accounted for.
– Check out that purple blob! It turns out this metal plate isn’t just for support—it’s also a heat sink that helps transfer heat from the heat pipe to the rear case.
Step 7


Most consoles rely on a good ol’ power supply, but the Switch’s on-the-go vibes call for that sweet wireless juice. Of course, that also means the battery isn’t immortal.
Unlike the 3DS, the Switch battery wasn’t designed for DIY swaps. Nintendo, however, “plans to” roll out a paid replacement program for those in need.
– Safety first! Disconnect the battery connector before you start prying off this little guy from its adhesive.
– The Switch packs a 16 Wh battery, which is quite the upgrade from the 5.6 Wh replaceable battery in the Wii U GamePad. Of course, it’s powering a full-on console, not just a display.
Step 8


The STMicroelectronics FingerTip touchscreen controller is located on the side opposite the game card reader.
– With the battery sorted, it’s time to tackle the next big player: the cooling system.
– The heatpipe is held down with standard Phillips screws, so refreshing the thermal paste should be smooth sailing.
– We set our sights on the fan, but it’s a bit shy—it’s tucked away under the I/O board, so full cleaning access isn’t possible from here.
– To make room, we carefully remove the game card reader and the attached headphone jack.
– And no, we didn’t give any cartridges a taste test. Promise.
Step 9


– Now that the I/O board is out of the way, let’s dive into the fun stuff – the fan!
– This Delta electronics fan is held in place by three screws with nifty rubber vibration damping mounts, and it’s rated for 5 V and 0.33 A. Yep, it’s a tiny but mighty fan!
– We all know that fans can be a bit of a battery-life buzzkill in portable devices. So, it’s no surprise that rumors say the graphics get a serious underclocking when you’re not docked. Makes sense, right?
– By pushing fewer pixels and running the fan less often, the Switch should be able to save some serious juice. It’s all about balance, folks!
Step 10


– This motherboard is packed with connections! To set it free, you’ll need to pop off the digitizer, backlight, and speaker connectors, along with two antennas and the two Joy-Con rails. Oh, and don’t forget the six Phillips screws holding it down.
– On the bright side, the design is impressively modular. Even the eMMC storage comes off on its own little PCB—how cool is that?
– Unfortunately, the modular fun stops at the USB-C port. Replacing this high-traffic component will test your soldering skills to the max.
– Fun fact: Nintendo managed to create a 6.2″ tablet with removable flash storage. So yes, it’s totally possible!
– The storage board features a Toshiba THGBMHG8C2LBAIL 32 GB eMMC NAND Flash IC—small but mighty!
Step 11

– Check out the front side of the motherboard, where you’ll find a cool collection of Miis ICs hanging out:
– NVIDIA ODNX02-A2, which we think is the Tegra X1-based SoC doing its thing.
– Samsung K4F6E304HB-MGCH 2 GB LPDDR4 DRAM (there are two of these bad boys for a total of 4 GB).
– Broadcom/Cypress BCM4356 802.11ac 2×2 + Bluetooth 4.1 SoC keeping you connected.
– Maxim Integrated MAX77621AEWI+T three phase buck regulators (two of them, because why not?).
– Rohm BM92T36 USB-C controller making sure your connections are smooth.
– Texas Instruments BQ24193 single cell battery charger (possibly, but who’s counting?).
– Texas Instruments TMP451 remote/local temperature sensor keeping an eye on the heat.
Step 12

– Now, let’s take a look at the back of the motherboard, where the magic happens!
– You’ll find the Pericom Semiconductor PI3USB30532, a fancy USB 3.0/DP1.2 matrix switch that helps your device talk to the world.
– Next up is the Realtek ALC5639 audio codec, which brings the sound to your ears.
– The Maxim Integrated MAX77620AEWJ+T PMIC is like the device’s personal power manager, making sure everything runs smoothly.
– Say hello to the B1633 GCBRG HAC STD T1001216, probably a Nintendo secure MCU that keeps things secure and locked down.
– The STMicroelectronics LSM6DS3H 3-axis accelerometer/gyroscope is like a tiny gym coach, helping your device stay balanced and oriented.
– The Maxim Integrated MAX17050 battery fuel gauge is like a gas meter, keeping an eye on your device’s power levels.
– Last but not least, the Rohm BH1603FVC ambient light sensor helps your device adjust to its surroundings.
Step 13


These speakers are working hard to bring the bass to life. The bigger diaphragms move more air, and the ported back gives it that deep, booming sound. However, early feedback suggests they still tend to highlight the treble a bit more.
– The stereo speakers are gently stuck to the rear case, but they’re not too stubborn—ready to pop off with some finesse.
– Tiny Phillips screws are holding down a Joy-Con rail at each end of the console. Let’s get those out of the way!
– Each rail is like a high-five between the console and Joy-Cons—it has contact pins that connect with the Joy-Cons to share charge and send button presses to the motherboard through a ribbon cable. Pretty neat, huh?
Step 14


Oops! In our rush to explore, we accidentally disconnected the digitizer data cable. Heads up, this device opens lengthwise—take it slow and steady to keep everything intact.
– Good news: the Switch’s digitizer isn’t fused to the display, so you can replace them separately – kudos to Nintendo for keeping repairability in mind!
– The digitizer is stuck to the display with a double-sided adhesive strip around the edges. With some heat and gentle prying, you should be able to carefully remove it.
Step 15

Making devices more portable often means they’re easier to drop. Props to Nintendo for crafting a more fixable device while upping its portability game.
– And as the icing on this cake? The LCD display pops right out without a fuss!
– With that, the console is officially taken care of—but hold on, there’s still more to do.
– Now, where did we stash those controllers…
Step 16


Joy-Cons aren’t exactly built for underwater adventures, so it’s best to keep them far away from your fish tank.
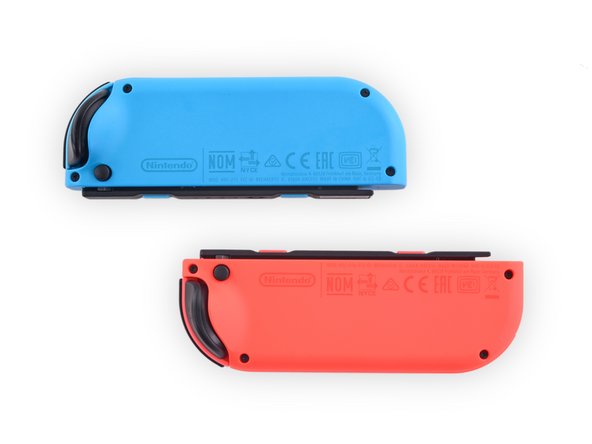
– Nintendo got creative with color coding to remind us that these Joy-Cons, which may look alike, actually pack different hardware under the hood.
– Not a fan of the neon vibe? If you’ve got a knack for stickers, you can disguise their true colors with a skin.
– Different hardware means different model numbers: The neon blue controller is labeled HAC-015, while the neon red goes by HAC-016.
– Whether it’s a laptop, wireless headset, wireless printer, microwave, wireless speakers, smartwatch, cordless phone—this tool is best used in a signal-free zone, like a cozy cave.
Step 17


– We might not be DNA experts, but we’re grabbing our trusty scalpel spudger to compare these sibling gadgets side by side.
– Each controller comes packed with a 1.9 Wh lithium-ion battery, Bluetooth connectivity, motion sensors, and a snazzy haptic ‘HD Rumble’ motor.
– Nintendo says the Joy-Con controllers can last up to 20 hours on a single charge, though you’ll need a chill 3.5 hours to juice ’em back up.
– Swapping out the battery isn’t as simple as with the old Wii Remotes, but with a little patience, it’s definitely doable.
– Need more juice? The Joy-Con charging grip is here to save the day, giving you a power boost and a comfier grip for your epic gaming sessions.
Tools Used

Step 18
The rail along the edge of the Switch Console is made of metal, and it feels like it’s ready to handle whatever adventures you throw at it.
– Word on the street hints at potential durability issues with the rail mechanism on the Joy-Con units, so let’s take a moment to give it a good, close inspection.
– The counterpart on the Joy-Con side is made of plastic, which is honestly ideal—if anything gives out, it’ll likely be the detachable controller itself, making it less expensive and simpler to repair or replace.
Step 19


The IR setup includes an IR camera and four IR LEDs. According to Nintendo, the camera can pick up different hand shapes and distances, and there’s potential for it to record video in the future. The LEDs? They’re likely throwing some infrared light around to help the camera recognize nearby objects more easily.
– The controllers shed their shells for a side-by-side comparison. Say hello to Red and Blue.
– It’s not just about looks—what’s inside really matters. The red Joy-Con takes the lead here with its IR hardware and NFC antenna.
– But you know what both rock? Two Phillips screws holding down the joystick and another two securing the board. Solid design, right?
– At the base of each, you’ll find a powerful HD Rumble motor weighing in at 5.5 grams—small but mighty.
– Blue, you’re the real MVP when it comes to making repairs smooth and straightforward. We salute you!
Step 20


– Let’s dive into the controller boards and see what makes them tick. Check out the feature-packed red board – it’s a real showstopper (and the blue board is similar, with a few tweaks):
– Broadcom BCM20734 Bluetooth 4.1/2.4 GHz Transceiver: the brains behind the Bluetooth operation
– STMicroelectronics ST21NFCB NFC controller: making contactless payments a breeze
– Macronix International MX25U4033E 4 Mb CMOS Flash: storing all the important stuff
– STMicroelectronics STM32P411 32-bit microcontroller: the mastermind behind it all
– STMicroelectronics LSM6DS3H 3-axis accelerometer/gyroscope (likely): keeping things balanced and on track
– Texas Instruments BQ24072 linear battery charger w/ power path management: keeping the juice flowing
– Rohm BD27400GUL mono class-D audio amplifier: bringing the beats
Step 21


These LRAs look a lot like the ones we’ve seen in the Oculus Touch controllers, HTC Vive, and the Steam Controller.
– Teardown Update: To make sure we got a good peek at the magic inside, we cracked open the haptic feedback motor—a linear resonant actuator (LRA) that makes the Switch’s HD Rumble come alive.
– Inside, this little vibration motor is pretty straightforward. It’s basically a voice coil mounted in a moving mass setup, with a couple of strong magnets keeping it all in check.
– What’s cool here is that this LRA vibrates along its short axis, which is a bit different from the usual haptic motors we’ve seen that prefer shaking along their long axis.
– For comparison, we opened up an Oculus Touch haptic motor, and surprise—it’s nearly identical to this one on the inside!
Step 22


Heads up from Nintendo: The rear USB port is rocking USB 2.0 at launch. No worries though, a future update will bring the speedy USB 3.0 support!
– Before we dive into the world of the Switch, we decided to get some intel first. We certainly didn’t want to trip any hidden wires.
– Let’s face it: that X-ray image is way cooler than our findings! So, what’s inside? The dock is basically a neat little box housing a circuit board and a few ports, including:
– Two USB 2.0 Ports
– AC Adapter Port
– HDMI Port
– One USB 3.0 Port
Step 23


– Dockside fish and chips: A quirky name for a tasty treat, but in this case, we’re diving into tech repair!
– Macronix International MX25L512E 512 Kb CMOS flash: A tiny yet mighty component, ready to make your device shine again.
– Macronix International MX25V2006E 2 Mb CMOS flash: Another heavyweight in the flash storage league, let’s get it back in action!
– Megachips STDP2550 Mobility DisplayPort (MyDP) to HDMI Converter: This little gem is your ticket to seamless video output. Let’s handle it with care!
– Rohm BM92T17 USB-C power delivery controller: A power player in USB-C tech. Let’s get it working like a charm!
– STMicroelectronics STM32P048 32-bit microcontroller: The brain behind the operation—let’s make sure it’s firing on all cylinders!
– VIA Labs VL210 USB 3.0 Hub Controller: Your device’s multitasking wizard! We’ll ensure it’s ready to juggle those tasks like a pro.
– Rohm BM92T55 USB-C power delivery controller: Another USB-C hero, ready to deliver power where it’s needed most!
Step 24


Now it’s time to put everything back together – let’s get this done!
– Ready for some cool layout shots? Here are the Nintendo Switch’s beautifully laid out internals.
– If you need help, you can always schedule a repair


