DIY Guide: PS2 Slimline Motherboard Replacement Tutorial
Duration: 45 minutes
Steps: 25 Steps
Get ready to tackle this step-by-step guide on swapping out the motherboard in your PlayStation 2 Slimline. Let’s make it happen!
Step 1
– First things first, power down your PlayStation 2 and gently unplug it from the wall. Oh, and don’t forget to pop that CD out of the console before you flip it over. Let’s keep things tidy and ready for the next step!
Step 2

You’ll find five of these little feet right out in the open, but the last one is playing hide and seek under the black void sticker on the back of your device. Sneaky, right?
Now, if you’re working with a console version like the PAL Version, it might be sticker-free. No worries! In that case, the foot or screw should be easy to spot.
– Find the six tiny feet on the bottom of your PS2.
Step 3


– Pop off the five visible feet from the bottom of the device using a spudger. Easy peasy!
Step 4


– Peel off that sticker and then say goodbye to the 6th foot!
Step 5


– Once you’ve said goodbye to all those little feet, grab your trusty Phillips #1 screwdriver and get ready to tackle the six 4.0mm screws hanging out at the base of the PS2. Let’s get to it!
Tools Used

Step 6


You might need to give those covers a little nudge to get them off. Just be gentle and watch out for those pesky plastic screw pins—they’re more fragile than they look!
– Alright, it’s time to get this repair started! Once you’ve removed all the screws, gently pry apart the plastic covers. Begin by lifting the side with the power cable and Ethernet port – this is where the magic happens. Then, carefully lift the opposite side to fully separate the two halves. You’re making great progress!
Step 7

– Congrats, if you’ve done it right, you’ll now have a completely detached plastic backing, revealing the cool inner workings of your PlayStation 2!
Step 8


– Spot the IR sensor hanging out on the motherboard. Now, grab your trusty tweezers and carefully unclip that blue-and-white ribbon connecting the IR sensor to the motherboard. Take it slow—you’re doing great!
Tools Used

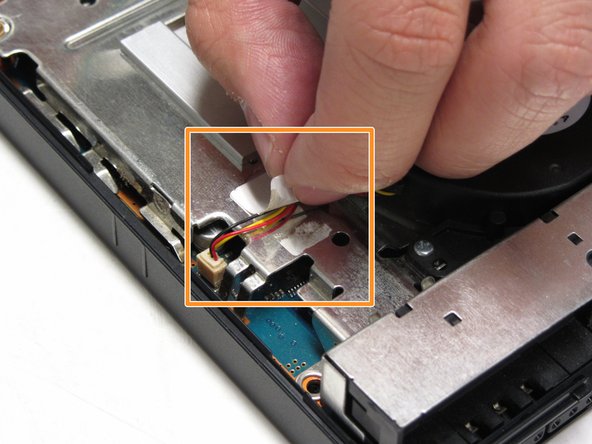
Step 9


– Spot the clock battery, then use tweezers to gently unplug the connector from the motherboard.
Tools Used


Step 11


– Find the fan on the motherboard of your PS2—it’s usually hanging out near the center.
– Gently peel off the sticker securing the fan’s wiring using your fingers or tweezers. Take it slow and steady!
Tools Used
Step 12


– Use your trusty tweezers to carefully pop off the white terminal that connects the red and yellow wires from the motherboard to the fan. Easy peasy, right?
Tools Used
Step 13


You’ll find them nestled just off the smooth, curved edge of the fan.
– Alright, first things first—find those three tiny 1.6mm screws hanging out near the base of the fan. Grab your screwdriver and get to work unscrewing them like a pro.
– Now that those pesky screws are out of the way, you can go ahead and gently lift the fan out of the PS2. Easy peasy, right?
Step 14


– Let’s get started by finding the optical drive on the motherboard. It’s time to track down that sneaky drive!
Step 15


– Let’s get started by removing the four 4.0mm screws that hold the optical drive in place on the motherboard. This is a simple step, but it’s essential to get your device fixed and running smoothly again.
Step 16

Heads-up: These ribbons come in three different sizes—one’s large, one’s medium, and one’s small.
– Spot the trio of ribbons that are chillin’ on the motherboard.
Step 17


Heads up! The orange ribbon is stuck to the metal chassis, so be gentle when pulling it upward to avoid any tears or damage. Take your time and ease it out carefully.
– With your trusty tweezers, gently unhook all three ribbon cables from the motherboard terminal. For the middle orange ribbon, simply lift the black tab on both sides to unlock it.
Tools Used
Step 18


– Carefully lift the optical drive away from the motherboard, like you’re unveiling a surprise gift!
Step 19

– Here’s a peek at the inner workings of the PS2—its electronic components are all laid out. Now, let’s get that top metal casing off the motherboard.
Step 20

– Find the lone 2.4mm screw that holds the metal casing snugly to the top of the motherboard. Grab your trusty Philips screwdriver and give that screw a twist to set it free!
Step 21


Get ready with three key players: the sturdy metal casing, the essential motherboard, and the top half of the outer shell of the PS2. You’re on your way to a successful repair!
– Carefully lift the metal casing away from the motherboard, like you’re unveiling a surprise gift.
– Next, gently detach the motherboard from the plastic outer shell, as if you’re lifting a delicate flower from its pot.
Step 22


Keep in mind that there are four screws on one side and just one on the other. Easy peasy, right?
– Turn the motherboard over.
– Find and unscrew all five 1.6mm screws holding the metal plate to the motherboard.
Step 23


– Carefully lift off the metal plates from the top and bottom of the motherboard.
Step 24

– Peel away the plastic film that’s cozying up between the metal plate and the motherboard. It’s time to give your device some breathing room!
Step 25


– Now it’s time to reassemble your device—just follow the steps in reverse order, and you’ll be back in action in no time.
– If you ran into trouble or feel like this might be too tricky for you, don’t hesitate to schedule a repair.
– You’ve got this!