PlayStation 4 Pro Teardown
Duration: 45 minutes
Steps: 17 Steps
The gaming console world keeps evolving fast. Manufacturers are rolling out mid-cycle refreshes to handle 4K TVs and VR gear. Recently, we took apart the PS4 Slim, and now we’re diving into the third version of this console era. Even if we’re not hardcore gamers, we’re ready to carefully dismantle the PlayStation 4 Pro. Ready to get started? For more repair tips and updates, follow us on Facebook, Instagram, or Twitter. If you need help along the way, you can always schedule a repair.
Step 1


– Meet the third-gen PS4! Not sure what we’re calling it these days, but here’s what’s going on under the hood:
– It’s packing an 8-core AMD ‘Jaguar’ X86-64 processor, now running at 2.1 GHz (up from 1.6 GHz).
– Graphics are handled by a 4.2 teraflop AMD Radeon-based GPU.
– You get 8 GB of GDDR5 RAM plus an extra 1 GB of DRAM for good measure.
– Storage? 1 TB hard drive that’s both removable and upgradeable.
– For connections, it’s got 802.11 a/b/g/n/ac Wi-Fi, Ethernet, and Bluetooth 4.0 (LE).
– Spin up your games and movies with the Blu-ray × 6 CAV and DVD × 8 CAV drives.
Step 2


This mighty machine still rocks the PlayStation 4 name, but ours comes with the model number CUH-7015B. We’ve also spotted a couple of ‘Warranty void if removed’ stickers (boo!) and a bunch of different ports (yay!).
– Think of this as the Big Mac of consoles—one extra layer compared to the Slim, and it’s definitely packing more size.
– Power
– HDMI 2.0
– PlayStation extension port
– S/PDIF optical audio out
– USB 3.0
– Ethernet
Step 3


Looks like we might be on a wild adventure here… bees, anyone? And don’t forget about that big fan! I’m definitely seeing some honeycomb vibes here, what about you?
– Navigating through unfamiliar territory? A trusty map will be your best friend!
– We reached out to our pals at Creative Electron, and they used their X-ray magic to help us out.
Step 4


– This triple-decker design isn’t quite like the ‘first’ fourth PlayStation we took apart, but don’t worry—we’re on it! Let’s flip the console over, pop the first panel, and get straight to work.
– A single Phillips #0 screw is all that stands between us and swapping out that hard drive. Easy, right?
– Replacements are a breeze and part of the PlayStation tradition: every console with a hard drive has given users the chance to replace it.
– Just like the original PlayStation 3
– …and the Slim
– …and the Super Slim
– …all the way through to the original PlayStation 4 and PlayStation 4 Slim.
Step 5

No stress—grab the right tools and a slick new 6.0 Gb/s SSD, and you’ll breeze through those laggy load times. You’ll be back to gaming before you know it!
– A couple more Phillips screws and the 2.5″ HGST HTS541010A9E680 hard drive slides right out of its cozy caddy.
– While the PlayStation folks hyped up the Pro’s SATA III support, this stock hard disk drive is actually listed at 3.0 Gb/s (SATA II).
– Or maybe not! Some sources say this one’s a 6.0 Gb/s HDD. Either way, at 5400 RPM, this platter drive won’t get close to SATA III speeds—pretty much on par with what we saw back in 2013.
Step 6


– First off, we need to peel off those pesky “Warranty void if seal removed” stickers to proceed. No turning back now!
– Great news! No screw is too tough for our trusty 64 Bit Driver Kit. With the case popped open, we can now slide off this big metal shield.
– But wait, there’s more! The screws lurking underneath are Security Torx screws—crafted specifically to keep us out.
– Now, all we can see is the backside of the motherboard. Not exactly the view we were hoping for.
– Taking a cue from our adventures with the PS4 Slim, we’ll flip this bad boy over and see if there’s any hidden treasure on the other side…
Step 7


– With the device on its back, the opposite panel lifts off after a bit of determined prying—no ‘warranty void’ stickers in sight!
– Unfortunately, popping off this panel doesn’t give us full access. The power supply comes out easily, but that’s about it.
– While the fan can’t be removed from here, you can give it a good cleaning—maybe that’s why this panel is designed for easy access.
Step 8


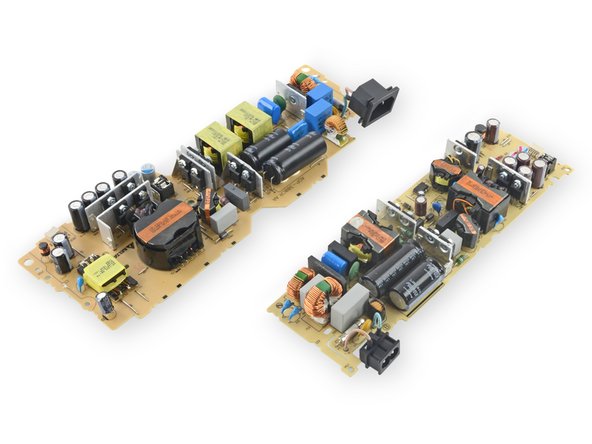
This power supply is seriously beefed up compared to the 2013 model. The old one maxed out at 165 W, while this one cranks up to 289 W (1.5 A @ 4.8 V + 23.5 A @ 12 V). That’s enough juice to keep the upgraded hardware running smoothly.
We lined up the PS4 Pro’s PSU (left) next to the OG PS4’s (right) for a classic side-by-side. The Pro’s power supply only weighs about 74.2 grams more, but the real difference is in the heat pipe and fan—these extras help whisk away all the extra heat from the boosted graphics muscle.
– With the top panel off, we’re zeroing in on the power supply unit. According to the official specs, the PS4 Pro guzzles around 310 W of power—most of that is probably used to convert AC to DC. And here’s the big question: Why is this console so much chunkier than the original? If you need help, you can always schedule a repair.
Step 9


– Stumped by the absence of any more screw heads on the PSU side of the PS4 Pro? No worries! Let’s flip it back over and focus on the motherboard instead.
– Digging through a layer of shielding behind the CPU, we uncover a nifty X-shaped retaining bracket, reminiscent of ones we’ve spotted in other consoles.
– Right beneath that, we discover a plastic-and-metal cover that resembles a pizza saver—just perfect for keeping the back of the board safe from the heat sink retaining bracket.
– As we lift the motherboard, we’re greeted with an impressive array of thermal management features. Check out that massive copper heat sink and the dedicated pads for six chips on the motherboard!
Step 10

– Let’s get a detailed look at the front side of the motherboard: First up, identify the SCEI (Sony Computer Entertainment, Inc.) CXD90044G System on Chip—this bad boy packs AMD ‘Jaguar’ cores along with an AMD Radeon GPU for graphics magic. Next, spot the Panasonic MN864729 HDMI transmitter, responsible for sending high-definition signals. Check out the Samsung K4B4G0846E-BYK0 512 MB DDR3 SDRAM module—your device’s memory powerhouse. Look for the Sony/Renesas R9J04G011FP1 I/O controller, which handles input and output tasks behind the scenes. Then, locate the Infineon (formerly International Rectifier) IR35218 PWM controller—this controls the power regulation to keep everything running smoothly. Don’t forget the Fairchild Semiconductor FDMF6840C 50 A power stage—your device’s high-current hero. Lastly, find the Cypress CYUSB3312 USB 3.0 hub controller, enabling fast data transfer between your device and connected peripherals. If you need assistance during any part of this process, you can always schedule a repair.
Step 11

Here’s a custom ASIC built on the Marvell 88EC128-BNS2 chip—looks intimidating, but you’ve got this!
– Let’s take a closer look at the components lining up at the back of the device: first up, we’ve got 8GB of GDDR5 memory from Samsung (8 x 1GB modules), giving your system some serious graphics power. Next, there’s the Sony J20H091 Wireless Communication module, powered by the Marvell Avastar 88W8897 chip—your device’s wireless magic. Moving on, you’ll find the Sony Computer Entertainment, Inc. CXD90036G I/O controller, likely managing all those essential input and output functions smoothly. There’s also a 512MB DDR3 RAM module from Samsung (K4B4G0846E-HC28), adding a little extra memory to keep things running gracefully. The Rohm BD7764MUV motor controller is here to handle motor functions, while the Rohm BD9685 synchronous step-down switching regulator ensures efficient power regulation. If you need help with any of these steps, you can always schedule a repair.
Step 12


– ICs, Meet the Crew (Part 2):
– Sony A02-C0L2: This one’s probably your secure microcontroller—keeping things locked down.
– Macronix MX25L25635FZ2I-10G: Pockets a solid 256 MB of serial flash memory for fast data work.
– ON Semiconductor CAT24C128WI−GT3: Handles 128 KB of EEPROM memory for the little stuff.
– Richtek RT5069A: Your go-to for power management—keeps everything humming smoothly.
– Texas Instruments TLV62090: A 3 A step-down converter, making sure voltage levels are just right.
– Richtek RT8237F: Synchronous buck PWM controller, keeping things efficient and cool.
– Texas Instruments SN74AUC2G66: A 2-channel analog switch, managing connections like a pro.
Step 13


Alright, so maybe we got a bit nervous— but don’t worry, you’ve got this.
– The fan and optical drive look so close, but they’re actually held in place from below, guarded by a hefty heat pipe setup. Not exactly an open invitation, but nothing we can’t handle.
– With a little finesse, the heat pipe assembly is out of the way—no injuries, just progress. Now we’ve got a clear shot at the fan.
– This Nidec fan pulls 2.1 amps at 12 volts, which adds up to 25.2 watts. So that’s where your extra PSU juice is going!
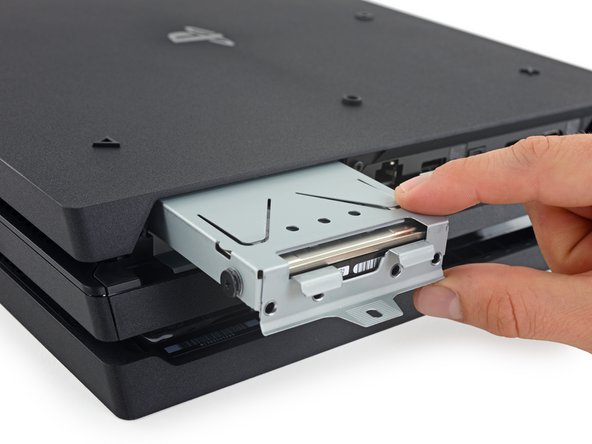
Step 14


– Time to snag that optical drive—think arcade claw machine, but with fewer prizes.
– A bit more prying and unscrewing gets this thing open. Inside, we spot:
– A suspiciously generous number of springs.
– A lens assembly cruising along a track with some smooth stabilization moves.
– And yes, plenty of nifty gears.
Step 15
Remember to switch off your lasers before poking around. Safety first, even when you’re feeling confident!
Great for gaming on the go or when you’re hanging out in California. Keep your device ready for fun, wherever you are!
– Time to give that optical drive laser pickup assembly the attention it deserves!
– We’ll use a quick puff of compressed air to move the pickup arm into place. It’s quick, super sensitive, and does an excellent job at preventing skips. Nice and smooth!
Step 16


– A bit of persistent prying gets you through the PS4’s middle layer. It’s just a plastic frame—pop that off, and you’ll see the last few pieces waiting underneath.
– This LED light guide grabs the glow from the LEDs on the left board and doubles as button covers for the mechanical switches on the two right-side boards.
Step 17


Missed our PS4 Slim teardown? Catch the speedy breakdown on our YouTube channel.
– PlayStation 4 Pro, expertly taken apart. Now you can see what’s inside!
– And as a little extra treat for you, here’s a bonus X-ray shot of the PS4 Pro controller. Enjoy the view!
