PlayStation 2 Teardown
Duration: 45 minutes
Steps: 25 Steps
First, I would like to apologize for my poor English, I am from Brazil, but I love this site, especially because I have loved to disassemble electronic things since I was a kid. My mother always freaks out, but I always assemble everything back. Sometimes I even fix some things. I’m writing this teardown to try to win the PSP GO or the PS3 slim, so please look with care, it was made with care. (editor’s note: WOOOOW This article is outdated. I hope you won your PSP GO or PS3 Slim. In this teardown, I will show how to disassemble a Sony Playstation 2. I was already planning to disassemble it to clean it and fix a small issue. Later in the repair guide, I will show how to fix a small problem I had. I sent it to a technician because the rumble effect was no longer working. He says that there was a problem in the motherboard and he needs to change it entirely, but the model is a SCPH 39001. It’s an old model. In fact, it was one of the first in the market. He says that the price to fix it was expensive and that it’s better to buy a PS2 Slim to replace mine. I remember when a bought my PS2. It cost more than R$800, almost US$400. I decided to stay with it anyway, and despite the problem, I even bought an ethernet adapter to continue playing it. Later, talking with some friends, I found out that there is a fuse that controls the rumble effect and all that I needed to do was change it. I found out that the fuses in the mainboard are very small and fixed in the main board. It’s almost impossible to change them. The same friend gave me a tip that I can use a glass fuse and take the internal wire to use in the main board. I decided to try it and it works perfectly. So, let’s start the teardown. Enjoy!
Step 1


– We’ve got our system console all put together and ready to rock!
– Check out those USB Ports, they’re looking sharp.
– And here are the S400 ports, just waiting for action!
– Don’t forget about the Optical Drive, it’s a real gem.
– The reset button is like a magic wand for refreshing your device.
– Last but not least, the eject button is here to save the day!
Step 2


– Here’s what you’ll need: four screwdrivers and a pair of tweezers—simple tools to get the job done. In the next shot, you’ll see the console, joystick, wiring, and a handy memory card. Keep these in mind as you follow along to keep everything organized and moving smoothly. If you need extra help at any point, you can always schedule a repair.
Step 3


– Alright, let’s take a peek at the back! Here we have an Ethernet adapter, perfect for gaming online and hooking up to an HDD.
– Next up, we have the cooler.
– Don’t forget about the power switch.
– Here’s where the AC plugs in.
– Check out the AV output.
– And last but not least, the digital output (optical).
Step 4


– Alright, let’s kick off this teardown! First up, grab your trusty Flathead screwdriver and carefully remove the ethernet adapter.
– Next, let’s tackle those 2 screws with that same Flathead screwdriver.
– And don’t worry, it’s super easy to pull off!
Step 5

– Welcome to the expansion bay! This is where your hard drive happily resides. When you’re ready to swap or upgrade, you’ll find it right here, ready for action. If you need any assistance along the way, remember you can always schedule a repair with Salvation Repair.
Step 6


– Flip the console over so the bottom is facing up.
– Grab a small flathead screwdriver and pop out those screw covers—there should be 8 little guys hiding out on this model.
Step 7


– Under the protection lies a screw
– Remove all eight screws using a Philips 0 screwdriver
– Some effort is needed to complete this task. If you need help, you can always schedule a repair
Step 8


– Place the console flat and level, then gently lift the top cover from the back towards the front. If you need a hand with this, you can always schedule a repair.
Step 9


This model features a flat cable connected to the reset and eject buttons. Handle with care to avoid damaging it.
– Gently pop off the button assembly by prying it up with a small flathead screwdriver. Easy does it!
Step 10

– The button structure pops out of the case easily. It’s got some tape on it, which helps prevent any extra damage. And yep, I may have already managed to wreck this flat cable. Oops!
Step 11


– Grab your trusty Philips ‘0’ screwdriver and unscrew the two screws to free the controller port. Easy peasy!
Step 12


– Time to unscrew the cooler and the main power switch—just a few twists and you’re on your way!
Step 13


– Gently lift the fan—easy does it, those wires are delicate!
– Pop the fan mount upward.
Step 14


– The power cable dives a bit deeper into the case—hold off on removing it until a later step.
– The fan wire also tucks itself further inside. It’s tiny, so handle it gently and keep it safe from any accidental snags.
Step 15


Alright, let’s flip the console over once more! Just a heads up, the pieces are a bit snug, so handle with care. Don’t worry, we’ll be able to pop them out in the next step!
Step 16


– Time to take off the bottom case. Next, we’ll be working inside your device.
Step 17


– Here’s the power source board. Time to tackle those 4 screws marked in blue—just take them out, and you’ll be one step closer to success!
Step 18


Heads up! When you’re working with the power supply, steer clear of the capacitor leads and any shiny solder spots on the back. Hold the board by its edges—your fingers will thank you.
– From the back, gently lift the board to free it from the main board’s pins.
– Now it’s time to say goodbye to the power switch—just remove it!
– And here we have the power source board, ready for its close-up.
Step 19


Time to disconnect the fan wire from the main board using your precision tweezers. This little guy is really putting up a fight—it came out easily before, but now it’s being stubborn. No worries! If it doesn’t budge, just move on and circle back at the end of the teardown.
– Time to take out the expansion bay grid—just lift it out and set it aside.
Step 20

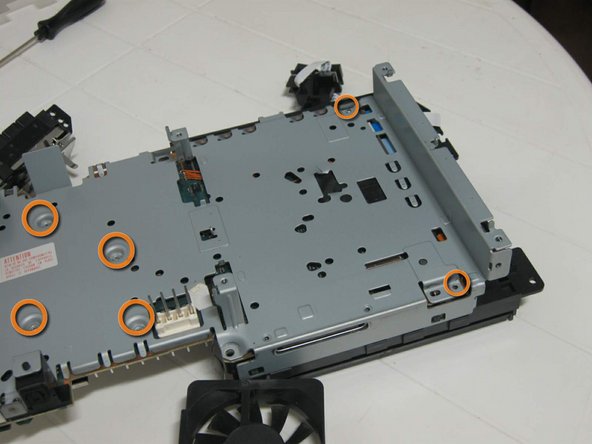
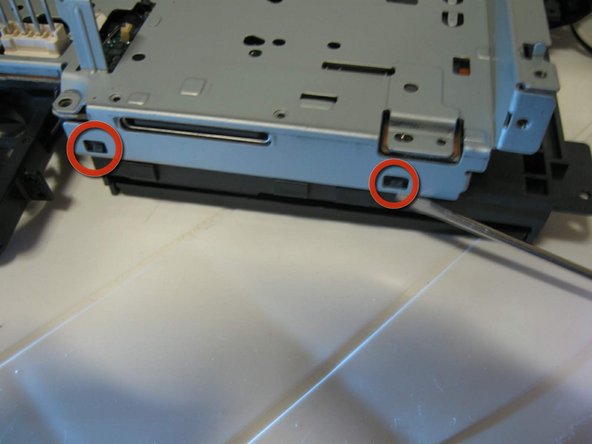
– Start by removing the metal case’s isolation cover. Next, grab a thin Phillips screwdriver to unscrew the small screws holding things together. Finally, gently pry the metal case away from the DVD player using a small flat-head screwdriver, as shown. If you need help along the way, you can always schedule a repair.
Step 21


– Alright, now it’s time to pop off the metal case and reveal the main board. Almost there!
– Check out those flat cables! Time to carefully detach them. Take your time and be gentle with these little guys!
Step 22


– There are 2 more, and hey, the DVD player is all yours now!
Step 23


– Time to flip it back over and gently take off that metal shield!
– You’re looking at the flip side of the main board now.
Step 24


– Tried to disconnect the cooler wire, and let’s just say it didn’t go as planned.
– That plug was supposed to come apart, but time turned it into one solid chunk—and the solder joints didn’t survive the breakup.
– No worries, though! There’s always a creative way to fix things. Onward!
Step 25

– And that’s a wrap on the teardown!
– Starting from the top left: Ethernet adapter, PS2 case, hard drive, cooler, cooler grid, bottom metal cover protection, screw protectors, screws, controller board, power switch, power source board, plastic cover to isolate the power source board, top metal cover, DVD drive, expansion bay cover, main board, reset/eject structure.
Success!

