Sony PlayStation Repair: Fix TV Console
Duration: 45 minutes
Steps: 13 Steps
Originally conceived through a collaboration between Sony and Nintendo for a CD-enabled SNES console, PlayStation has grown into one of the most iconic brands worldwide. To celebrate its 25th anniversary, we’re diving into the very first model, the Japan-exclusive SCPH-1000. And how do we mark this milestone? By taking it apart, of course! Want more teardown fun? Connect with us on Instagram, Twitter, and Facebook for all the exciting repair updates. For the latest news straight to your inbox, don’t forget to sign up for our newsletter.
Step 1


Did you know? This PlayStation is often called the “PSX” because that was its codename during development. Even after the “X” was dropped, the name stuck around! Fun fact: Sony eventually released a DVR/PS2 combo in Japan named the PSX, which you might not have come across. Isn’t that quirky?
– Get ready for a blast from the past! Let’s take a trip down memory lane and recall the original PlayStation specs that had us all hyped back in the day:
– MIPS R3000 33.9 MHz, 32-bit RISC CPU – yeah, that’s some old-school power!
– 32-bit GPU, because who didn’t want smooth graphics?
– 2 MB RAM, which was plenty back then, right?
– 1 MB VRAM, dedicated to bringing you the best graphics possible
– 16-bit 24-channel PCM stereo sound – that’s some serious audio quality
– 2x CD-ROM Drive, because who needs a hard drive when you have CDs?
Step 2


What does all this mean? We’ll need to run some tests, but we’re thinking these unique colors might give your car an extra boost of about 30 horsepower in Gran Turismo. And if you’re into skating, it could mean pulling off tricks that are 15% gnarlier in Tony Hawk’s Pro Skater.
– From a distance, our sleek Japanese model (on the right) might seem just like the original North American version. But when you take a closer look, you’ll spot a few subtle differences:
– The interiors of the CD trays are almost a perfect match, with just a few minor variations in the plastic design.
– The most eye-catching difference is the PlayStation logos on the lids. The Japanese model features a splash of green instead of the familiar PlayStation Blue, along with a brownish hue in the logo’s negative space.
Step 3


– Flipping the console over unveils a treasure trove of ports. This isn’t your average two-port MacBook Pro, folks!
– Our Japanese might be a bit shaky, but we’re pretty sure these labels are trying to share some wisdom about the ports.
Step 4


– Absolutely! We also have an English version ready for you! Let’s dive into these labels and explore the various connection options available:
– Parallel I/O: Interestingly, Sony never launched an official product that utilized the parallel port, but numerous third-party companies created cheat devices for it.
– Serial I/O: This port allows you to connect two PlayStations together for multiplayer fun on separate TVs, although only select games support it.
– RCA Out: These handy ports offered a simple way to connect the PlayStation to your TV without any proprietary fuss.
– RFU DC Out: For those with older TVs lacking RCA ports, this clever port facilitated the use of an RF modulator, converting video and audio into an RF signal for your TV.
– S-Video Out: This rare port made its debut on the original SCPH-1000 model in Japan. Depending on your TV, some say this dedicated S-Video port can deliver better image quality than the other outputs.
– AV Multi Out: Sony’s own connector for video and audio output was here to streamline your connections! Over the years, the development of RCA, S-Video, and RF cables for this port phased out the other options.
– AC In: The PlayStation relies on a standard C7/C8 cable and connector, with the North American model sporting a polarized version. Sony has consistently used this AC connector across all its PlayStation consoles.
Step 5


Oh, what’s this? A teardown adventure awaits! Let’s dive back in and get to work.
– When lined up next to its retro rival, the PlayStation Classic, our original PlayStation stands tall like a titan of nostalgia.
– The PSC does a fantastic job of capturing all the iconic design elements of its predecessor and stuffing them into an adorable little gray box. We love the meticulous attention to detail—everything from the side vents to the ‘memory card’ slots is there, just as we remember.
– However, we can’t overlook one glaring omission: the un-open-able CD lid. Seriously, Sony, why tease us with a real, push-able Open button if it doesn’t actually do anything? Maybe that’s part of the reason sales didn’t soar.
Step 6


After a year of dealing with devices that seem glued shut and nearly impossible to open, these handy tips are like a refreshing breeze. Well, to be honest, the air is a bit dusty in here—this gadget has seen better days. But you catch my drift!
– Alright, let’s crack this thing open! Those arrows might be our secret weapon…
– We won’t need to use every tool in our kit (spoiler alert: just one will do!) for this little adventure, but hey, it’s great to have our trusty Mako driver kit by our side.
– Guess what? Each screw tying the two halves of the console together has a cute little arrow to guide us!
Step 7


This internal power supply takes up a significant amount of space, roughly 20% of the console’s footprint. But amazingly, Sony managed to fit it inside the relatively small console without any issues.
If you’re feeling stuck, take a deep breath – it’s time to tackle this beast of a power supply!
– Let’s pop the lid off this intriguing console and see what’s inside. Fingers crossed for some hidden treasures!
– To start, let’s carefully disconnect the power supply to avoid any shocking surprises.
– No gems here, but there’s still some pretty neat stuff to check out. No dragons, though.
– Even though 90’s tech didn’t run as hot, it’s still impressive to see an internal power supply, an entire optical drive assembly, and all the main board components (more on that later), all in a fanless setup.
Step 8


These slots may not handle your fancy 512 GB micro SD cards, but the classic 1 MB PlayStation memory cards were divided into 15 separate memory blocks. This nifty feature let you save progress for multiple games on one card. It’s definitely better than memorizing passwords or crossing your fingers that the coin-cell battery in your game cartridge doesn’t quit!
Some folks say the early models with RCA jacks had amazing audio quality for music CDs. It’s been a hot topic of debate ever since the console’s debut.
– First things first, let’s get those controller ports and memory card slots out together as one happy assembly.
– The CD laser and motor assembly is chillin’ on three pegs that are held in place by rubber grommets. This little setup lets the whole mechanism wiggle a bit to soak up any vibrations from that spinning disc.
– And just a friendly reminder: keep your hands off the lens! It’s a sensitive little thing.
Step 9


– Alright, time to lift the big metal shield covering the motherboard and reveal the main attraction.
– Just like an adventure, we carefully lift this ancient piece out of its spot, hoping we don’t set off any hidden traps.
– Phew, looks like we’re in the clear—no traps here! Let’s take a closer look at this gem we’ve uncovered.
Step 10


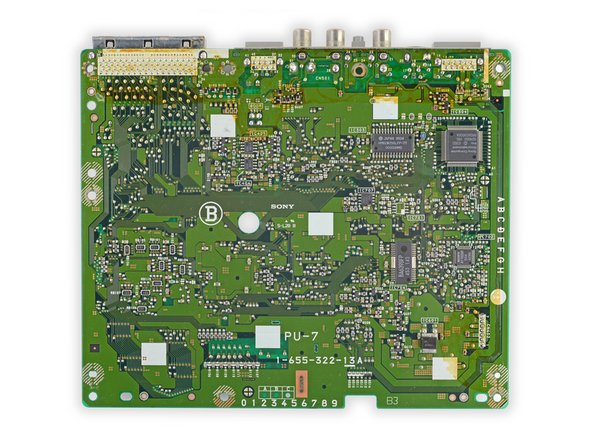
– Let’s dive in and take a closer look – we’ve got a real treasure trove of components here, with more chips than you’d find in a few bags of your favorite snack!
– First off, we’ve got the brain of the operation: the Sony CXD8530BQ CPU, cleverly designed by MIPS.
– Next up, the Sony CXD8514Q GPU, designed by Toshiba, is handling all the graphics duties.
– The memory department is covered by the Samsung KM48V514BJ-6, packing 4 x 512 KB of DRAM.
– The Sony M534032C-02 ROM is where all the essential data is stored.
– For visuals, we’ve got the Samsung KM4216V256G-60, providing 2 x 512 KB of VRAM.
– The sound is handled by the Sony CXD2922Q SPU, making sure everything sounds just right.
– Last but not least, the Sony CXD1199BQ CD decoder is responsible for all your audio needs.
Step 11

– We couldn’t quite scoop up all the chips in one go, so here are a few more to keep you on track:
– Sony CXD2516Q CD digital signal processor
– Samsung KM416V256ALLT-8 audio RAM
– Sony CXD2923AR digital-to-analog converter
– Sony CXA1645M video encoder
Step 12

Isn’t it wild how much gaming consoles have evolved in 25 years? The PlayStation 4 packs nearly 50x the processing power and 4,000x more RAM than this retro gem—and the PS4 Pro is on another level. We’re betting the 2020 PS5 will take things up a notch!
– Whoa there! Flipping the motherboard over shows off some more chips…
– Sony E35D 424660 185 BRSAC9505A CD controller
– Hitachi HM62W256LFP-7T CMOS SRAM
– Rohm BA6398FP 4-channel BTL driver
– Sony A1782BR RF signal processing servo amplifier
– Toshiba TA78M05F Power Supply IC
Step 13

– And that’s a wrap! This original PlayStation is pretty simple inside, showcasing Sony’s smart design and engineering skills—or maybe technology was just a bit more straightforward back then… Likely a mix of both.
– It’s tough to imagine a time when Sony wasn’t in the game console business, and it’s clear why: they hit the mark on so many key aspects right from the start.
– Couple that with a continuous flow of award-winning games, and you’ve got PlayStation soaring to the top of the best-selling-console list more than once in the past couple of decades. The original PlayStation ranks #5 on that list, but it still holds the #1 spot in many hearts.
– With that said, it’s time to wrap up this special 25th-anniversary teardown from the past. If you need us, we’ll be off with a certain web-slinging hero. Remember, if you run into any trouble, you can always schedule a repair.

