DIY: Replace Galaxy Watch Motherboard – Step-by-Step
Duration: 45 minutes
Steps: 12 Steps
Follow this guide to swap out the motherboard in your Samsung Galaxy Watch. It’s easier than you think, and you’ll be back to checking the time in no time! If you hit a snag, remember, you can always schedule a repair.
Step 1
– Get ready to unleash your inner tech wizard! Start by carefully taking out those four Tri-point #00 screws (they’re 4.2 mm long) from the back of the watch. You’ve got this!
Step 2
Hold your horses! Don’t go yanking off that back cover just yet. There’s a sneaky flex cable that connects to the core assembly hiding inside.
– Grab your opening tool and gently wiggle it into the seam between the back cover and the metal body of the watch. Take your time—slow and steady wins the race here!
– Now, with some careful prying, ease that plastic back cover off. Stay chill and let the tool do the work!
Step 3
– Place the watch face down and pop off the back cover to reveal the sensor connector hanging out on the motherboard.
Step 4
– Grab your trusty spudger and gently pry apart the sensor flex cable from the motherboard. You’re on the right track!
Tools Used
Step 5
– Let’s get started by removing the back cover. This is the first step to unlocking your device’s secrets!
– Now it’s time to close up shop! Just remember to check that rubber gasket – if it’s damaged, swap it out with a new one to keep everything running smoothly.
Step 6
– Grab a trusty spudger and gently detach the display flex cable from the motherboard. You’re doing great!
Tools Used
Step 7
Gently wiggle that display flex cable through the core’s plastic frame gap—you’re almost there, nice and easy!
The core’s plastic frame is snugly nestled inside the housing, ready for you to work your magic!
– Gently lift the core unit out of the housing—like you’re rescuing a tiny treasure.
Step 8
– Grab your trusty spudger and gently pop off the hall sensor flex cable like a pro!
Tools Used
Step 10
– Remove the single Phillips #00 screw that is 3.4 mm in length from the device by turning it counterclockwise. We have seen many devices and know that this screw can be a bit stubborn, but don’t worry, it should come out with a bit of gentle force.
Step 11
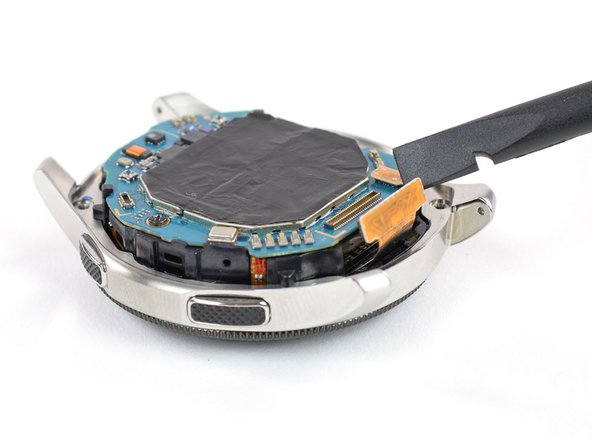
– Grab your trusty spudger and gently slide it into that little gap under the motherboard—right where the plastic frame has that handy cutout.
– Give the spudger a slight twist to lift the motherboard up. Easy does it!
– Now, carefully slide the motherboard out from underneath that pesky plastic tab. Smooth moves!
Tools Used
Step 12
– If you can, power up your device and give your repair a test run before sealing it back up.
– To put your device back together, just follow these steps in reverse order.
– Things didn’t go quite as planned? No worries! Try some basic troubleshooting, or feel free to reach out to our Answers community for a helping hand.
– Got some e-waste? Make sure to drop it off at an R2 or e-Stewards certified recycler.
– If you didn’t finish this guide, just hit cancel.
– Remember, you’re not alone in this journey!
Success!


