DIY Xbox 360 Motherboard Reflow Guide: Step-by-Step Repair
Duration: 45 minutes
Steps: 50 Steps
To prevent any future hiccups, we highly suggest grabbing our Red Ring of Death Fix Kit after you finish the reflow. It’s a smart move to keep your device in tip-top shape!
Get ready to tackle that pesky Red Ring of Death (RROD) on your Xbox 360! This guide will walk you through the process of reflowing the solder on those tricky chips that often cause this failure. You’ll need a heat gun with a high-temperature output to get the job done right. By reflowing the motherboard, you’ll help those solder balls under the CPU, GPU, RAM, and other chips reconnect with their contacts on the motherboard. And to keep your Xbox 360 running smoothly in the future, we highly recommend installing our Red Ring of Death Fix Kit after the reflow. If you need help, you can always schedule a repair.
Step 1
– Grab that hard drive assembly like it’s your best friend and give it a little lift. You’ll find a release button – press it while you’re lifting, and the hard drive will pop right out!
– Now, gently pull the hard drive assembly out from the top vent. It’s like a little dance, and you’re the star!
Step 2
During the upcoming opening steps, feel free to swap in your trusty Xbox 360 opening tool instead of using a spudger. You’ve got this!
– Let’s get this console standing tall with the bottom edge pointing up!
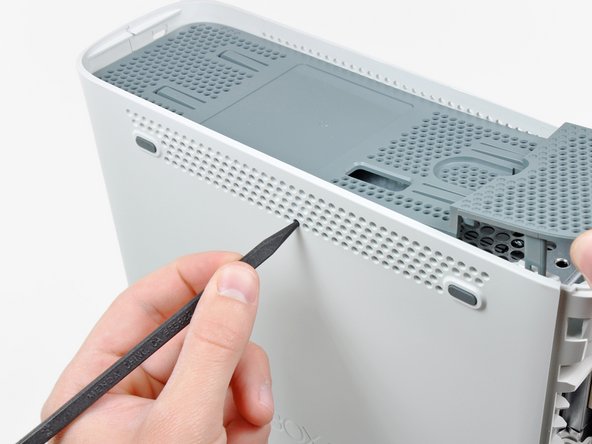
– Take the flat end of a spudger or an Xbox 360 opening tool and gently slide it into the little gap at the front of the bottom vent.
– Now, give a gentle pry to that front edge of the bottom vent to lift it away from the faceplate. You’ve got this!
Tools Used
Step 3
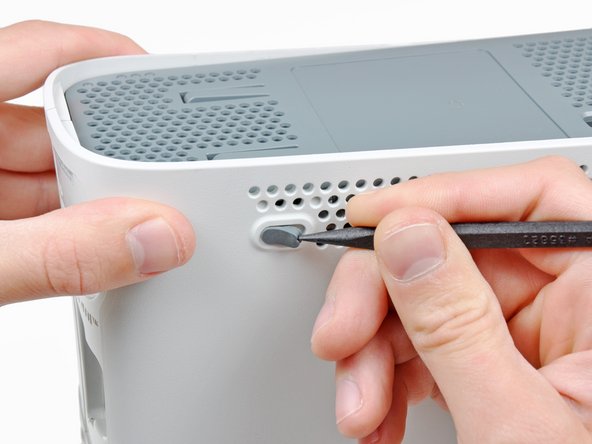
Now it’s time to get those clips released along the left and right sides of the bottom vent. Take a look at the highlighted areas in red – that’s where you’ll be working your magic with the tip of a spudger or an Xbox 360 opening tool.
Gently insert your tool into the holes in the white plastic side case pieces. You’re making great progress!
Tools Used
Step 5
– Now it’s time to free those two center clips on the bottom vent – just repeat the same process and you’ll be golden!
Step 7
– Pop off the bottom vent from the 360 with a little finesse.
Step 8
If you’re feeling adventurous, you can use the edge of the Xbox 360 opening tool to get this done. Just be careful not to scratch the plastic case, though! You could also use your hands, but be gentle and pull the faceplate away from the Xbox slowly and carefully.
Hey, if you’re finding this a bit tricky, remember you can always schedule a repair with us!
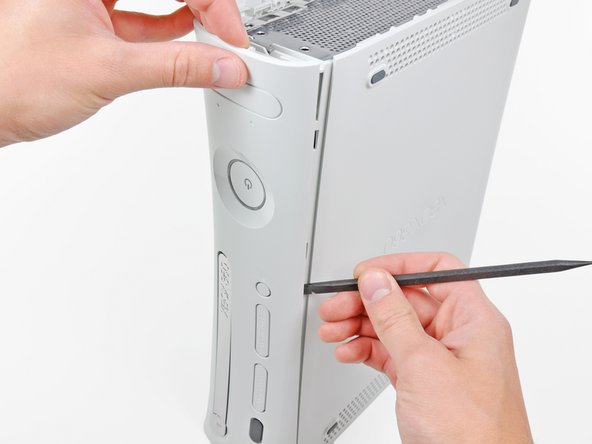
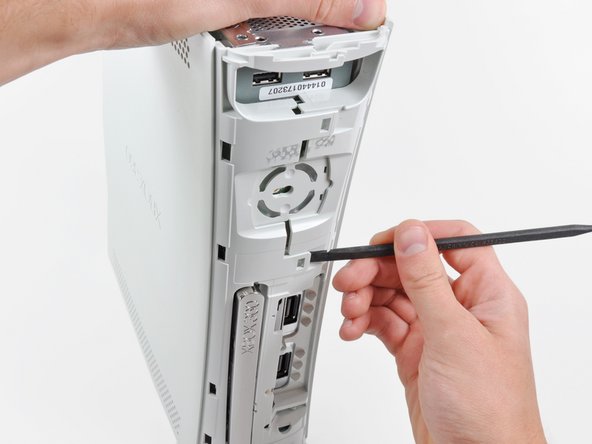
– Gently slide the flat edge of a spudger into the gap between the faceplate and the outer casing, right near the power button – easy does it!
– Now, carefully run your spudger along the edge of the faceplate to release the clips that hold it in place on the front of the console. Take your time and work your way around.
Tools Used
Step 9
– Use the same smooth moves as before to gently pop off the left side of the faceplate.
Step 10
– Let’s get started by carefully removing the faceplate from the front of your console. This is the first step towards getting your device up and running again.
Step 11
– Position the console upright with the top edge pointing skyward.
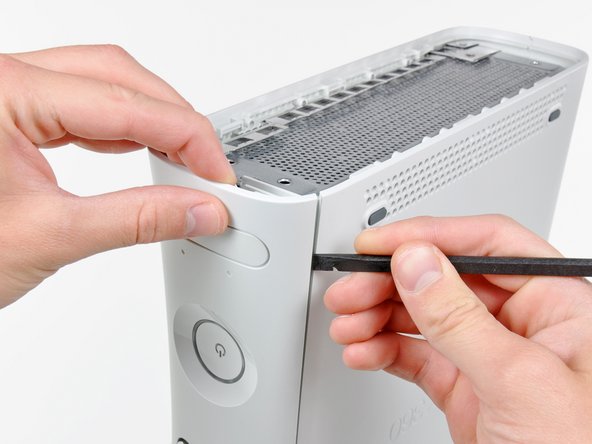
– The top vent is held in place by some sneaky clips. The first two clips are hiding just beneath the top vent, right near the faceplate, as you can see in the pictures.
Step 12
You can totally use the long finger of an Xbox 360 opening tool to get this job done!
– Alright, let’s use that spudger! Gently wiggle the flat end into those gaps to unclip things.
Tools Used
Step 13
Alright, let’s get those clips released! Using your spudger or an Xbox 360 opening tool, gently pry open the clips along the left and right sides of the top vent. You’ll see their locations highlighted in red.
Tools Used
Step 14
– Alright, let’s loosen those clips! Start in the middle of the top vent and gently work your way out.
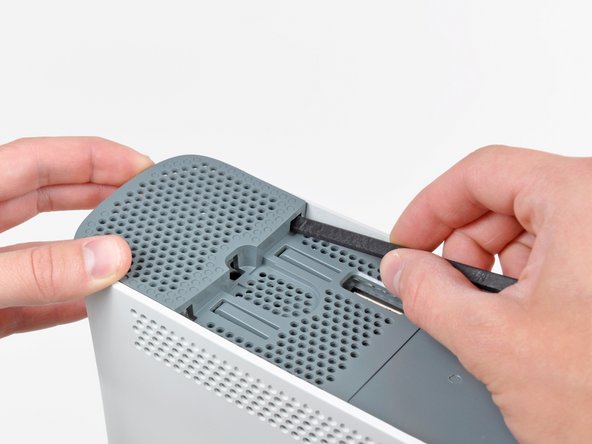
– Now, as you carefully lift the front edge of the top vent, use the tip of a spudger to nudge those clips towards the inside of the console. Think of it like a little dance, getting them to move just a bit.
Tools Used
Step 16
The final clip is hiding under the rubber foot closest to the back of the console. Sneaky, right?
Step 17
– Pop that console up on its side like a champ, with the top edge taking a nap against the surface!
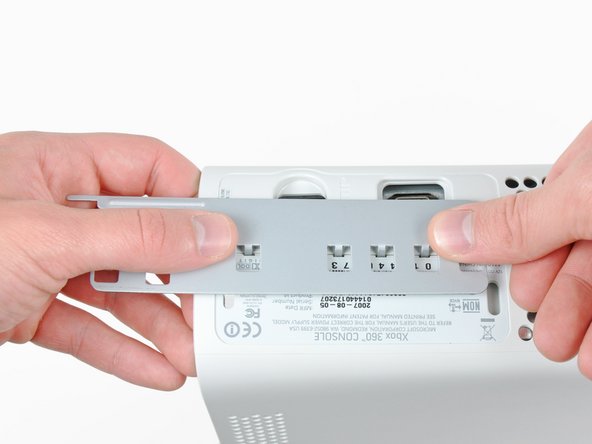
– Gently coax the warranty sticker off the console like you’re peeling a banana—smooth and steady!
Step 18
Alright, let’s get those cases apart! You’ll find a few latches holding the top and bottom pieces together, kind of like a puzzle. They’re hanging out in the front and back. Just gently release those latches and the top case will pop right off. Easy peasy!
Step 20
– Gently raise the front part of the lower case to make sure the latches at the front are fully released. You’ve got this!
Step 21
The upper and lower cases are snugly held together by seven sneaky release latches on the back of the console. You can spot their locations highlighted in a cheerful red!
Step 22
– Press the Xbox 360 opening tool down into the clips holding the bottom case to the top case near the ports. It’s like a little dance! You gotta press down and slide it apart. You got this!
– Keep pressing down on the tool while you gently push the bottom and top cases apart to release those clips. You’re almost there!
Tools Used
Step 23
– As you gently pry the upper and lower cases apart, grab a spudger or the tip of an Xbox 360 opening tool. Use it to nudge that long clip highlighted in red right towards the center of your 360.
– Once you’ve done that, the clip will pop free, leaving just the clips near the power connector to keep the upper and lower cases snuggly together.
Tools Used
Step 24
– Now, let’s pop those last two clips near the power connector loose. Just gently press down on your Xbox 360 opening tool.
– Time to give those cases a little wiggle room! Gently push the top and bottom cases apart to release those stubborn clips.
Tools Used
Step 25
Be gentle when handling the lower case near the power plug, as it can be prone to cracking if bent too much.
– Flip the console over so its front is pointing down—it’s like giving it a little hug!
– Now, grab the back part of the lower case and gently lift it away from the console, as if you’re unveiling a surprise!
Step 26
You can also get the job done with an Xbox 360 opening tool – pretty handy, right?
– Let’s get started by using the tip of a spudger to carefully release the clip that’s holding the eject button in place on the metal casing.
– Next, slide the flat end of a spudger between the eject button and the optical drive to create some space.
– Now, gently pry the eject button off its retaining posts and remove it from the 360 – you’re making great progress! If you need help, you can always schedule a repair
Tools Used
Step 27
– Let’s get started by removing the six silver 64 mm T10 Torx screws that hold the upper case in place. Grab your trusty screwdriver and carefully take out these screws from the metal casing.
Step 28
– Let’s get started by turning the console so the upper case is facing up – it’s time to get a little hands-on!
– Now, carefully lift the upper case straight up and set it aside – you’re making great progress!
Step 29
– Carefully peel away the silver tape that’s keeping the optical drive snug against the metal casing. You’re almost there!
Step 30
Hold your horses! Don’t go yanking out that optical drive just yet. It’s still got two cables happily connected to the motherboard.
– Gently nudge the optical drive upwards to create some space for disconnecting the SATA and power connectors tucked away on the back of the optical drive.
Step 31
– Alright, let’s get this optical drive outta here! Gently grab the power connector by its cables and pull it straight out of its socket. You got this!
– Now, let’s disconnect that SATA data connector from its socket. Just pull it straight away – no need to force it! You’re doing great!
Step 32
– Time to give that optical drive assembly a little air! Carefully lift it out of the metal casing.
Step 33
– Time to get started! Insert the flat end of a spudger into the small rectangular opening on the top of the cooling fan duct – it’s a tight fit, but don’t worry, it’s doable.
– Next, carefully release the fan duct retaining clip. You can do this! Once it’s loose, remove the fan duct from the Xbox. Take your time, it’s not as tricky as it sounds.
– If the clip is being stubborn, you can also use the metal finger of an Xbox 360 opening tool to release it. Easy does it, you’re making great progress!
Tools Used
Step 34
Hang tight! Don’t totally detach the dual fan assembly yet. Its cable’s still hanging out with the motherboard. We’ll take care of that in a jiffy.
– As you gently lift the metal chassis strip above the dual fans, give those fans a little nudge toward the center of the motherboard. You’ve got this!
Step 35
Some fan connectors have a sneaky locking tab, so be sure to press it down while you’re disconnecting the fan from the motherboard. It’s an easy step, but an important one to avoid any damage.
– Gently pop the dual fan connector straight up from its cozy spot on the motherboard.
– Carefully lift out the dual fan assembly from the console and give yourself a pat on the back!
Step 36
Using your fingernail to pop those clips off the RF module might just be the trick!
Step 37
– Unscrew those three 5.6 mm T8 Torx screws holding the RF module snugly to the metal chassis. You’ve got this!
Step 38
– Grab hold of the RF module and gently lift it straight up to pop it out of its cozy spot on the motherboard.
– Now, go ahead and remove the RF module from the console. You’re doing great!
Step 39
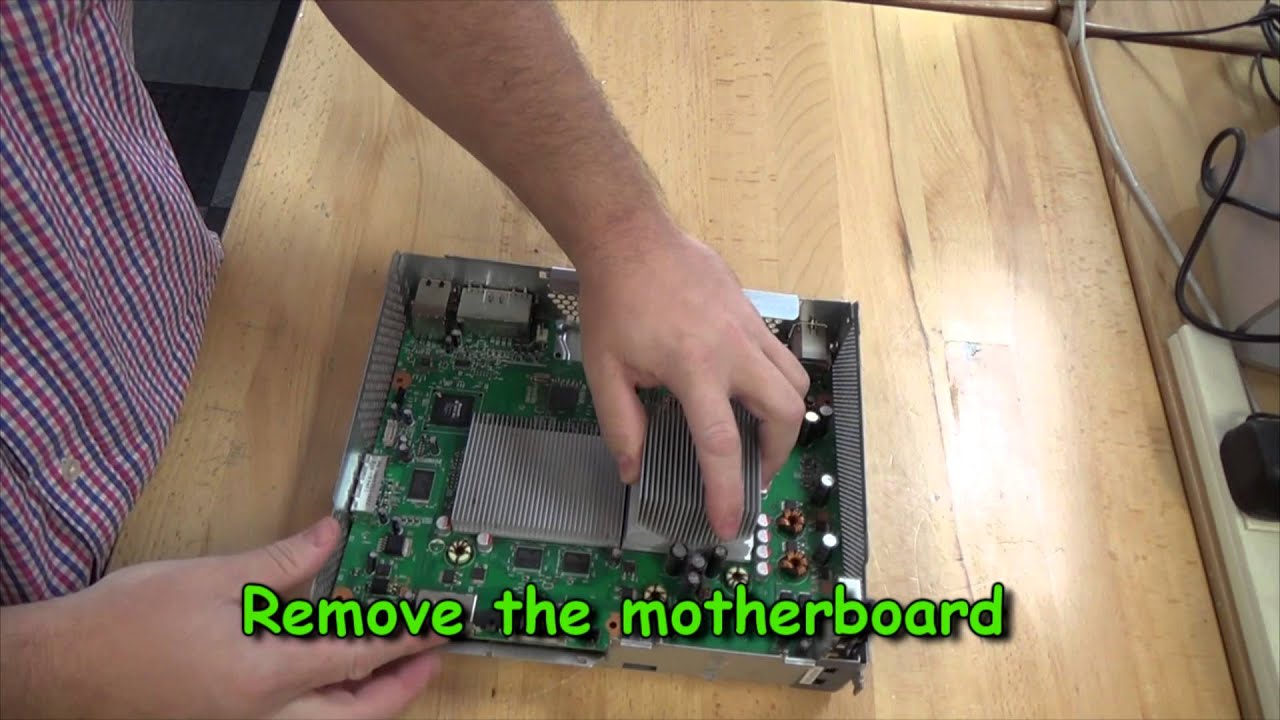
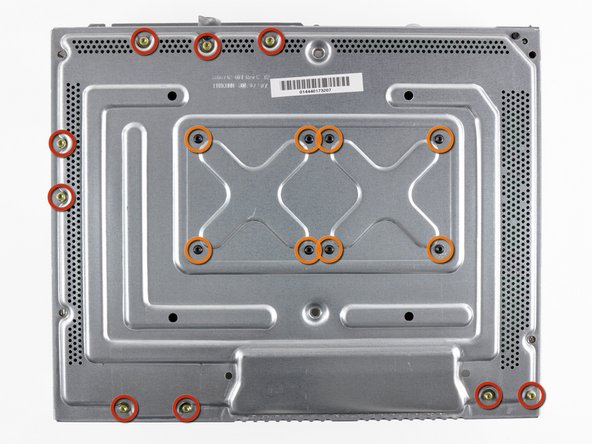
– Let’s get started by removing the screws that hold the motherboard in place inside the metal casing – it’s time to set it free!
– If you’re putting your Xbox 360 back together after a repair, don’t worry about the eight T8 Torx screws highlighted in orange – they won’t be needed again.
– Next, you’ll need to remove the nine gold 11 mm T10 Torx screws – they’re holding on tight, but you’ve got this!
– Then, take out the eight black 5.6 mm T8 Torx screws – you’re making great progress, keep going!
Step 40
Watch out for those sockets while you gently twist the motherboard away from the metal casing. We want to keep everything safe and sound!
Flip the Xbox over, but hold on tight to the motherboard. Don’t let it go for a joyride!
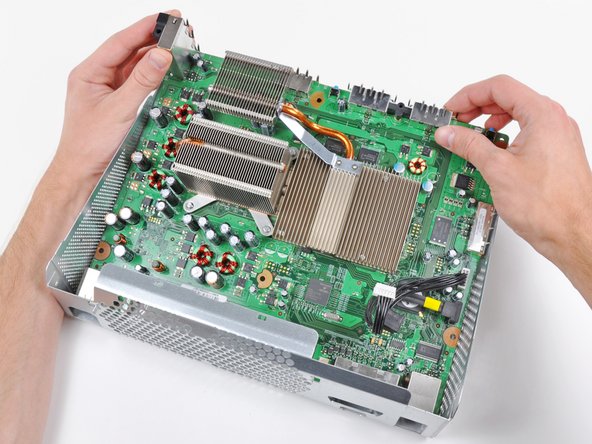
– Gently lift the motherboard assembly up from the front edge.
– Now, carefully slide the motherboard assembly out of the metal casing.
Step 41
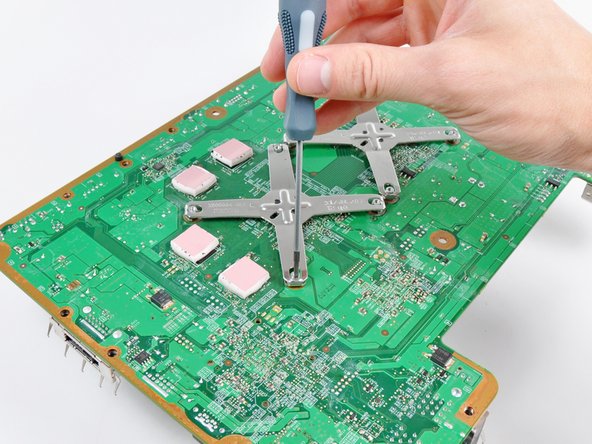
– Time to get started! Insert the tip of a small flathead screwdriver between the X clamp and its retaining post on the heat sink – it’s a tight spot, but you’ve got this!
– Gently pry the X clamp away from its retaining post until it’s lifted above the small groove cut into the retaining post. Take your time, it’s a delicate move, but you’re making great progress!
Step 42
As you tackle that last corner of the X clamp while flipping the motherboard upside down, make sure to catch the GPU heat sink! We wouldn’t want it taking a tumble and causing any mishaps.
Tackle each corner of that X clamp just like the others! Keep the momentum going and you’ll have it done in no time.
– Slide your screwdriver in smoothly, right between the X clamp and its trusty retaining post, just like a pro.
– Give that screwdriver a little twist to set the X clamp free from its post. You’re doing great!
Step 43
Now, repeat the process for the last arm of the X clamp. We’re almost there!
– Let’s get that X clamp back in place. Start by attaching two corners to the posts on the heat sink – easy does it!
– Now, hold the third arm of the X clamp down against the post attached to the heat sink, and use a small flathead screwdriver to gently pry it away from the heat sink post. Don’t worry, it’s easier than it sounds!
– As you pry, press down on the arm of the X clamp until you ‘walk’ it down into the retaining groove cut into the post attached to the heat sink. You’re doing great, just take your time!
Step 44
Before you dive into reinstalling that GPU heat sink, don’t forget to slather on a fresh coat of thermal paste!
Need to put that heat sink back on the motherboard? No problem! We’ve got a thermal paste guide to make that a piece of cake. You’ll be back in action in no time.
Step 45
Alright, almost there! When removing that last corner of the X-clamp, make sure you’ve got a good grip on the motherboard (upside down, remember?) and catch that CPU heat sink—wouldn’t want it taking a tumble!
If you need to, slide your screwdriver in parallel to the motherboard, right between the X clamp and its trusty retaining post. Give it a twist to pop that X clamp free from its post.
Now, just repeat that little dance for all four corners of the X clamp.
– Time to get started! Insert the tip of a small flathead screwdriver between the X clamp and its retaining post on the heat sink – it’s a tight spot, but you’ve got this!
– Gently pry the X clamp away from its retaining post until it’s lifted above the small groove cut into the retaining post. Take your time, it’s a delicate step.
– Now it’s time to remove the CPU heat sink from the motherboard. Remember to apply a new layer of thermal paste when you’re reinstalling it – this will keep everything running smoothly.
Step 46
– Unplug the power and SATA cables from the optical drive, ensuring you give your motherboard some breathing room.
Step 47
– If you’re replacing the motherboard, be sure to gently transfer the four thermal pads from the bottom of the old motherboard to your brand new one. You’re practically a motherboard transplant surgeon now!
– And that’s it for the motherboard. You’re rocking it!
The DVD drive and the motherboard are a perfect match when they come from the factory, like a pair of dancing shoes! If you change one, you gotta change the other. Putting a new DVD drive in that doesn’t match the motherboard is like trying to fit a square peg in a round hole – it’ll play DVDs but no games. Don’t worry, you can adjust the connection so they get along! You can always schedule a repair if you need a helping hand.
Step 48
Before you start heating up the motherboard, take a minute to thoroughly clean off the old thermal paste from both the CPU and GPU. Get them squeaky clean, just like the processors shown in the first picture. If you’re not sure how to do this, you can find the cleaning process explained in detail here.
– Let’s get started by placing the motherboard with the processor side facing down onto the flat metal bottom of the bare chassis. Make sure the open side of the chassis is facing down, just like you see in the second picture. Don’t worry if the tall USB socket hangs over the edge – that’s exactly what we want, so the board sits nice and flat.
– Now it’s time to heat things up – literally! Grab your heat gun and set it to the LOW setting. Hold it about 6 inches away from the motherboard and slowly sweep it back and forth across the back of the board for about a minute. This will help loosen any stubborn components. Remember to keep the heat gun moving to avoid hotspots.
Tools Used
Step 49
If you’ve already got the RROD fix kit in place, make sure to leave those two little black heat sinks right where they are on their chips. The tape holding them down is super strong, and trying to peel them off might just cause some damage to the chips below. No worries though—the heating process won’t harm the heat sinks at all!
– Once you’ve warmed up the back of the motherboard for a cozy minute, it’s time to flip it like a pancake! Carefully place it onto the chassis just like the picture shows. You’ve got this!
Step 50
When you’re cranking up that heat gun, make sure to keep it moving! You want the hot air to dance around and warm up the area evenly. No one likes a hot spot!
Steer clear of those cylindrical electrolytic capacitors nearby the red box. They’re sensitive little guys, and we don’t want to toast them!
Hey, just a heads up! We recommend going with our Red Ring of Death Fix Kit to keep your device from going kaput in the future. It’s like giving your device a superhero shield!
– To wrap things up, simply reverse the steps starting from Step 48 – easy peasy!
– If you didn’t quite get it done, no worries! You can always schedule a repair and let the pros handle it.
– You’re all done! Pat yourself on the back, you’ve completed the repair guide!
