DIY Repair Guide: Replace Xbox 360 CPU Heat Sink – Step-by-Step
Duration: 45 minutes
Steps: 44 Steps
Time to detach that CPU heat sink from your Xbox 360. Don’t forget, when you put it back on, use a fresh layer of thermal paste for optimal coolness!
Step 1
– Get a grip on that hard drive assembly and press the release button – now’s the time to set it free by lifting its front edge!
– Gently pull the hard drive assembly out from the top vent, and you’re one step closer to a successful repair!
Step 2
During the upcoming opening process, feel free to swap in an Xbox 360 opening tool in place of that trusty spudger. You’ve got this!
– Get your console ready by standing it up vertically with the bottom edge facing upwards – easy peasy!
– Now, take your trusty spudger or Xbox 360 opening tool and insert the flat end into the small gap at the front edge of the bottom vent. This is where the magic happens!
– Gently pry the front edge of the bottom vent away from the faceplate. Take your time and be careful, you’re making great progress!
Tools Used
- Spudger
CPU Heat Sink Replacement” src=”https://cart-products.cdn.ifixit.com/cart-products/vy2elt3YPAXL1LmZ.thumbnail”/>
- Xbox 360 Opening Tool
CPU Heat Sink Replacement” src=”https://cart-products.cdn.ifixit.com/cart-products/tf6VDhoF1dfKt1Wg.thumbnail”/>
Step 3
Get ready to release those clips! Use the tip of a spudger or the finger of an Xbox 360 opening tool to gently pry them loose along the left and right sides of the bottom vent. We’ve highlighted their locations in red to make it easy for you.
Now, carefully insert your tool into the holes molded into the white plastic side case pieces. Take your time and you’ll be a pro in no time!
Tools Used
- Spudger
CPU Heat Sink Replacement” src=”https://cart-products.cdn.ifixit.com/cart-products/vy2elt3YPAXL1LmZ.thumbnail”/>
- Xbox 360 Opening Tool
CPU Heat Sink Replacement” src=”https://cart-products.cdn.ifixit.com/cart-products/tf6VDhoF1dfKt1Wg.thumbnail”/>
Step 4
– Ready to free those clips? Awesome! Let’s start at the front edge of the bottom vent.
– Gently lift the front edge of the bottom vent. Now, use the tip of your spudger to push those clips (the ones closest to the front) inward. You got this!
Tools Used
- Spudger
CPU Heat Sink Replacement” src=”https://cart-products.cdn.ifixit.com/cart-products/vy2elt3YPAXL1LmZ.thumbnail”/>
Step 5
– Let’s give those bottom vent clips the same love! Repeat the process to release the center two.
Step 6
– Use your trusty spudger to gently pry open the clips on the bottom vent, starting from the back of the Xbox. You got this!
Tools Used
- Spudger
CPU Heat Sink Replacement” src=”https://cart-products.cdn.ifixit.com/cart-products/vy2elt3YPAXL1LmZ.thumbnail”/>
Step 7
– Let’s get started by removing the bottom vent from your 360 – it’s the first step towards getting your device up and running again!
Step 8
You can also use the edge of the Xbox 360 opening tool to help you along. Just be careful not to scratch the plastic case.
If you’re feeling adventurous, you can use your hands to carefully pull the faceplate away from the Xbox. Just be gentle, now.
– Gently slide the pointed edge of your spudger in between the faceplate and the outer casing just next to the power button. You got this!
– Now, glide your spudger along the side of the faceplate to pop those clips loose that are holding it tight to the front of your device. Almost there!
Tools Used
- Spudger
CPU Heat Sink Replacement” src=”https://cart-products.cdn.ifixit.com/cart-products/vy2elt3YPAXL1LmZ.thumbnail”/>
- Xbox 360 Opening Tool
CPU Heat Sink Replacement” src=”https://cart-products.cdn.ifixit.com/cart-products/tf6VDhoF1dfKt1Wg.thumbnail”/>
Step 9
– Now, let’s give that left side of the faceplate the same love we gave the right side! Repeat those same moves we just did to release it. You’re doing awesome!
Step 10
– Let’s get this party started! Carefully detach the faceplate from the front of the console.
Step 11
– Position the console upright with the top side facing toward you.
– You’ll find the top vent held in place by a couple of clips. The first two clips are nestled right underneath the top vent, close to the faceplate. Check out the pictures for a visual guide!
Step 12
You can also use the long finger of an Xbox 360 opening tool to get this done – it’s a great alternative to have up your sleeve.
– Now it’s time to get those clips to release. Insert the flat end of a spudger into the small gaps you found earlier and gently pry them open.
Tools Used
- Spudger
CPU Heat Sink Replacement” src=”https://cart-products.cdn.ifixit.com/cart-products/vy2elt3YPAXL1LmZ.thumbnail”/>
- Xbox 360 Opening Tool
CPU Heat Sink Replacement” src=”https://cart-products.cdn.ifixit.com/cart-products/tf6VDhoF1dfKt1Wg.thumbnail”/>
Step 13
Now it’s time to get those clips released along the left and right sides of the top vent. Use the tip of a spudger or the finger of an Xbox 360 opening tool to gently pry them loose – their locations are highlighted in red for your convenience.
Tools Used
- Spudger
CPU Heat Sink Replacement” src=”https://cart-products.cdn.ifixit.com/cart-products/vy2elt3YPAXL1LmZ.thumbnail”/>
- Xbox 360 Opening Tool
CPU Heat Sink Replacement” src=”https://cart-products.cdn.ifixit.com/cart-products/tf6VDhoF1dfKt1Wg.thumbnail”/>
Step 14
– Let’s get started by releasing the clips from the middle of the top vent – it’s easier than you think!
– Gently lift the front edge of the top vent and use a spudger to nudge the center clips towards the inside of the console. Take your time and you’ll be a pro in no time!
Tools Used
- Spudger
CPU Heat Sink Replacement” src=”https://cart-products.cdn.ifixit.com/cart-products/vy2elt3YPAXL1LmZ.thumbnail”/>
Step 15
– Now, grab your trusty spudger and gently pry up that little clip on the top vent. You know, the one closest to the back of the Xbox’s top case. Just give it a little nudge – it’ll come right off!
Tools Used
- Spudger
CPU Heat Sink Replacement” src=”https://cart-products.cdn.ifixit.com/cart-products/vy2elt3YPAXL1LmZ.thumbnail”/>
Step 16
The final clip is cleverly tucked away under the rubber foot that’s closest to the back of the console.
– Time to get started! Use the tip of your trusty spudger to gently release the clip on the top vent nearest the back of the Xbox – it’s easier than you think!
– Now, carefully remove the top vent from the 360. You’re making great progress!
Tools Used
- Spudger
CPU Heat Sink Replacement” src=”https://cart-products.cdn.ifixit.com/cart-products/vy2elt3YPAXL1LmZ.thumbnail”/>
Step 17
– Position the console upright with its top edge pointing downwards.
– Gently remove the warranty sticker from the console, taking care to avoid any damage.
Step 18
The top and bottom parts are like best buds, hanging out with a bunch of latches in the front and back. You’ll need to get those latches to chill out so you can separate the top part from the party down below.
– Time to get started! Use the flat end of a spudger to release the latches in these key spots:
– Above the front-facing USB ports – gently pry them open.
– Beneath the front-facing USB ports – same thing, nice and easy.
– Above the Memory Unit slots – one more to go, you’re doing great!
Tools Used
- Spudger
CPU Heat Sink Replacement” src=”https://cart-products.cdn.ifixit.com/cart-products/vy2elt3YPAXL1LmZ.thumbnail”/>
Step 19
– Carefully slide the flat end of your trusty spudger underneath and give it a gentle upward pry to pop loose that last stubborn latch just above the eject button.
Tools Used
- Spudger
CPU Heat Sink Replacement” src=”https://cart-products.cdn.ifixit.com/cart-products/vy2elt3YPAXL1LmZ.thumbnail”/>
Step 20
– Give that lower case a gentle lift in the front, like you’re opening a treasure chest. Make sure those latches in the front are totally free – they should be ready to party!
Step 21
Alright, let’s get this party started! You’ll see seven little release latches holding the top and bottom halves of your device together. They’re marked in red, so you can’t miss them!
Step 22
– Let’s get this case open! Take your Xbox 360 opening tool and gently press it down onto the clips that hold the bottom case to the top case near the I/O ports.
– Now, keep that tool pressed down and carefully pry the bottom and top cases apart to separate the retaining clips. You’re doing great!
Tools Used
- Xbox 360 Opening Tool
CPU Heat Sink Replacement” src=”https://cart-products.cdn.ifixit.com/cart-products/tf6VDhoF1dfKt1Wg.thumbnail”/>
Step 23
– As you gently pry the upper and lower cases apart, grab a spudger or the trusty finger of an Xbox 360 opening tool and give that long clip, marked in red, a little nudge toward the center of the 360. It’s like a fun dance move!
– With a satisfying pop, the clip should give way, leaving only the ones near the power connector to keep the upper and lower cases connected. You’re almost there!
Tools Used
- Spudger
CPU Heat Sink Replacement” src=”https://cart-products.cdn.ifixit.com/cart-products/vy2elt3YPAXL1LmZ.thumbnail”/>
- Xbox 360 Opening Tool
CPU Heat Sink Replacement” src=”https://cart-products.cdn.ifixit.com/cart-products/tf6VDhoF1dfKt1Wg.thumbnail”/>
Step 24
– Now it’s time to get this Xbox 360 open – use your trusty opening tool to release the two remaining clips near the power connector. Gently press it down and you’ll be golden!
– Give the upper and lower cases a little nudge to fully release the retaining clips. Easy does it, you’re making great progress!
Tools Used
- Xbox 360 Opening Tool
CPU Heat Sink Replacement” src=”https://cart-products.cdn.ifixit.com/cart-products/tf6VDhoF1dfKt1Wg.thumbnail”/>
Step 25
Don’t go crazy bending that lower case near the power plug, it’s a little delicate and could crack!
– Flip that console over so the screen’s taking a little nap face down.
– Get a good grip on the back half of the lower case and give it a gentle lift – time to separate it from the console.
Step 26


You can also use an Xbox 360 opening tool to make things a little easier. It’s like having a special friend helping you open your device!
– Use the tip of a spudger to gently release the clip that’s holding the eject button onto the metal casing. You got this!
– Insert the flat end of a spudger between the eject button and the optical drive. You’re doing great!
– Carefully pry the eject button off its little holding posts and then remove it from the 360. You’re almost there!
Tools Used


Step 27

– Let’s get started by removing the six silver 64 mm T10 Torx screws that hold the upper case in place. Grab your trusty screwdriver and carefully take out these screws from the metal casing.
Step 28

– Position the console with the upper case pointing skyward.
– Gently lift the upper case straight off and detach it from the console.
Step 29

– Let’s get started by carefully peeling off the silver tape that’s holding the optical drive in place against the metal casing.
Step 30

Hold your horses! Before you go all in and yank that optical drive out, remember there are still two cables hanging on tight to the motherboard. Let’s keep things connected for now!
– Gently lift the optical drive upwards just enough to clear the space needed to unplug the SATA and power connectors tucked away at the back of the optical drive. You’ve got this!
Step 31


– Take hold of the power connector by its cables and gently wiggle it out of its cozy spot in the optical drive’s socket.
– Next up, disconnect the SATA data connector with a straightforward pull, freeing it from its snug connection on the optical drive.
Step 32

– Time to give that optical drive some air! Carefully lift it out of its metal home.
Step 33


– Slide the flat end of a spudger into the tiny opening on the top of the fan duct. It’s like you’re giving the fan duct a little high-five!
– Now, gently release the fan duct’s retaining clip, and you’ll be able to take the fan duct out of the Xbox. Easy peasy, lemon squeezy!
– If you’re feeling fancy, you can use the metal finger of an Xbox 360 opening tool to release the clip. We won’t judge, but the spudger works just as well!
Tools Used
Step 34


Hold your horses! Don’t yank out the dual fan assembly just yet. It’s still connected to the motherboard with a cable, so let’s keep it cozy for now.
– While carefully lifting the metal chassis strip above the dual fans, gently pull the fans towards the center of the motherboard to get them out of the way.
Step 35

Some fan connectors have a sneaky little locking tab. Don’t forget to press it down while you’re disconnecting the fan from the motherboard, or it just won’t budge!
– Okay, time to unplug that dual fan connector! Gently lift it straight up from its home on the motherboard.
– With the connector free, you can now remove the entire dual fan assembly from the console. Easy peasy!
Step 36


Using your fingernail can be a great way to gently release the clips from the RF module, making this step a whole lot easier.
Step 37

– Get your hands on three 5.6 mm T8 Torx screws and remove them to nicely free the RF module from the metal chassis. You’re doing great!
Step 38


– Grab the RF module and gently lift it straight up to disconnect it from its cozy socket on the motherboard.
– Carefully take the RF module out of the console. Remember, you got this!
Step 39
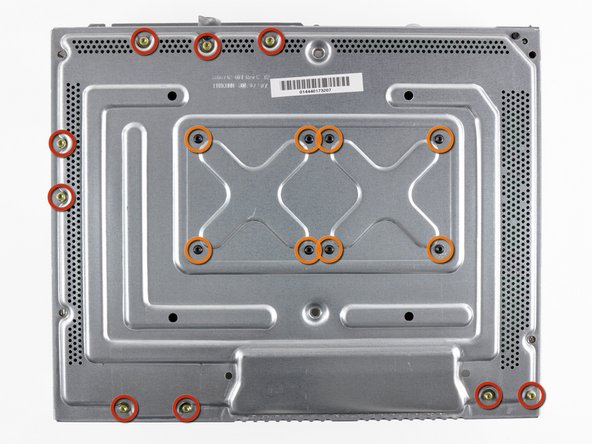
– Time to get those screws out! Start by unscrewing the following screws that are holding the motherboard to the metal casing:
– If you’re putting your Xbox 360 back together after using the Red Ring of Death Fix Kit, remember those eight T8 Torx screws highlighted in orange? They’re on a vacation – no need to reuse them!
– Next up, you’ll find nine shiny gold 11 mm T10 Torx screws waiting for their turn.
– And don’t forget about those eight sleek black 5.6 mm T8 Torx screws – they’re ready to roll too!
Step 40
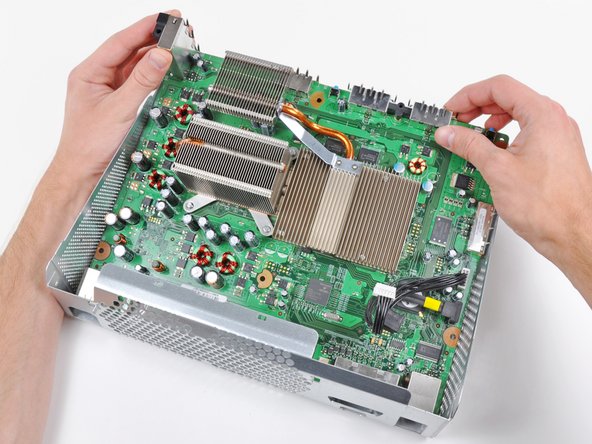

Take it easy while you twist that motherboard away from the metal casing—let’s keep those sockets safe and sound!
Flip your Xbox over, taking care to keep the motherboard snug inside the chassis.
– Time to get this motherboard out – start by lifting it from the front edge, nice and gentle.
– Now, carefully remove the motherboard assembly from the metal casing, you’re making great progress!
Step 41

– Gently slide the tip of a small flathead screwdriver into the space between the X clamp and its retaining post on the heat sink. You’re doing great!
– Carefully pry the X clamp away from its retaining post until it pops up just above the little groove on the post. Almost there!
Step 42


As you’re about to remove that last corner of the x clamp, remember to hold the logic board upside down and be ready to catch the CPU heat sink. We wouldn’t want it taking a tumble and causing some unwanted damage, right?
Now, let’s do the same thing for each of the four corners. We’re almost there!
– Time to get started! Insert your screwdriver parallel to the motherboard, sliding it gently between the X clamp and its retaining post – easy does it!
– Now, give that screwdriver a gentle twist to fully release the X clamp from its retaining post. You’re making great progress!
Step 43

Go for the four-peat and repeat for the last arm of that X clamp!
– Ready to get that X clamp back in action? Start by hooking up two corners to the posts on the heat sink. You’ve got this!
– While you hold down the third arm of the X clamp against the post on the heat sink, grab a small flathead screwdriver and gently pry the X clamp away from the heat sink post. Easy does it!
– As you give it a little nudge, keep pressing down on the arm of the X clamp until you smoothly guide it into the retaining groove on the post. You’re almost there!
Step 44

Before you get your CPU heat sink back in action, don’t forget to spread on a fresh layer of thermal paste. It’s like giving it a cozy blanket for optimal performance!
Yo! Need to put that heat sink back on? We got you covered. Check out our thermal paste guide for a super smooth thermal compound replacement.
– Take off the CPU heat sink with care.