
DIY Xbox 360 E Repair Guide: Step-by-Step Teardown Tutorial
Duration: 45 minutes
Steps: 19 Steps
To dive into your Xbox 360 E and swap out parts like the CD drive or motherboard, you’ll need to pop off the top cover. Let’s get inside and give your console the TLC it deserves!

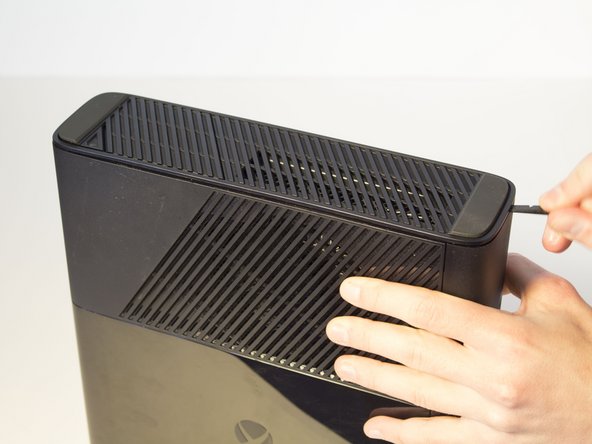
Step 2

– Now, let’s give that spudger a little dance along the gap you just made between the grated panel and the bottom body. You know, a little shimmy, shimmy, shimmy!
– As you’re sliding, give the spudger a little tug back like you’re pulling a lever. Keep that pressure going so you can really get things moving!
Tools Used


Step 4

– Carefully take out the 11 mm screw located to the left of the vibrant green wifi card using your trusty T9 Torx screw bit.
Step 5


– Grab that green Wi-Fi card firmly and gently pull it out of the Xbox. You got this!


Step 9


– Look for the Xbox logo near the CD drive. Give that logo a little tap to the left, and watch the disk tray panel pop right off. You’ve got this!


Step 11


– Keep that partially separated panel open – you can use a spudger to wedge it in place or just hold it with your hands, whichever works best for you.
– Now, rotate the Xbox to the left. You’re on a mission to find the clip that connects the front panel to the body. Slide your spudger into the gap and gently wiggle it to release the clip. Don’t worry if it takes a little bit of effort – when it pops off, you’ll know you’re making progress and the front panel will start to come loose.
Tools Used


Step 13


Be gentle when removing the panel – take your time and pull it away slowly to avoid damaging the ribbon cable. You got this!
Step 14


– Locate the brown section where the ribbon cable connects to the green board. Gently lift the brown part and carefully pull out the plastic tab at the end of the ribbon. You’re doing great!
Step 15


– Flip your Xbox over so the bottom is pointing up. Look for those rubber feet—they’re your clue that you’ve got the right side ready for action!
– Gently lift the bottom part away from the main body at a cool 45-degree angle. Easy does it!
Step 16


Heads up! To get inside, you’ll need to peel off that warranty sticker. Just a friendly reminder, this will void your warranty. For more info, check out the main page to find warranty details from Microsoft.
No need to worry about the sticker when putting everything back together – it’s not necessary for reassembly.
– Flip that Xbox around so you’re peering at its back side like a pro!
– Peel off that sticker from the back of your Xbox and give it a fresh look.
Step 17


– Gently twist your Xbox to the left to find the sneaky little clip that’s keeping the body snugly together.
– Grab your trusty spudger and give the clip a little nudge upwards like you’re lifting a latch! Then, glide over to the far end and repeat the same charming maneuver to release the other clip. You’ve got this!
Tools Used


Step 19


– Time to get your hands a little dirty! Start by grabbing that trusty T9 Torx screwdriver and unscrew those five long black 55 mm screws labeled C2-5 and C7. You’ve got this!
– Now, let’s flip the device over gently. Carefully lift the body from the metal section that’s cozying up to the plastic exterior. Easy peasy, right?