Replace Xbox 360 E Motherboard – Step-by-Step Guide
Duration: 45 minutes
Steps: 28 Steps
Hey there! This guide is for you if your Xbox 360 E’s back connections are acting up. Swapping out the motherboard takes a little more time than replacing other parts, but don’t worry, we’ll walk you through it! You’ll be back to gaming in no time.
Step 1

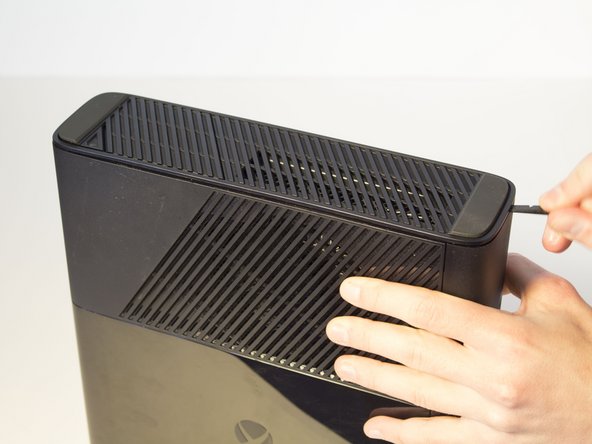
– Slide the Spudger into the little gap between the Xbox’s top panel and the bottom body where the rubber feet are. It’s like finding a secret passage!
– Now, gently pull back on the spudger like you’re operating a lever, while keeping it snugly pressed into that crevice. You’re doing great!
Tools Used


Step 6


Step 7


– Right next to the Xbox logo on your CD drive is the magic spot. Give it a gentle press, and the disk tray panel will pop right off. It’s like opening a treasure chest!


Step 9


– Keep holding that panel open! You can use a spudger to hold it open, or just use your hands. It’s all good.
– Now, rotate the Xbox a little to the left. See that clip holding the front panel in place? Use that spudger to gently pop it off. It might take a little wiggling, but you’ll get it. That’ll loosen up the front panel.
Tools Used


Step 11


Be gentle when removing the panel – pulling too quickly can damage the delicate ribbon cable inside. Take your time and slowly pull the panel away to avoid any damage.
Step 12


– Locate the brown section where the ribbon cable connects to the green board. Gently lift the brown part and carefully pull out the plastic tab at the end of the ribbon. You’re doing great!
Step 13


– Take a moment to admire your device’s body, and then spot the green panel just to the right of the CD drive—it’s time to give it some attention!
– Now, grab your T8 Torx screwdriver and tackle those two 6 mm screws hanging out at the top left and middle right. Twist them off with care!
– With the screws out of the way, gently grip the middle of the green board and give it a delicate pull to set it free. You’ve got this!
Step 14

– Let’s get started by removing the 11 mm screw located to the left of the green wifi-card – simply use your trusty T9 Torx screw bit to get the job done.
Step 15


– With a steady hand, grasp the vibrant green Wi-Fi card and gently pull it out of the Xbox. You’ve got this!
Step 16


– Flip your Xbox over so the bottom side is up—look for those rubber feet! That’s how you know you’re on the right track.
– Gently lift the bottom part away from the core at a nice 45-degree angle. You got this!
Step 17


Removing the warranty sticker is a necessary step, but it does mean that your warranty will be voided. For more details on this, check out the main page for warranty information from Microsoft.
That sticker? Totally optional for putting things back together!
– Flip that Xbox around so you’re looking at the back, like you’re about to give it a high five!
– Now, peel that sticker off the back. It’s like giving your Xbox a little makeover, but less glitter and more fixing!
Step 18


– Give your Xbox a gentle nudge to the left to find the sneaky clip that’s keeping the body snug as a bug.
– Grab your trusty spudger and give that clip a little push upwards, just like opening a latch. Now, make your way to the other end and repeat the magic to free the second clip!
Tools Used


Step 20


– Let’s get started by unscrewing those five long black screws, 55 mm in size, tagged as C2-5 and C7. Grab your trusty T9 Torx screwdriver and give it a go!
– Now, it’s time to flip the device with care! Gently lift from the metal part that connects to the plastic shell to remove the body. Easy peasy!
Step 21


– Gently wiggle those fingers and unplug the blue ribbon cable from the CD drive. You’ve got this!
Step 22

– Grab those tweezers and gently unplug the blue and pink wires. It’s a little dance, and you’ve got this!
Step 23

– Let’s get this party started! Give the front end of the CD drive a little lift and slide it out. You got this!
Step 24


– Alright, let’s get down to business! Grab your trusty T9 torx screwdriver and head to the bottom of your Xbox. It’s time to unscrew all those 11 mm screws labeled B1-7. You’ve got this!
– Oh, and don’t forget about that sneaky screw hiding on the side of the Xbox next to the power plug. It’s easy to miss, but we know you’re on top of it!
Step 25


– Turn that Xbox upside down and gently remove the heat sink’s plastic shield. A little care goes a long way!
Step 26


– Alright, let’s get those cables out of the way! Gently unplug the red cable, followed by the blue cable. Now, get a good grip on that hard drive assembly – grab it by the long plastic arm and lift it out, piece of cake!
Step 27

– Now, flip that Xbox over to the back side. Grab your T10 Torx screwdriver and give those last four 6 mm screws a good twist. You’ll find them labelled A1-4.
Step 28


Slide two fingers into the grooves on the side of the device. Carefully pull up, but be sure to avoid pulling from the side with plugs like the HDMI or ethernet connections. You’ve got this!
– First things first, let’s flip that Xbox over and gently remove the metal and plastic insert from the top. You’ve got this!
– Now, as you lift the motherboard, glide over to the left side and keep that upward momentum going. Almost there!
– Once you’ve freed that side, go ahead and lift the rest of the motherboard away from the metal frame. You’re on a roll!