Google Pixel 9 Screen Replacement DIY Repair Guide
Duration: 45 minutes
Steps: 26 Steps
This repair guide is crafted with care by our team here at Salvation Repair. While it’s not officially endorsed by any big names, we’re all about helping you get your device back in action! For more tips and tricks, feel free to check out our other guides or if you need help, you can always schedule a repair.
Hey there, tech-savvy friend! This guide will walk you through replacing a busted screen on your Pixel 9. Think of it like giving your phone a brand new face! If your screen doesn’t already have adhesive, you’ll need some new screen adhesive to stick it back together. Heads up: any repair can mess with your phone’s water resistance. How waterproof it stays after the repair depends on how well you reapply the adhesive on the back cover. If you’re not feeling confident, you can always schedule a repair with the pros.
Step 1


Ahoy! Before you get started on this Pixel repair, let it run out of juice past the 25% mark, ’cause we don’t wanna deal with a fiery battery situation, right? Stay safe and rev up for some fun repairs ahead!
Give those power and volume up buttons a simultaneous press to unveil the magical shutdown menu!
– First things first, give your phone a little break! Unplug all the cables.
– Next, power off your phone. We’re getting ready for some tech magic!
Step 2


Watch out for those pesky glass shards! They can make things tricky and, even worse, lead to some ouchies. If your phone has a cracked screen, let’s tackle this together:
Be sure to only cover the glass itself—keep that tape away from the frame!
– Stick on some overlapping strips of packing tape to cover that cracked glass completely—this will help the suction cup grab hold like a champ!
– Don’t forget to rock some safety glasses to keep your peepers safe from any sneaky glass shards that might pop out during the repair.
Tools Used


Step 3


– Get ready to warm things up! Use a hairdryer, heat gun, or hot plate to heat the entire screen until it’s almost too hot to touch. We’re talking about making that screen nice and toasty. Not too hot though, we don’t want any meltdowns!
Tools Used


Step 4


– Grab your trusty suction handle and stick it right in the center of the screen’s top edge. You got this!
Tools Used

Step 5


Watch out for those delicate little metal spring-contacts that are hanging out around the edge of your device! To keep them safe and sound while you’re separating the screen, make sure your pick doesn’t dive deeper than 3 mm. Happy repairing!
Alternatively, stick a coin to your pick about 3 mm from the end. It’s a clever little hack to get the job done!
– From the tip, measure out 3 mm and give your opening pick a little love tap with a permanent marker to mark the spot. You’re on the right track!
Step 6


Popping in that opening pick can be a bit tricky! Take a deep breath, stay cool, and if it feels like it’s not budging, feel free to give the screen a little heat to help it loosen up.
– With purpose and a firm grip, pull up on that suction handle to make a cozy little gap between the screen and the frame. You’re doing great!
– Next up, gently slide the tip of your opening pick beneath the screen. Just a little finesse here goes a long way!
Tools Used
Step 7


– Gently glide the opening pick along the top edge to break free the adhesive holding it in place.
Step 8


– Keep gliding your trusty opening pick around the edges of the screen to break free the last bits of adhesive. You’re almost there!
Step 9


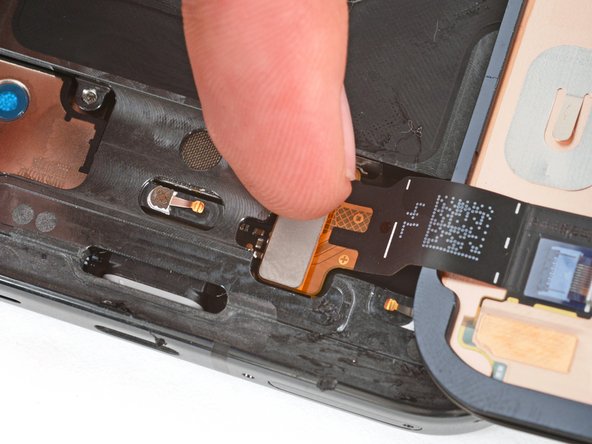
Take it easy and make sure you don’t put too much pressure on that display cable down in the bottom right corner. It’s a little sensitive, so give it some love!
If you feel like you’re wrestling with that stubborn screen, take another spin around the edges with your trusty opening pick. It’ll help you separate any lingering adhesive.
– Gently flip the screen over the right edge of your phone and hold it up with the suction handle. You’re doing great!
Tools Used


Step 12


Take extra care when peeling off the screen adhesive in this step—those delicate components around the frame are like little butterflies, and we want to be gentle so they don’t get hurt.
Removing the adhesive might feel like a dance, so take your time and roll it up onto itself like a pro! It’s all about that gentle touch.
– Grab your trusty spudger and gently scrape away all that pesky old screen adhesive from around the frame’s edge.
– After you’ve cleared away the old sticky stuff, take a little isopropyl alcohol and a microfiber cloth to wipe off any remaining adhesive residue from the frame’s perimeter.
– Let the frame air dry completely before moving on to the next step.
Tools Used

Step 13


If your new screen comes with adhesive all set to go, feel free to leap ahead seven steps! If not, don’t worry—just follow the next seven steps to apply some fresh adhesive like a pro.
Make sure the blue liner is facing up, while the larger clear liner rests on the bottom. You’ve got this!
– Before you get your sticky fingers all over the adhesive, make sure you know which way it goes on the frame. Hold it up to your phone and get it lined up right!
– The adhesive has a little groove around the edge of the frame, so it’s easy to see where it goes.
– There are cutouts in the blue liner that match up with the spring contacts on the frame. You’re a pro!
Step 14

– Gently peel back the top half of the big, clear liner to reveal the adhesive—just a heads up, keep that liner on for now.


Step 18


– Grab those tweezers and gently lift the top left corner of the blue liner. Give it a nice tug to peel it away like a pro!
Tools Used


Step 21

Take it easy with that screen cable! Be gentle and maybe hold the screen at a nice angle to help guide the cable into place. You’ve got this!
Gentle touch is the name of the game! Avoid pressing down in the center because if the connector isn’t lined up just right, those pins might bend, and trust us, that’s a one-way ticket to permanent trouble.
– Time to get that screen in! Line up the screen press connector with its socket and give a gentle push down on one side until you hear a satisfying click, then do the same for the other side.
– Hey, why not give your phone a test drive before sealing everything up? Power it on and check if it’s functioning. Just make sure to power it back down before diving into the reassembly.
– Now, let’s get that screen cable bracket secure. Hook the bottom edge into its designated cutout and then press down firmly on the top edge until it clicks snugly into position.
Step 22


Step 23


Step 24


Handle the screen with the utmost care while peeling off those liners!
– Alright, let’s get this show on the road! Check your new screen for any leftover plastic liners (especially around the front camera and screen cable) and gently peel them off. You can spot them by their little pull tabs. Don’t worry, it’s like a little treasure hunt! 😎


Step 26


– Awesome job on finishing your screen repair!
– Want to make sure everything’s in tip-top shape? Give the built-in Pixel Diagnostic tool a whirl by clicking here.
– Got some old tech lying around? Don’t forget to drop it off at an R2 or e-Stewards certified recycler.
– If things didn’t go quite as you hoped, don’t sweat it! Check out some basic troubleshooting tips or reach out to our Answers community for a helping hand.
– If it turns out you didn’t complete this guide, that’s cool too! Just let us know.
–
Success!

