Google Pixel 6 Pro Battery Replacement Guide: DIY Tutorial
Duration: 45 minutes
Steps: 29 Steps
Hey there, repair hero! This guide is made by the awesome team at Salvation Repair, not Google. Want to see more cool guides? Click here.
Alright, safety first! Before you start taking things apart, give your phone’s battery a little break and get it down to 25% or lower. That’s just smart, right?
Ready to give your Google Pixel 6 Pro a fresh battery boost? This guide will show you how to swap out that tired old battery and get your phone feeling like new again! We’ll walk you through the whole process step-by-step, so don’t worry if you’re a repair newbie. Just remember to take it easy if you spot a swollen battery—safety first! And before you start, try to bring that battery down below 25% charge. It’s all about staying safe and keeping the energy levels in check. We’ll also give you a heads-up: the Pixel 6 Pro packs some powerful lasers, so handle with care! And when you’re putting everything back together, make sure to use some fresh adhesive. This will help keep your phone water-resistant, but remember, your device’s IP rating might be a bit different after the repair. Need a helping hand? You can always schedule a repair. Let’s get this battery swap party started!
Step 1


Hey there! Let’s make sure that battery is a little bit low before we start. A full battery can be a bit sassy if it’s not handled carefully. Let’s keep things safe and drain it down below 25% before we get started. If you need help, you can always schedule a repair.
– First, let’s get started by completely powering down your phone and unplugging any cables, it’s time to begin your repair journey with Salvation Repair! If you need help, you can always schedule a repair
Step 2


Get ready to make the opening process a whole lot easier with our trusty Anti-Clamp tool! If you’re not using it, no worries – just skip ahead three steps for an alternative method.
Got a cracked screen? No problem! Just cover it with some clear packing tape to help the suction cup stick.
Want the full lowdown on using the Anti-Clamp? Check out our guide for all the details.
If your phone’s surface is too slippery for the Anti-Clamp to get a good grip, don’t stress – just add some tape to give it a bit more traction. And if you need help along the way, you can always schedule a repair with Salvation Repair.
– Let’s unlock those Anti-Clamp arms! Give that blue handle a good pull backwards.
– Now, slide those arms over either the left or right edge of your phone – you’re the boss!
– Time to get sticky! Position those suction cups near the bottom edge of your phone – one on the front, and one on the back.
– Squeeze those cups together to get a good grip. You’re almost there!
Step 3


– Give that blue handle a gentle tug forward to lock the arms in place. Nice and easy!
– Now, let’s get that handle spinning! Twist it clockwise a whole 360 degrees or until the cups start to stretch like a good pair of sweatpants.
– Keep an eye on those suction cups! They should be buddies, staying aligned. If they start to drift apart, just loosen them up a bit and guide them back into position.
Step 4


Take it easy! Don’t twist more than a half turn at a time and give it a minute to chill out. We want the Anti-Clamp and time to do the heavy lifting for you.
For an extra boost, try using a hair dryer or heat gun – just be careful not to overheat, as this can damage your display or battery. Take your time and proceed with caution.
If the Anti-Clamp isn’t creating enough space, don’t worry! Just apply a bit more heat to the area and give the handle a gentle clockwise turn – about half a turn should do the trick. If you need help, you can always schedule a repair
– First, give that iOpener a little heat and slide it right through the arms of the Anti-Clamp.
– Now, fold up that iOpener so it sits nicely along the bottom edge of the phone.
– Take a breather for a minute to let the adhesive get cozy and create an opening gap.
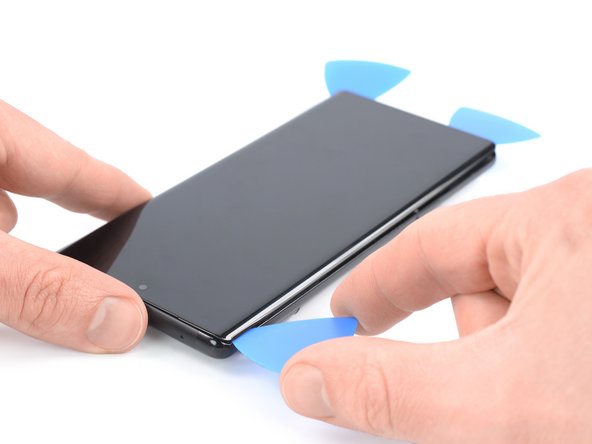
– Once the Anti-Clamp has done its job and opened up a nice space, slide an opening pick beneath the screen frame.
– Feel free to skip the next two steps if you’re ready to keep it moving!


Step 5

When it’s time to get your device warmed up, you can use a hair dryer, heat gun, or hot plate – just be gentle and avoid overheating. If you need help, you can always schedule a repair
– Time to get this repair started! Apply a heated iOpener to the screen for at least 3 minutes to loosen the adhesive underneath. If you need help, you can always schedule a repair
Step 6


– First things first, warm up that screen until it’s cozy to the touch. Next, grab a suction handle and stick it to the bottom edge of the screen.
– Give the screen a gentle lift along with its safety frame using the suction handle. This will create a tiny gap between the screen and the phone assembly.
– Now, slip an opening pick into that gap you’ve just made between the screen frame and the phone assembly.
– Slide that opening pick over to the bottom left corner of the screen to cut through the adhesive like a pro.
– Keep the opening pick right where it is to stop the adhesive from sealing back up. You’re on a roll!
Be sure to slide your opening pick into the perfect spot to keep the screen snug in its safety frame and not get cozy with the phone assembly instead.
If your screen’s looking like a spider web, don’t fret! Slapping on a layer of clear packing tape might just do the trick to help that suction handle stick like a champ. Got some heavy-duty tape? That works too, no suction handle necessary! And if all else fails, you can always glue that suction handle right onto the screen. Let’s get that screen fixed up!
Tools Used

Step 7


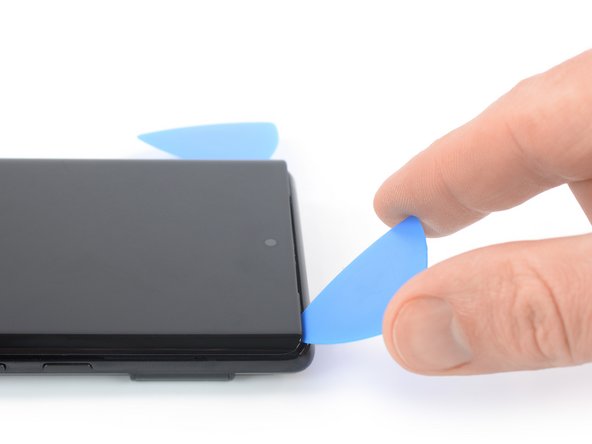
– Slide a second opening pick into the bottom edge and gently shimmy it over to the bottom right corner of the screen to cut through the adhesive.
– Keep that opening pick in place to stop the adhesive from sticking back together.
Step 8


The screen of the Google Pixel 6 Pro is held in place by adhesive and small plastic pins. If your opening pick gets stuck during screen removal, it’s likely because you inserted it too deep. Just insert the tip of the opening pick, about 3-4 mm, when slicing through the display adhesive. If you need help, you can always schedule a repair
– First up, slide a third opening pick into the cozy little space at the bottom left corner of the screen.
– Now, gently glide that pick along the left edge as you slice through the adhesive like a pro.
– To make sure the adhesive doesn’t get any funny ideas about re-sealing, just leave the opening pick nestled in the top left corner.
Step 9

When you’re slicing close to the front-facing camera, just slide in the tip of the opening pick (about 2-3 mm) to keep that camera safe and sound—no smudges or damage on our watch!
If the adhesive gets stubborn, don’t worry – it’s probably just cooled down. Give it a little love with your iOpener or heat gun for 1-2 minutes to warm it back up. If you need help, you can always schedule a repair
– Pop a fourth opening pick into the top left corner of the screen.
– Glide the opening pick along the top edge of the phone to slice through the sticky adhesive.
– Keep the opening pick chillin’ in the top right corner so the adhesive doesn’t reseal.
Step 10


Be careful not to completely remove the display just yet – it’s still connected to the phone’s internal assembly. If you need help, you can always schedule a repair
– Now it’s time to bring in the fifth opening pick – slide it along the right edge of your phone to carefully cut through the remaining adhesive. If you need help, you can always schedule a repair


Step 12

Hey there, those Pixel 6 Pro screws are a bit tricky, but don’t worry! A standard Torx bit will do the trick. Just keep a steady hand and push down gently. You don’t want to strip those screws. We wouldn’t want you to end up with a phone that looks like a swiss cheese! 😉
Speaking of keeping things in order, it’s time to play a little game of ‘Where’s Waldo’ with your screws. Make sure to remember where each one goes! It’s like a puzzle, but with tiny metal bits. If you need help, you can always schedule a repair.
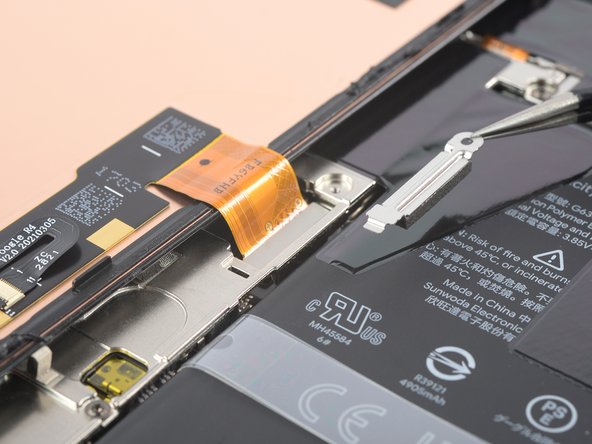
– Let’s loosen up that display cable metal bracket! Grab your trusty Torx T3 screwdriver and give those two 2.0 mm-long 3IP Torx Plus screws a little spin. You’ll be removing the bracket in no time.


Step 14


– Grab your spudger tool and gently pry up the display flex cable connector. Just give it a little lift to disconnect it from its socket. No need to get too forceful, we’re not trying to break anything here! If you need help, you can always schedule a repair
Tools Used

Step 15

Don’t forget to put that display cable bracket back in its spot! You’ve got this!
– First things first, gently take off that screen!
– Now, as you get ready to piece everything back together:
– If you’ve just swapped out the screen, double-check the spots for the front-facing camera and sensor cutouts—there might be some sneaky protective liners hiding there. Be sure to peel those off before you seal your phone up tight!
– Here’s a smart move: test your phone before putting it back together! Hook up your screen, power it on, and give it a whirl. If all looks good, switch off your phone, and disconnect the screen again before you carry on.
– Need help with those custom-cut adhesives? This guide’s got you covered!
– Using a pre-cut adhesive card? No worries! Just follow this guide.
– Installing a new screen? Don’t forget to check out this guide to calibrate that fingerprint sensor so it’s as good as new!
Step 16

Avoid putting heat directly on the battery, as it can lead to heat damage and might create a thermal situation. Keep it cool and safe, and if you need help, you can always schedule a repair.
– Time to warm things up! Get your iOpener or heat gun ready and give the back glass some loving. Focus on the areas where the graphite films meet the battery – we’re loosening that adhesive! Hold the heat for at least two minutes, letting the warmth do its thing. If you need help, you can always schedule a repair.
Step 17


Be super careful with that battery! Avoid puncturing or bending it with your tool—doing so could lead to some not-so-fun leaks of dangerous chemicals or even a thermal event. If you need help, you can always schedule a repair.
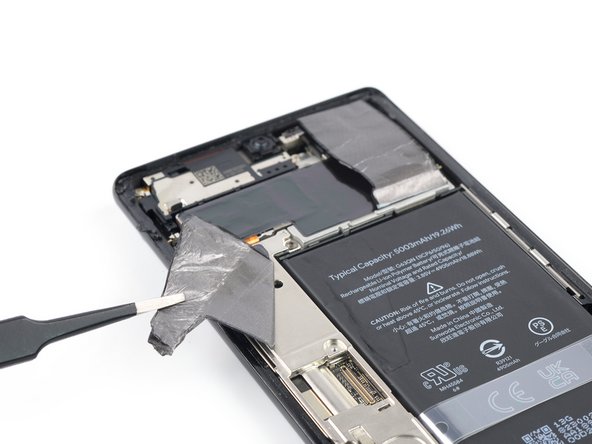
– Grab a pair of blunt nose tweezers or, if you’re feeling a bit adventurous, your clean fingernail! Gently peel off the black graphite film from the bottom edge of the battery and the motherboard shield. Easy peasy!
– Now, just go ahead and remove that pesky graphite film!
Tools Used
Step 18


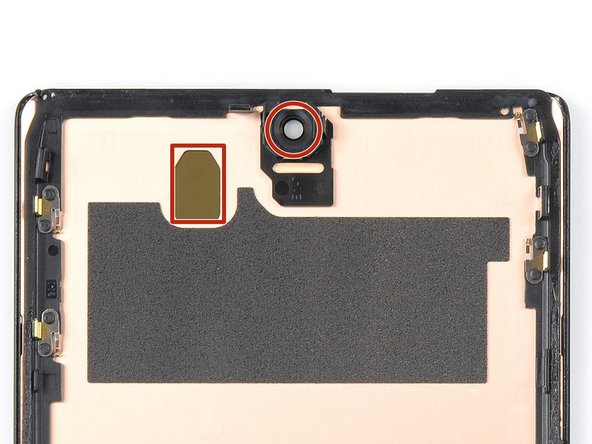
– Grab a pair of blunt nose tweezers or just use your clean fingernail, and gently peel away that black graphite film from the upper right corner of the battery. It’s like peeling a sticker – but keep it cool!
– Now, fold that graphite film toward the selfie camera. This is your ticket to getting easy access to the battery. You’ve got this!
Looking to replace some phone parts? No problemo! Just gently take off the bottom part of the graphite film if you’re swapping out the battery. For that rear camera, it’s a full removal mission. If the earpiece speaker or front-facing camera is on your fix list, feel free to keep it in place. And remember, if you need help, you can always schedule a repair!
Tools Used
Step 19


If the graphite film feels tough to peel off, don’t sweat it! It just needs a little heat. Warm up the rear glass with your iOpener or heat gun for 1-2 minutes and it should become more manageable. If you need help, you can always schedule a repair.
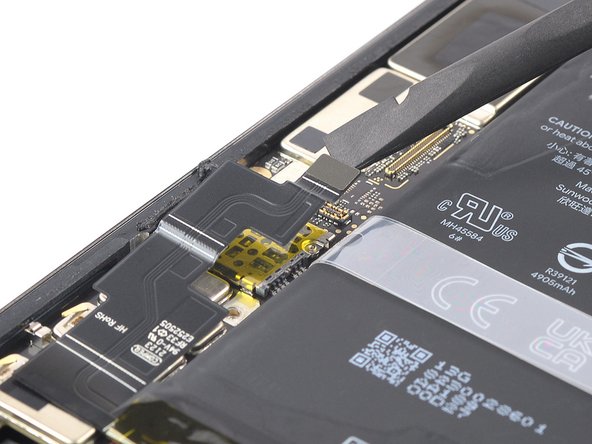
– Time to get up close and personal with your device’s internals. Use a pair of trusty blunt nose tweezers or a clean fingernail to gently pry the black graphite film off the left edge of the battery and the motherboard shield. Take your time and be careful – we’ve got your back. If you need help, you can always schedule a repair
Step 20

– Let’s get started! Use a Torx T3 screwdriver to carefully remove the two 5.1 mm-long 3IP Torx Plus screws that hold the charging port metal bracket in place. If you need help, you can always schedule a repair
Step 21


Don’t lose this little guy! You’ll need it when you put everything back together. 😎
– Time to get up close and personal with that charging port bracket! Use a trusty pair of tweezers to carefully remove it. If you need help, you can always schedule a repair
Tools Used
Step 22

– Grab your trusty Torx T3 screwdriver and get ready to unscrew those five 5.1 mm-long 3IP Torx Plus screws that are keeping that motherboard cover locked down tight.
Step 23


– Time to get up close and personal with your device’s internals! Use a pair of tweezers or your fingers to carefully pry off the motherboard cover. Remember to take your time and be gentle, and if you need help, you can always schedule a repair
Tools Used

Step 25


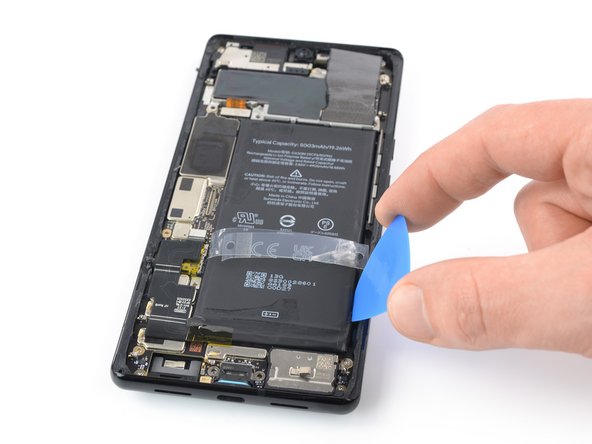
The adhesive is only hanging out beneath the top and bottom parts of the battery, so no worries about the center. That clear plastic strip wrapped around the center? Not too helpful for removing the battery, so feel free to say goodbye to it. Just pop it off, and you’ll have a much easier time handling the battery after peeling off its adhesive seal.
Now for a little prep work! To spread that isopropyl alcohol just right, you can either hold your phone in one hand while applying the alcohol with the other, or if you prefer, attach your suction handle to the back glass and let it work like a mini stand for your phone. Easy peasy!
– Tilt your phone assembly to about a 45° angle—just like you’re trying to catch a glimpse of the secret menu at your favorite cafe!
– Now, add a few drops of high concentration (over 90%) isopropyl alcohol into the gap between the motherboard and the top left and bottom left corners of the battery. It’s like giving your device a refreshing spa treatment!
Tools Used
Step 26


– Slide that opening pick into the cozy little gap at the top right corner of the battery and the midframe. It’s an easy squeeze!
– Now, give that battery a gentle nudge by tilting your pick downwards. Open up that gap and let the battery be free!

Step 28


If the battery is being stubborn and won’t budge with high concentration isopropyl alcohol (over 90%) alone, don’t worry – we’ve got a trick up our sleeve. Try combining it with some heat to loosen things up. Grab an iOpener and apply it to the rear glass for at least two minutes to help dissolve the adhesive underneath the battery. And remember, if you need help, you can always schedule a repair
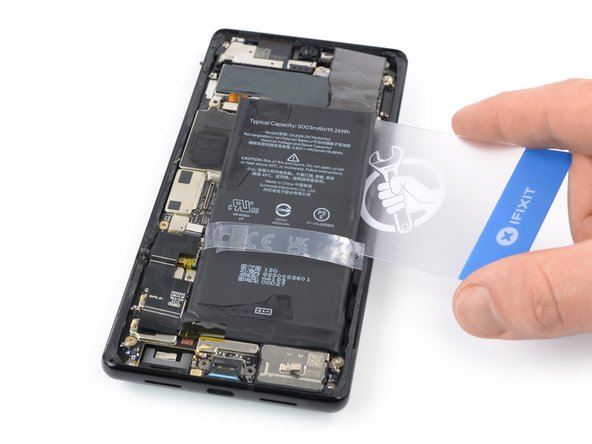
– Let’s get this battery out! Gently slip a plastic card underneath the right edge of the battery.
– Slide that card along the right edge to create some space between the battery and the midframe.
– Time to give that battery a little nudge! Use your plastic card to gently pry it up.
Tools Used
Step 29


Be safe out there! Don’t even think about reinstalling a damaged or deformed battery – it’s just not worth the risk. If you need help, you can always schedule a repair
– Time to give that battery a little TLC! Gently peel it off the remaining adhesive.
– Now, it’s time to say goodbye to the old battery – remove it!
– Get ready to welcome your new battery with open arms (or, you know, adhesive!). Secure the new battery with pre-cut adhesive or double-sided tape. Make sure it’s perfectly aligned – think of it as a dance! Apply the new adhesive into the device where the old adhesive used to be, not directly on the battery. Press the new battery firmly into place. You’ve got this!
– Just a quick tip for perfect placement! Temporarily reconnect the battery to the motherboard – think of it as a little dance rehearsal. Disconnect the battery once it’s snug and ready to go. If you need help, you can always schedule a repair