DIY Google Pixel 6 Screen Replacement Guide: Step-by-Step Tutorial
Duration: 45 minutes
Steps: 14 Steps
Welcome to Salvation Repair’s step-by-step guide! We’ve put together this easy-to-follow guide to help you repair your device. Learn more about our repair process at Salvation Repair.
Before you start, make sure to discharge your battery to 25% or less to avoid any potential risks.
Note: If you’re not comfortable with this repair, don’t worry! Our experts are here to help. If you need help, you can always schedule a repair.
Hey there, tech wizard! Ready to give your Google Pixel 6 a brand new look? This guide will walk you through replacing that cracked or broken screen with a fresh one, step-by-step! We’ll show you how to swap out the screen like a pro. If you’re working with a new fingerprint reader, be sure to recalibrate it for smooth operation. And remember, if you’re using an aftermarket screen, it’s good to double-check that the fingerprint recalibration tool will play nice. If your phone’s frame is a little out of shape, you’ll want to replace it, too. That’ll make sure your new screen sits snug and secure. Before you get started, let’s make sure the battery is powered down below 25% for safety. Just a little precaution. Heads up, this Pixel 6 has lasers inside, so be mindful of those when you’re taking things apart. We’ll make sure you swap out the screen like a champ, but if things get a little tricky, you can always schedule a repair. Hang in there, you got this!
Step 1


Before you start, make sure your battery is below 25% charged. We want to avoid any accidents, like a damaged battery catching fire. If you need help, you can always schedule a repair
– Alright, buddy, it’s time to take a little nap! Give your phone some ZZZs and don’t forget to say goodbye to those cables!
Step 2


The next three steps show off the Anti-Clamp, a handy tool we created to make opening your device a breeze. If you’re not using the Anti-Clamp, hop down three steps for an alternate method.
Got a cracked screen? Slap on some clear packing tape to help the suction cup stick.
Need the full lowdown on how to use the Anti-Clamp? Check out this guide.
If your phone’s surface is too slippery for the Anti-Clamp to grab onto, just use some tape to create a better grip.
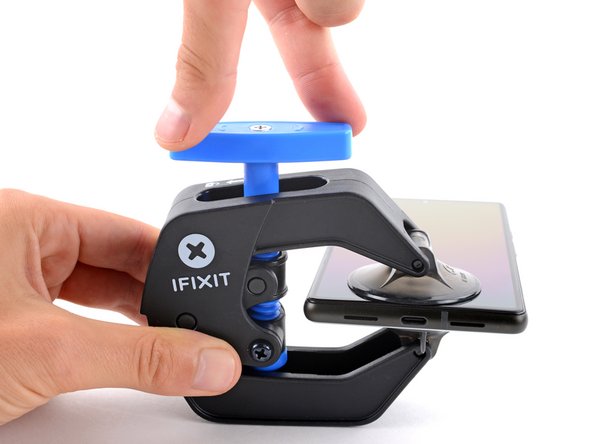
– Gently tug the blue handle back to release the Anti-Clamp’s arms—easy does it!
– Slide those arms over the left or right edge of your phone like you mean it.
– Place the suction cups close to the bottom edge of your phone—one on the front and one on the back, just chillin’.
– Give those cups a little squeeze to create some suction magic!
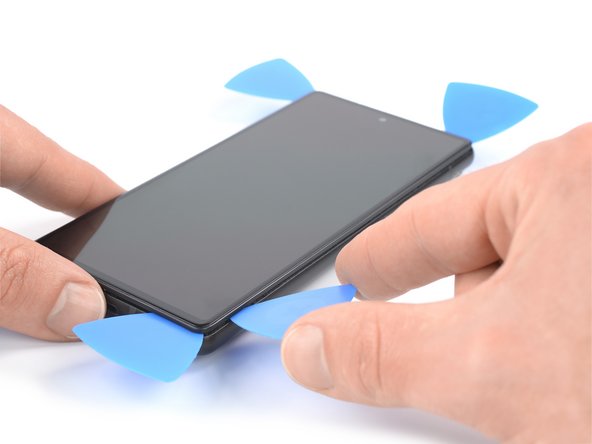
Step 3


– Give that blue handle a gentle pull forward to lock those arms in place!
– Now, twist the handle clockwise a full 360 degrees or until those suction cups start to stretch out a bit.
– Keep an eye on those suction cups to ensure they’re still buddies staying aligned. If they start to drift apart, just loosen them a tad and get those arms back in sync!
Step 4


Take your time with those turns—just half a twist at a time, and give it a minute to catch its breath between each one. Let the Anti-Clamp and a little patience handle the heavy lifting for you!
Need a little extra heat? A hair dryer or heat gun can help, just be cautious – too much heat can wreak havoc on your display or battery!
If the Anti-Clamp isn’t giving you the gap you need, no worries! Just heat the area a tad more and give that handle a half turn clockwise.
– Warm up your iOpener and thread it through the Anti-Clamp’s arms.
– Fold the iOpener so it rests on the bottom edge of your phone.
– Wait a minute for the adhesive to loosen up and create a gap.
– Slide an opening pick under the screen frame when the Anti-Clamp opens up a big enough gap.
– You can skip the next two steps.


Step 5

You can use a hair dryer, heat gun, or hot plate. Just make sure not to overheat your device!
Step 6


Hey, be careful with that opening pick! Make sure you’re sliding it in the right spot so you don’t accidentally separate the screen from the phone’s frame. You want to get that screen off smoothly, right? If you need help, you can always schedule a repair.
If your screen is badly cracked, don’t worry – we’ve got you covered. Try slapping a layer of clear packing tape over it to help the suction handle stick. If that doesn’t work, you can use some seriously strong tape as a substitute. And if all else fails, a tiny bit of superglue can be used to attach the suction handle to the screen. If you need help, you can always schedule a repair
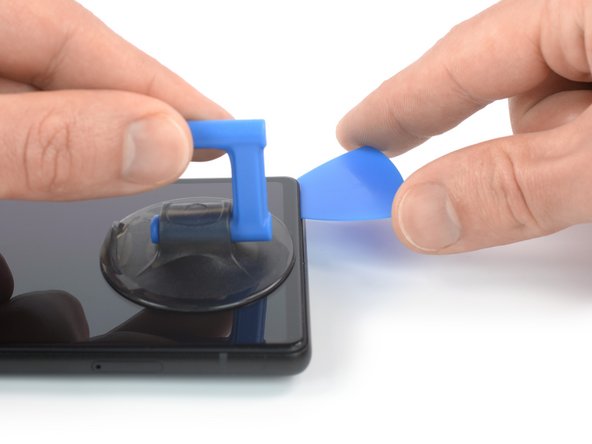
– Get that screen warm to the touch, then grab your trusty suction handle and attach it to the bottom edge – it’s go time!
– Use the suction handle to carefully lift the screen, along with its safety frame, and create a small gap between the screen and the phone assembly. You’re making progress!
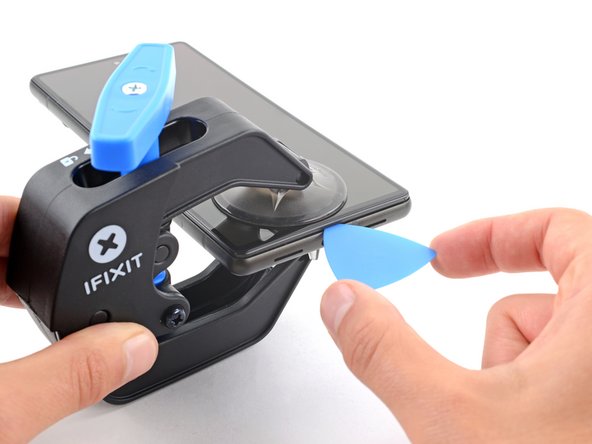
– Now it’s time to bring in the opening pick – insert it into the gap between the screen frame and the phone assembly, and get ready to release that screen.
– Gently slide the opening pick to the bottom right corner of the screen, slicing through the adhesive as you go. You’re almost there!
– Leave the opening pick in place to keep that adhesive from resealing, and take a moment to pat yourself on the back – you’re doing great! If you need help, you can always schedule a repair
Tools Used

Step 7


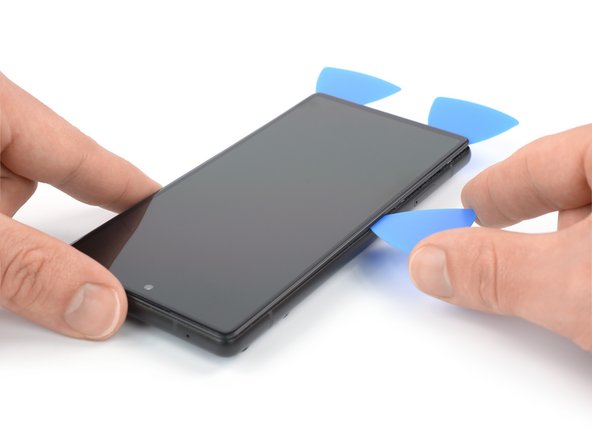
– Grab a second opening pick and gently slide it into the bottom edge, making your way over to the bottom left corner of the screen to slice through that adhesive like a pro!
– Keep that opening pick right where it is to stop the adhesive from trying to seal back up. You’ve got this!
Step 8


– The Google Pixel 6 screen’s held in place by some sticky stuff and little plastic clips. If your opening pick gets stuck during the screen removal, it means you went a bit too deep. Just insert the tip of the pick (3-4mm) when you’re slicing that adhesive.
– Now, slide a third opening pick underneath the bottom left corner of the screen.
– Slide that pick along the left edge of the screen to cut through the adhesive.
– Leave the opening pick in the top left corner to stop the adhesive from sticking back together.
Step 9


When you’re getting close to that front-facing camera, just slide in the tip of your opening pick (about 2-3 mm) and keep it gentle – nobody wants to smudge that lens or cause any damage. You’ve got this!
If the adhesive gets stubborn and hard to cut, don’t worry – it’s probably just cooled down. Give it a little love with your iOpener or heat gun for 1-2 minutes to warm it back up. If you need help, you can always schedule a repair
– Let’s get this party started by sliding a fourth opening pick into the top left corner of your screen.
– Now, gently slide the opening pick along the top edge of your phone, like a little dance across the adhesive.
– Leave the opening pick chilling in the top right corner to keep that sticky stuff from getting too cozy.
Step 10

Be careful not to completely remove the display just yet – it’s still connected to the phone’s internal assembly. If you need help, you can always schedule a repair
– Now, it’s time to release that last bit of adhesive holding the back cover on! Slide a fifth opening pick along the phone’s right edge, gently cutting through the remaining adhesive. You’re almost there! If you need any help along the way, you can always schedule a repair.
Step 11


Be gentle with that display cable while you’re doing your thing! No need to put it under strain. You’ve got this!
– Gently swing open the right side of the screen towards the left side of the phone assembly, kind of like you’re opening a book. Take your time and be careful not to apply too much pressure.


Step 13
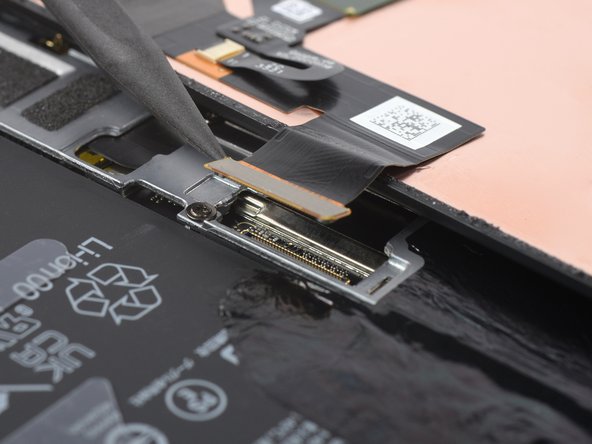

– Time to give that display cable a little nudge! Carefully use your spudger to gently pry the connector straight up from its socket. Think of it as a little dance move for the cable. If you need help, you can always schedule a repair.
Tools Used

Step 14

– Start by gently taking off the screen.
– Now, as you prepare to put things back together:
– If you swapped out the screen, take a peek at the front-facing camera hole on the new screen and make sure to peel away any leftover protective liners in there.
– Here’s a great chance to give your device a quick test run! Temporarily attach your screen, power up your device, and see if everything is running smoothly. Before diving back into reassembly, just remember to power down your device and disconnect the screen.
– If you’re working with custom-cut adhesives, check out our guide for tips on using them.
– For those using a pre-cut adhesive card, we have guidance for that too!
– Installing a new screen? Be sure to follow our instructions on calibrating that fingerprint sensor for optimal performance.
