Google Pixel 5a Camera Replacement Guide
Duration: 45 minutes
Steps: 28 Steps
This repair guide has been crafted with care by our super awesome technicians at Salvation Repair, not necessarily endorsed by Google, and is here to help you get your device back in action without any fuss!
Alright, tech-savvy friend, ready to tackle your Google Pixel 5a’s rear camera? Let’s get this show on the road! Before we dive in, just a friendly heads-up: make sure that battery is chillin’ below 25%. It’s all about keeping things safe and sound. A drained battery makes for a happy (and safer) repair. If your battery is looking a little puffy, don’t sweat it! Just be extra careful and you’ll be good to go. Got any questions or need a helping hand? You can always schedule a repair with us. We’re here to help you through this, step by step!
Step 1
Before you start, make sure your device is completely powered off – it’s an important safety step.
Now it’s time to carefully pry the screen up and remove it from your phone. Take a minute to read through the next few notes to ensure a smooth repair process. If you need help, you can always schedule a repair.
– Okay, cool beans, let’s check out those edges on your phone!
– There are two seams we gotta be aware of:
– Screen seam: This is where the screen meets the rest of the phone. Leave it alone, it’s not for prying.
– Bezel seam: This is where the plastic bezel, protecting your screen, meets the frame. It’s held in place by some tiny plastic clips. This is where we’ll start prying. No worries, you got this!
Step 2
That sticky stuff holding everything together can be a tough cookie! You might need to give that iOpener a few rounds to loosen it up.
You can also try a hair dryer, heat gun, or even a hot plate, but be careful, okay? Overheating your phone can be bad news for the display and battery. If you need help, you can always schedule a repair
– Get that iOpener nice and toasty and hold it against the right edge of the display for a minute. This will loosen up the adhesive and make things a little easier.
Tools Used
Step 3
Alright, let’s get this screen out! You’ll want to slide those opening picks between those little black clips holding the bezel to the midframe. It’s like giving the screen a little tickle! If you need help, you can always schedule a repair.
– Okay, let’s see where we can get in there. We’re gonna need to know what’s the best way to open up this device. Time to figure out those entry points!
Step 4
Hey, so if your screen is cracked and you need help getting a good grip, try covering it with some clear packing tape. This’ll help the suction cup stick better. If that doesn’t work, try some super strong tape instead. If you’re really stuck, no worries! You can always superglue the suction cup to the screen. If you’re not comfortable with any of this, you can always schedule a repair with us!
– Grab that suction cup and place it as close to the right edge of the screen as you can manage!
– Now, give that suction cup a solid lift with a steady motion until you see a little gap appear between the bezel and midframe. You’ve got this!
Step 5
– Let’s get that phone open! Slide the tip of your opening pick into the seam between the bezel and the phone. Aim for about 4-5 cm from the bottom. You’ve got this!
Alright, let’s get this bezel party started! The bezel is held in place by a bunch of little plastic clips along the edges. To release it, you’ll need to gently pry it off with an opening pick. Just work your way around the seam, and you’ll be good to go. If you’re feeling a little unsure, don’t worry – you can always schedule a repair with us.
Step 6
– Slide the tip of your trusty opening pick into the bezel seam, about 3-4 cm down from the top of your phone. You’ve got this!
Step 7
If you’re finding this step a bit tricky, don’t worry! Just glide the pick along the top right corner of your phone until you create a nice little gap at the top for the opening pick to slip in.
– Gently slide the tip of your trusty opening pick into the seam at the top of the phone’s bezel. You’ve got this!
Step 8
Hey there! If you’re finding this step a bit tricky, no worries! Just gently slide that handy-dandy pick along your phone’s bottom right corner until you create a nice little gap at the bottom. You’ve got this, buddy! And remember, if you need help, you can always schedule a repair
– Let’s get started by inserting the tip of an opening pick into the bezel seam at the bottom of the phone. Take your time and make sure it’s securely in place.
Step 9
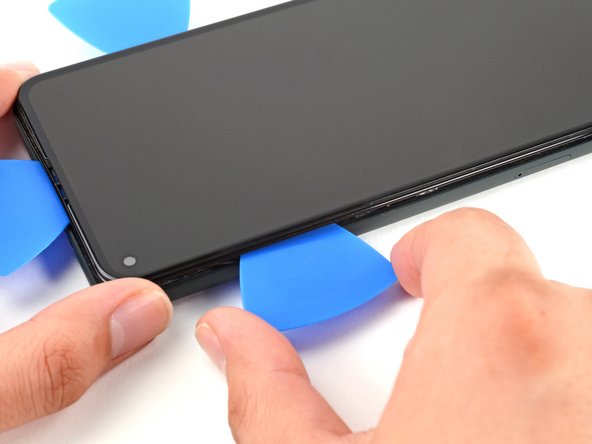
– Slide the tip of your opening pick into the bezel seam on the left side of the phone, about 2 cm from the bottom. Easy peasy, lemon squeezy! If you need help, you can always schedule a repair.
Step 10
– Let’s get that device open! Slide the tip of your opening pick into the bezel seam, about 3-4 cm below the front-facing camera. You’ve got this! If you need help, you can always schedule a repair
Step 11
– Take a moment to pop off all those clips. If there’s any stubborn adhesive left, just slice it away with your trusty opening pick.
– Now, gently open the device from the right side, just like flipping open a book!
Step 12
Alright, let’s keep those screws organized! We don’t want to lose track of any little fellas. Make sure each one goes back where it came from, just like we were playing a game of screw Tetris! Don’t worry, you’ve got this. If you need a helping hand, you can always schedule a repair with us!
– Grab your trusty T3 Torx driver and give those 4.6mm-long screws securing the screen connector bracket a little spin to loosen ’em up. You got this!
Step 13
– Here’s to you, screen connector hero! Grab those tweezers and let’s make this bracket removal an awesome journey to victory! Need a hand? We’ve got you covered!
Tools Used
Step 14
– Use your trusty spudger to carefully pry up and disconnect the screen flex cable – it’s like a little wake-up call for your device!
– To reattach those pesky press connectors, line them up just right and gently press down on one side until you hear that satisfying click. Then, repeat the process on the other side. Remember, don’t press down on the middle or you might end up with bent pins and a world of trouble. If you need help, you can always schedule a repair
Tools Used
Step 15
Don’t forget to pop that screen connector bracket back in place!
– Let’s get started by removing the screen from your phone – it’s the first step to getting it back in working order.
– When you’re putting everything back together, keep the following tips in mind:
– If you’ve replaced the screen, take a moment to check the front-facing camera hole and remove any protective liners that might be covering it.
– Using a custom-cut adhesive? No problem – just follow our guide to apply new screen adhesive like a pro.
– Tesa tape more your style? We’ve got you covered – follow our guide to reattach the screen with ease.
– After you’ve finished reassembling your phone, it will go through a calibration sequence during the boot-up process. Just let it do its thing – don’t touch the screen until it’s done, or you might end up with some touch issues. And if you need help at any point, you can always schedule a repair with Salvation Repair.
Step 16
– Grab your trusty T3 Torx driver and get ready to tackle those six screws holding the midframe snugly against the motherboard!
– Keep an eye on those screws, as they come in different lengths. It’s a good idea to keep them organized so you’ll know just where to put each one back.
– Four screws are 4.6 mm long,
– One screw measures in at 4.0 mm, and
– You’ve also got one tricky little 2.0 mm screw to watch out for.
Step 19
– Grab your trusty tweezers and gently lift the tape that’s hiding those two screws holding the charging port bracket in place. You’ve got this!
Tools Used
Step 20
– Grab your trusty T3 Torx screwdriver and give those last four screws holding the midframe to the motherboard a little spin! It’s a breeze, trust us. You’ve got this! You’ll see three 4.6 mm screws and one 4.0 mm screw. Easy peasy! If you need help, you can always schedule a repair
Step 21
Be careful not to poke or bend the battery with your tool – you don’t want to make it leak any nasty stuff or start a fire! If you need help, you can always schedule a repair
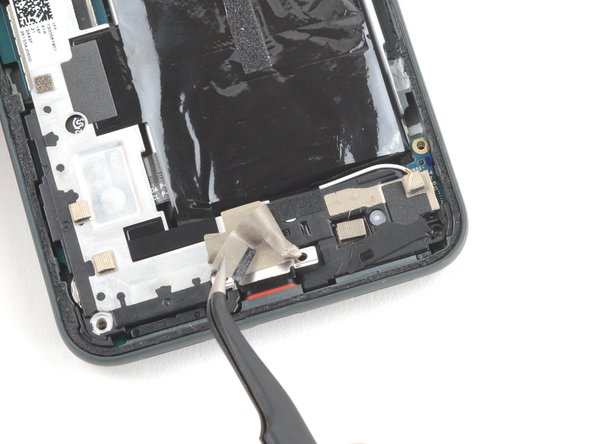
– Now, grab your trusty spudger or tweezers and gently peel back the tape holding the charging port bracket to the speaker assembly. It’s like giving a little hug, but with tools! If you need help with this step, you can always schedule a repair
Step 23
– Alright, let’s get this midframe party started! Grab that spudger and slide the pointed end under the top right corner of the midframe. You’ll feel a little give, don’t worry.
– Now, there’s a little black plastic clip up top holding this midframe in place. Use your spudger to give it a gentle pull down, and then pry it up. You’re almost there!
Tools Used
Step 25
– Hey, you’ll see two little plastic buddies holding the midframe together. Keep a close eye on them, they’re like tiny escape artists. Don’t worry, we’ll get them back in their spots when we put everything back together. Just remember where they go!
Step 27
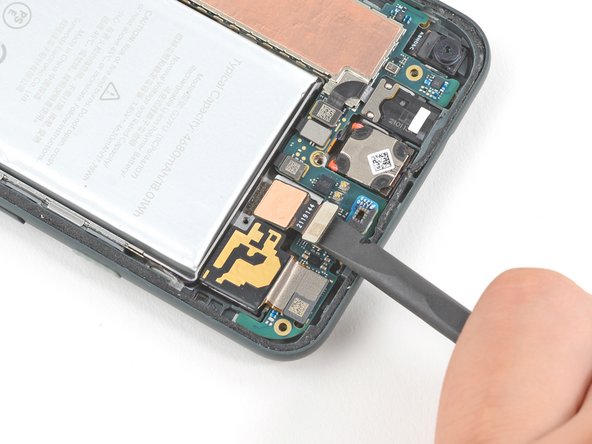
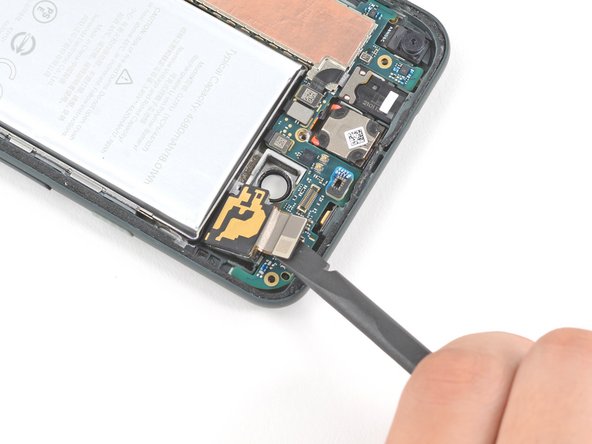
– Time to get that camera disconnected! Use your trusty spudger to gently pry up on the 16 MP Ultrawide camera’s connector – it’s time to set it free.
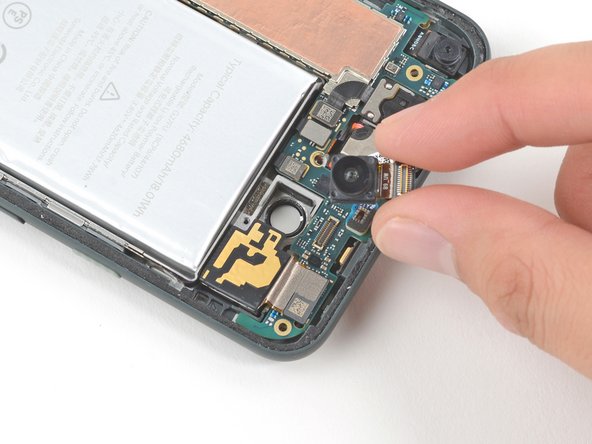
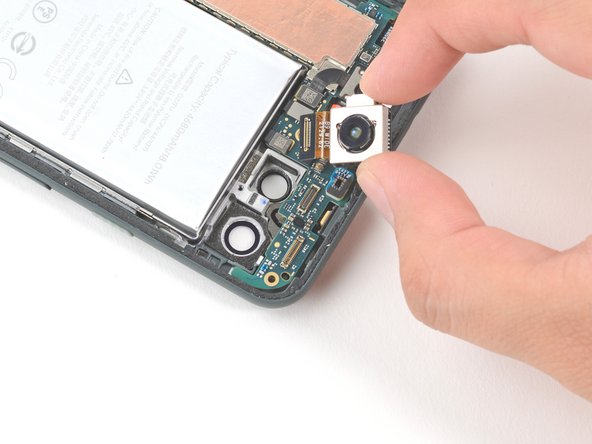
– Now that the connector is out of the way, you can remove the 16 MP Ultrawide camera. If you need help, you can always schedule a repair
Tools Used


