DIY Google Pixel 4 XL Back Panel Replacement Guide
Duration: 45 minutes
Steps: 21 Steps
This guide is crafted by the talented folks at iFixit, and while we’re all about helping you out, this isn’t officially backed by Google. But don’t worry, you’ve got this!
Hey there! Ready to dive into some repair magic? This guide is brought to you by the awesome folks at Salvation Repair, and while Google hasn’t given it a thumbs up, we’re here to help you out! In this step-by-step journey, you’ll learn how to take off or swap out the back glass panel on your Google Pixel 4 XL. Just a heads up: the wireless charging coil, LED flash, and NFC hardware are all snugly attached to this panel, so they’ll come off as one happy family. If your shiny new replacement doesn’t come with these parts already in place, you might need to do a little part transferring from the original panel. Remember, removing that back glass is your ticket to accessing all the internal goodies. If you need help, you can always schedule a repair!
Step 1
– Grab your trusty SIM eject tool, a little screwdriver, or even a straightened paperclip and slide it into that tiny hole on the SIM card tray located on the left edge of your phone.
– Give it a good press, and watch the tray pop right out!
– Now, gently pull out the SIM card tray.
Step 2
You can also use a hair dryer, heat gun, or hot plate, just make sure to keep an eye on the temperature! Overheating your phone can lead to some serious heat damage for both the display and the internal battery, and we definitely want to avoid that. Stay cool while you heat things up! If you need help, you can always schedule a repair.
– Get your trusty iOpener ready and slap it on the bottom edge of the back panel, giving it a cozy minute to warm things up.
Tools Used
Step 3
If your back glass is badly cracked, don’t worry – we’ve got you covered. Try slapping a layer of clear packing tape over it to help the suction cup stick. If that doesn’t work, you can use some seriously strong tape as a substitute. And if all else fails, a tiny bit of superglue can help the suction cup stay put on the broken panel. If you need help, you can always schedule a repair
– Get ready to give that back panel a little love! Apply a suction cup to the heated edge – stick it as close to the edge as you can. Give it a good press to get a strong grip on the back panel.
Step 4
Hey, depending on how old your phone is, this might be a little tricky. If you’re struggling, just add a bit more heat to the edge and give it another go. You got this! If you need help, you can always schedule a repair.
– Give that suction cup a good, firm tug to open up a little space between the back panel and the frame. You’ve got this!
– Slide the tip of an opening pick into that newly created gap and keep moving forward.
Step 5
– Gently glide your trusty opening pick along the bottom edge towards the left corner to cut through that pesky adhesive.
– While keeping the pick in place, smoothly transition it from the bottom left corner all the way to the bottom right corner to ensure the adhesive is fully sliced.
– Keep that pick snugly in the bottom right corner to stop the adhesive from re-sticking like a clingy friend.
Step 6
– Get ready to unlock your phone’s full potential – start by heating up an iOpener and applying it to the left edge of your phone for about a minute. If you need help, you can always schedule a repair
Tools Used
Step 7
– Slide a second opening pick under the back panel right over the charge port, just like sliding into a cozy seat.
– Now, glide that opening pick down to the bottom left corner of the phone, as if you’re dancing your way to the finish line.
Step 8
The adhesive can be a bit sticky. Wiggle the pick back and forth like you’re sawing through butter to make slicing a breeze.
– Alright, let’s get this party started! Gently slide the opening pick around the bottom left corner and across the left side of the phone. It’s like a tiny dance party for your phone’s adhesive.
– Keep sliding until you reach the top left corner, near the camera, and leave the pick in place. You’re doing great!
Step 9
– Get ready to unlock your phone’s full potential – start by heating up an iOpener and applying it to the right edge of your phone for about a minute. If you need help, you can always schedule a repair
Tools Used
Step 10
– Now that you’ve got two opening picks in place, it’s time to bring in the third pick to help with the lower part of the righthand side.
– Gently slide the opening pick upwards towards the top of the phone, carefully cutting through the adhesive on the right side.
– When you reach the top right corner, stop and leave the pick in place – you’re making great progress! If you need help, you can always schedule a repair
Step 11
– Now, let’s get that last bit of adhesive off. Slide your opening pick around the top right corner and across the top side of the phone, cutting through the remaining adhesive. It’s like a little dance for your phone’s case!
Step 12
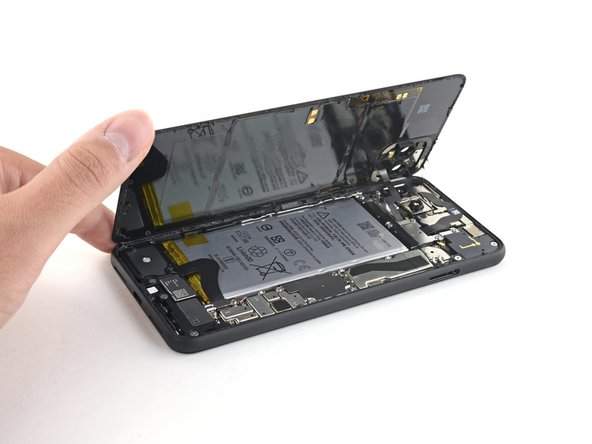
– Now that you’ve skillfully cut around the edge of the phone, gently lift the right side of the back cover as if you’re opening a book on a lazy Sunday morning.
– Just a heads up, don’t try to yank the panel off completely yet; it’s still holding on tight to the phone like a loyal friend.
Step 13
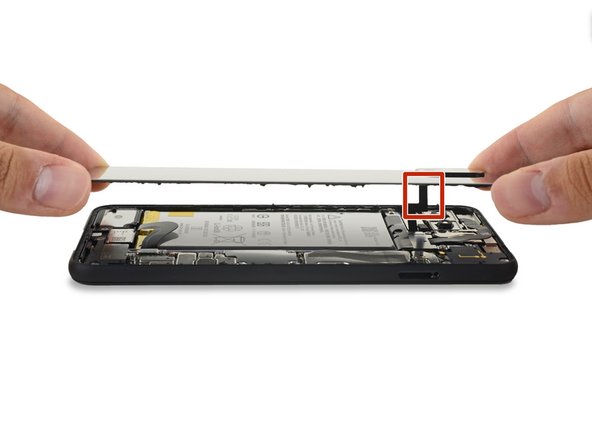
– Now it’s time to swing that back panel open – just be gentle and make sure it’s resting comfortably on the left edge of your phone. Don’t put any stress on that delicate ribbon cable, okay?
– Before you seal everything up, take a minute to power on your phone and test all the functions. Make sure everything is working smoothly, then power it back down before moving forward. If you need help, you can always schedule a repair
Step 14
Stay organized during this repair by keeping track of each screw and making sure it ends up back in its original spot. If you need help, you can always schedule a repair
– Alrighty, tech lovers! Time to take off the battery connector shield and unscrew those little guys holding it in place. Start with the T3 Torx screws – remove ’em all. Then move on to those 1.8mm, 4.1mm, 4.4mm, and 4.0mm screws. Unfasten those too! Think you can handle it? If you need help, you can always schedule a repair with our awesome repair team!
Step 15
– Time to get up close and personal with those tiny parts! Use a trusty pair of tweezers to carefully remove the battery connector shield. If you need help, you can always schedule a repair
Tools Used
Step 16
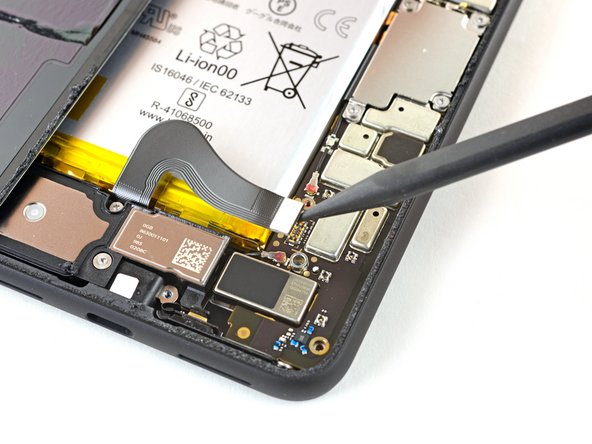
– Grab your trusty spudger and gently nudge the battery connector straight up from the motherboard—this will disconnect the battery. Easy peasy!
– When it’s time to reconnect, align those connectors perfectly, then gently press down on one side until you hear that satisfying click. Do the same on the other side, but steer clear of the middle—pressing there can lead to bent pins and a sad phone. If things don’t line up just right, don’t fret, just readjust!
Tools Used
Step 18
– Let’s get started! Use a T3 Torx driver to remove the two 4.1 mm screws that hold the back panel connector cover in place. If you need help, you can always schedule a repair
Step 21
– Kick off by gently taking off the back panel. It’s like opening a gift, but this one has goodies inside!
– When it’s time to put things back together, just refer to this guide for installing those custom-cut adhesives tailored for your device. You’ve got this!
– If you’re rolling with a pre-cut adhesive card, just follow this guide to get it right. Easy peasy!


