Replace Google Pixel 3a XL Camera: DIY Guide & Tutorial
Duration: 45 minutes
Steps: 26 Steps
Welcome to Salvation Repair’s step-by-step guide for repairing your device. Please note that this guide was created by our team and hasn’t been officially endorsed by the manufacturer. For more information about our repair guides, click here.
Be careful when handling the display panel of your Pixel 3a XL, as it’s pretty fragile and can break easily. If you need help, you can always schedule a repair
Yo! This guide will show you how to swap out the main camera on your Google Pixel 3a XL. We’re talkin’ about the rear-facing camera, the one that takes those sweet pics! Keep in mind, the Pixel 3a XL’s screen is pretty delicate, so be careful when taking it apart. If you’re planning on using your original screen after the repair, make sure to pay attention to the instructions we give you for opening the device. If you need help with your repair, you can always schedule a repair.
Step 1


– Hey there, let’s get this screen off! First, take a peek at the back of your phone – you’ll see the screen in this step, right?
– Now, check out the two seams that run along the edge of the screen. See how they’re different?
– There’s a tiny gap between the edge of the screen and the OLED panel under the glass. If you’re planning to reuse this screen, be super careful – follow these instructions closely!
– The screen seam is where the screen meets the phone. This is where you’ll separate the screen and where you’ll be prying.
– The midframe seam is where the midframe meets the body of the phone. This is held down by screws. Don’t even think about prying at this seam.
Step 2


– Let’s get this screen off! Place a suction cup on the right edge of the screen, right below the volume button.
Step 3


Now it’s time to get a little tricky – carefully insert an opening pick between the screen and the plastic body of the phone. Take your time and make sure everything is aligned properly. If you need help, you can always schedule a repair
– Hey there! Just a heads up, if you’re not careful, that plastic opening tool could cause some trouble for the delicate OLED display hiding under the glass.
– Want to keep your phone’s screen intact? Make sure to slide your pick in at a downward angle, just like in that second photo of this step.
– Doing this will help the opening pick glide under the OLED panel instead of wedging between the glass and the panel, which is a recipe for disaster for your screen.
Step 4


Now that you’ve got an opening pick in place, it’s time to ditch the suction cup!
– Give that suction cup a good, firm pull to create a little space between the screen and your phone. You’ve got this!
– Slide your opening pick into that gap you’ve just made. Keep it steady!
– If you feel the pick bumping into something, pause for a moment. It might be pressing against the edge of the OLED panel. Just angle the pick down a bit and give it another go!


Step 7


Alright, cool cats, check out this gap between the screen and the glass. You’ll notice it’s bigger on the top than the sides. We’re just getting started!
– Gently glide your opening pick around the top-right corner of your screen, taking your time to be careful.
– If you’re planning to bring your screen back to life by reusing it, please be extra cautious here! Keep your pick nestled below the OLED display (check out the photos for guidance) or just slide it in about 5 mm to dodge any contact with the display hiding under the glass.
Step 8


As you glide along this edge, you might encounter the camera and proximity sensor hanging out here. No need to be forceful, just navigate around them.
Step 9


– Gently slide your opening pick down the left side of the phone to coax apart that stubborn adhesive. Remember, you’re doing great!
Step 10

– To give your screen a second chance, warm up the bottom edge of your phone using an iOpener, a heat gun, or even a trusty hair dryer. This will help loosen the adhesive before you start slicing away.
Tools Used
Step 11


Alright, check out that gap between the screen and the edge! It’s a little bigger here than on the sides. Don’t worry, we’ve got this! If you need help, you can always schedule a repair.
– Glide your opening pick along the bottom edge of your phone to peel away the last bit of adhesive keeping the screen stuck.
– Hold up! The screen’s still tethered to the phone by a display cable.
– If you’re planning to keep your screen, take extra care here. Either keep your pick deep under the OLED display (like in the photos) or just slide it in 5 mm to dodge the display beneath the glass. If you need help, you can always schedule a repair.
Step 12


Step 14

These little screws play a bit of a trick on ya, but don’t sweat it! Sometimes it’s a T3, sometimes it’s a T4, but that’s why we’re here to help. If you’re really stuck, just remember, schedule a repair and let the pros do their thing!
– Let’s start by gently taking out those two 4.3mm T3 screws that are keeping the display cable bracket snug and secure.
– As you work through this repair, be sure to keep a close eye on each screw. It’s important they find their way back to their original homes!
Step 15


Hey, when you’re unplugging things like these connectors, be extra careful not to bump those tiny parts around the socket. They’re delicate little things!
– Alright, let’s get that display cable bracket out of the way. It’s time to give it the boot!
– Now, grab your spudger and gently pry up the cable connector. Think of it as a little dance – just a little wiggle and it’ll be disconnected!
– Okay, time to reconnect that connector. Think of it like a puzzle! Carefully align the sides, press down on one side, click, then repeat on the other. No pressing down on the middle, though – we don’t want to bend those pins, right? If you’re not feeling confident, you can always schedule a repair
Tools Used

Step 16

– Time to get that screen outta there! Carefully remove it from the phone.
– Now, let’s compare your shiny new replacement part to the original. You might need to move some components like the speaker grille and camera bracket over to the new part. It’s like a little part swap party!
Step 17


– Alright, let’s get this screen back in place! It’s time to reinstall that screen.
– Once you’ve put everything back together, your screen will go through a little calibration dance during the boot-up process. Don’t touch the screen during this dance party, or you might end up with some funky touch issues.
– Grab your trusty tweezers or an opening tool and give those adhesive remnants on the phone frame a good cleaning. You can use some high-concentration isopropyl alcohol to help get those sticky bits off.
– If you’re planning on re-using the screen, be sure to give it a good clean too. Remove all that sticky stuff and be careful with any metal tools so you don’t scratch the screen.
– Now, let’s get that screen back where it belongs. Apply some pre-cut adhesive or double-sided tape (like Tesa tape) to re-attach it to the frame. You’ve got this! If you need help, you can always schedule a repair
Tools Used
Step 18

Sometimes, those T3 screws can be a little stubborn! You might find a T4 Torx driver fits a bit better. No worries, it’s all good.
– Let’s tackle those 4.3mm screws! Start by removing these little guys:
– As you work through this repair, remember to keep an eye on each screw. They’ll want to go back to their original spots!
– 14 shiny silver T3 Torx screws
– 2 sleek black T3 Torx screws
Step 19


Those plastic clips are holding on tight, but we can handle it! Let’s get this midframe out!
– Slip an opening pick into the space at the bottom of your phone. No need to be shy!
– Gently slide the pick along that seam to pop open the clips holding the midframe snugly in place. You’ve got this!
Step 20


After you’ve popped those clips loose at the bottom of the phone, just grab your trusty opening pick and let it work its magic on the rest of the clips. You’ve got this!
– Let’s get this phone open! Slide the opening pick along the left and right edges of the phone to release those midframe clips.
– Now, gently lift up the bottom edge of the midframe. Don’t go all the way just yet, though – there’s still a delicate cable connecting the midframe to the phone.
Step 21


– Time to get up close and personal with your device’s internals. Use a trusty spudger to carefully pry up and detach the proximity sensor cable from the motherboard. If you need help, you can always schedule a repair
Tools Used
Step 22

– Pop the midframe off the phone.
Step 23


– When putting everything back together, line up the top edge of the midframe with the top of your phone. Then, use a spudger to gently nudge the proximity sensor cable connector into place. It’s all about finesse here!
– Take your time and be patient – it might take a little bit of wiggling to get the connector to fit snugly into its socket. If you’re having trouble, you can also use your finger to give it a gentle push. And remember, if you need help, you can always schedule a repair
Tools Used
Step 24


– Let’s disconnect that battery! Grab your spudger and gently pry up the battery connector. It’s like a little dance – give it a little wiggle and it’ll pop right off. If you need help, you can always schedule a repair.
Tools Used
Step 25


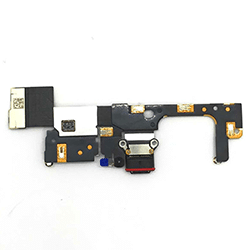
– Now, grab that spudger tool – you know, the one with the pointy end. Use that to gently pry up the camera cable and disconnect it from the motherboard. It’s like giving the camera a little high-five to say goodbye for now.
Tools Used
Step 26

– Time to give that camera a little vacation! Carefully remove it from your phone.
– If your replacement camera module is feeling a little fancy and has a plastic spacer, give it a quick send-off before you install the module.
– When you’re putting everything back together, make sure there’s no dust or debris hanging around between the camera lens and the phone’s clear camera hole. We want a clear view, right?