Google Pixel 3a Battery Replacement Guide: DIY Step-by-Step Tutorial
Duration: 45 minutes
Steps: 26 Steps
This repair guide comes straight from the talented folks at iFixit, and while it’s not officially backed by Google, it’s packed with helpful tips! Want to dive deeper? Check out our repair guides here.
Safety first! Make sure to drain your battery to below 25% before you start taking apart your phone. It’s a smart move!
Heads up! The Pixel 3a’s display panel is a bit delicate, so handle it with care.
Welcome to your go-to guide for safely removing the lithium-ion battery from your Pixel 3a! Just a heads up, this guide is brought to you by the awesome folks at Salvation Repair, and while we love sharing our expertise, we’re not backed by Google. Before diving in, if your battery looks swollen, make sure to take all the necessary precautions. For your safety, it’s best to drain your battery to under 25% before you start taking your phone apart. This helps prevent any unexpected thermal surprises if the battery gets damaged during the process. Remember, the Pixel 3a’s display is a bit of a diva, so handle it with care! If you’re planning to reuse the screen, keep a close eye on the warnings in the opening procedure. And if you ever feel stuck, don’t hesitate to schedule a repair for professional help!
Step 1


– Alright, let’s get this phone open! First, take a peek at the seams on the phone. We’re gonna be working around these bad boys.
– Before we start prying, let’s talk about the screen. There are a few important areas to keep in mind.
– Screen seam: This is where the screen meets the rest of the phone. This is where you’ll want to carefully pry.
– Frame seam: This is where the plastic frame meets the back cover. It’s held in place by screws. Don’t even think about prying here!
– Screen flex cable: You gotta be careful, Don’t pry any deeper than we tell you, or you might accidentally damage this cable.
– Adhesive perimeter: Stick to the narrow perimeter around the screen. If you start prying beyond that, you might damage the display. Don’t worry, we’ve got you covered! If you need help, you can always schedule a repair.


Step 3


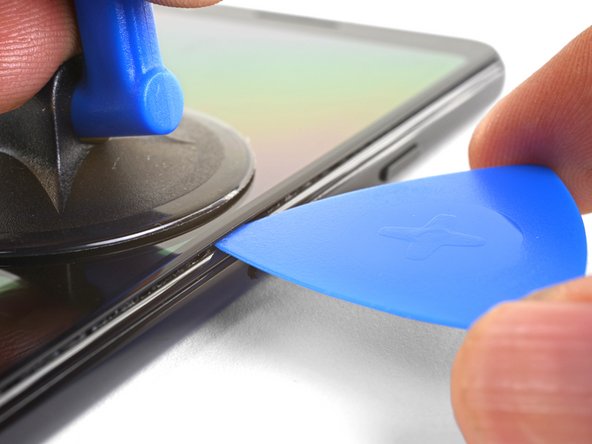
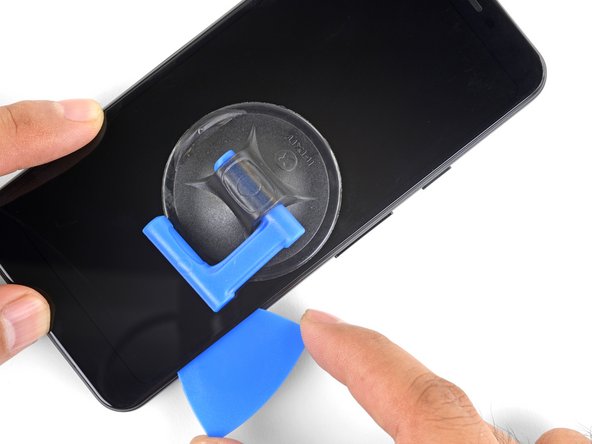
– Let’s get this screen party started! Place a suction cup near the right edge of the screen.
– Now, pull on that suction cup with a nice, strong, steady force.
– Carefully slide that pick into the gap – just a tiny bit, like 1 mm, no more!
Step 4
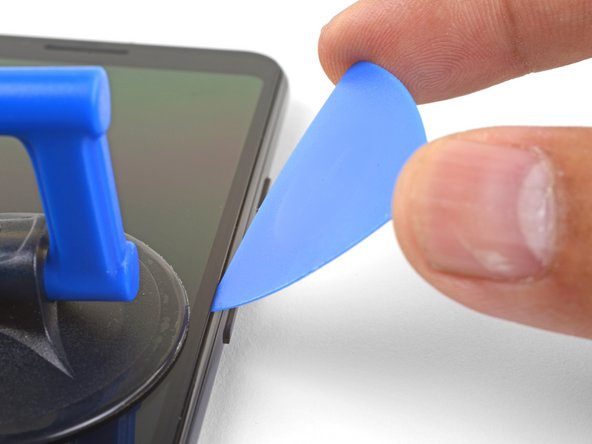

Be careful not to push too hard – if you feel the pick hitting a ridge, it’s probably pressing against the edge of the OLED panel. Try angling the pick and giving it another shot. If you need help, you can always schedule a repair
Here’s how to carefully insert the pick without putting your OLED panel in jeopardy! Make sure to do this before you tackle those long edges of the phone.
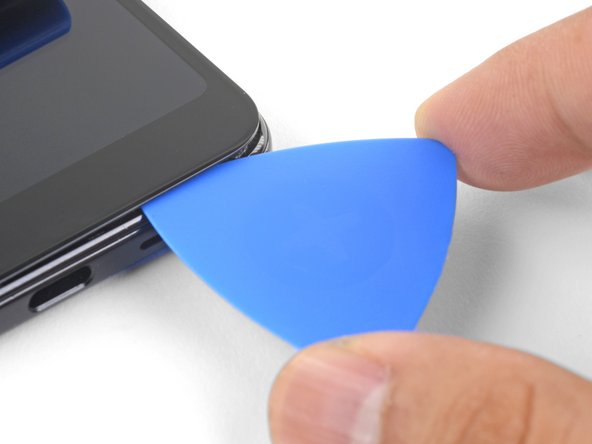
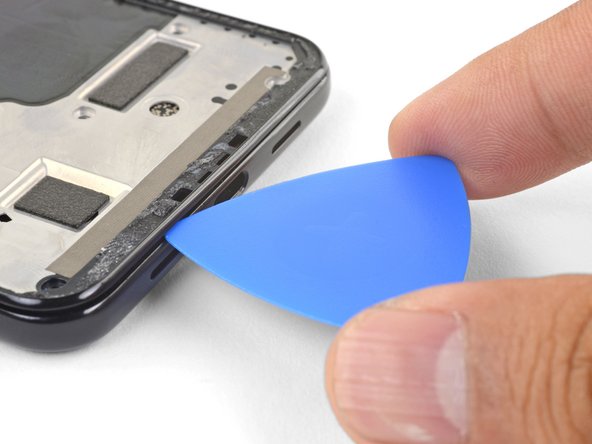
– Now it’s time to get a little tricky – insert the pick into the gap about 1 mm, then gently pivot it upwards to a pretty steep angle. You got this!
– Keep going! At this angle, carefully push the pick into the gap about 1/4″ (6 mm). It should slide in smoothly below the OLED panel. If you need help, you can always schedule a repair
Step 5


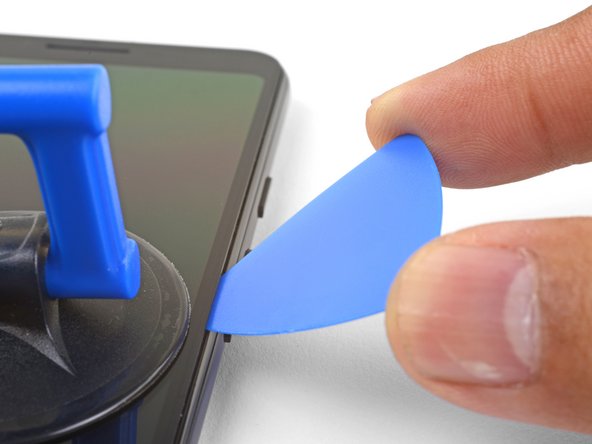
Keep the pick at a chill 1/4″ (6 mm) max! Going deeper might put your screen’s flex cable in a bit of a pickle. If you need help, you can always schedule a repair.
– Now it’s time to get this repair started – slide the pick along the right edge and gently slice through the adhesive to loosen things up.
– Leave a pick in place to keep the adhesive from resealing, you’re making great progress so far. If you need help, you can always schedule a repair
Step 6

Carefully slice around the bottom edge of your phone, but don’t insert the pick more than 1/4″ (6 mm) – we don’t want any accidents!
Having trouble slicing through a corner? Try applying a heated iOpener to the area for about a minute and then give it another shot. If you need help, you can always schedule a repair
– Gently work the pick around the bottom right corner to cut through the adhesive – you’re making great progress!
– Keep slicing along the bottom edge of the phone and around the left corner. If you need help, you can always schedule a repair
Tools Used
Step 7


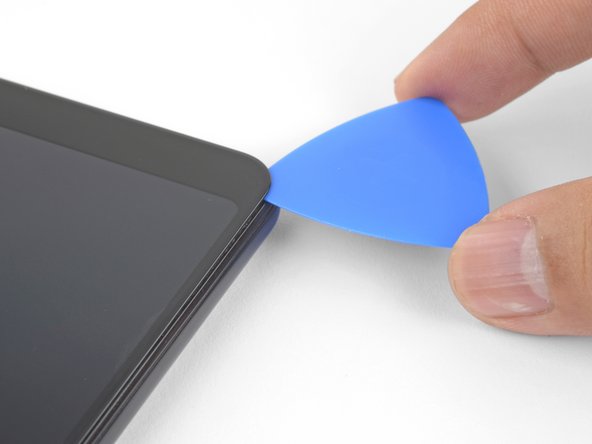
– Gently glide the pick along the left side of the phone, making sure to angle it just right beneath the OLED panel. Don’t push it in more than 1/4″ (6 mm) to keep things safe and sound.
– When you’re angling the pick under the OLED panel, slide the tip in just about 1 mm, tilt it upwards like you’re giving a thumbs up, and then ease it in a quarter of an inch. You’re doing great—keep it going!
Step 8


– Gently glide your pick along the top edge, making sure to keep it within 5/16″ (8 mm) for the best results.
Step 9


Hold up there, cowboy! Don’t go ripping that screen off just yet. It’s still holding on for dear life with a flex cable over by the left side. Let’s not break anything, alright? We want this repair to be a smooth ride.
– Once you’ve snipped all the edges, gently lift the right side of the screen like a pro.
– Grab an opening pick and carefully slice through any stubborn adhesive that’s still hanging around.
Step 10


– Now that you’ve snipped all the adhesives, gently flip the screen glass so it’s resting glass-side down on the phone. Just let that screen flex cable hang out in a relaxed arch!
Step 11

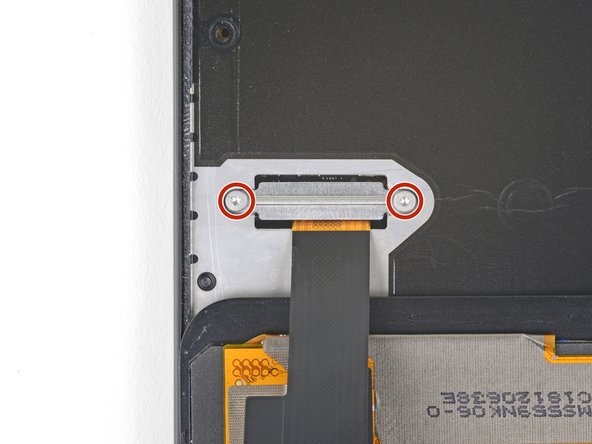

– Gently peel back that sneaky black tape hiding the screen connector bracket.
– Unscrew those two 4.4 mm T3 screws that are keeping the screen connector bracket in place.
– Now, let’s take off that screen connector bracket.
– If the tape looks good as new, feel free to reuse it when you put everything back together. If not, just swap it out for a piece of trusty electrical tape.
Step 12


When disconnecting connectors, be gentle to avoid dislodging the tiny surface-mounted components nearby. If you need help, you can always schedule a repair
– Use the point of a spudger to carefully pry up and disconnect the screen flex cable. It’s like giving the cable a little nudge to say ‘see ya later!’
– To re-attach press connectors like this one, carefully align and press down on one side until it clicks into place, then repeat on the other side. Don’t press down on the middle – think of it like a high five for the connector, one side at a time! If the connector is misaligned, the pins can bend, causing permanent damage. If you’re feeling a bit nervous, you can always schedule a repair.
Tools Used

Step 13


– Start by gently removing the screen.
– Take a moment to compare your new screen with the original one. You might need to move over some extra bits, like the speaker mesh, to your shiny new part.
– Now, let’s get that screen back in place:
– As your device powers up after putting it all back together, the screen will go through a calibration dance. Hands off during this time, please! Touching the screen could throw off the calibration and lead to some touchy issues.
– If you’re using custom-cut adhesives, check out this guide.
– For those using double-sided tape like Tesa tape, make sure to follow this guide.
Step 14

– First things first, let’s tackle those fourteen T3 screws that are holding down the plastic midframe. Here’s what you need to know:
– As you dive into this repair, make sure to keep an eye on each screw. They all want to go back home to their exact spots after the job’s done!
– You’ll find twelve shiny 4.3 mm silver T3 screws.
– And don’t forget the two 4.3 mm black T3 screws waiting to be removed too!
Step 15


The midframe is still secured by plastic clips, so let’s take a closer look at how to release them. If you need help, you can always schedule a repair
– Grab your trusty opening pick and gently slip it into the frame seam at the bottom of your phone. This little gap is hanging out between the plastic midframe and the back cover.
– Now, slide that pick along the seam like a pro to pop out those clips holding the plastic midframe in place!
Step 16


– Gently glide the opening pick along the left and right edges of your phone to pop those midframe clips free.
– Carefully lift the bottom edge of the plastic midframe, but hold on! Don’t take it off just yet, as it’s still connected to the phone by the delicate proximity sensor cable at the top.
– When you’re ready to put the plastic midframe back, line it up with the back cover and give the perimeter a gentle squeeze with your fingers to snap those clips back into place.
Step 17


Your proximity sensor connector might’ve accidentally unplug when you lifted the midframe. No worries, just snap it back in place and you’ll be good to go! If you need help, you can always schedule a repair.
– Time to get up close and personal with that proximity sensor connector – use the point of a spudger to carefully pry it up and disconnect it from the motherboard. Take your time, it’s a delicate process!
– Now it’s time to remove the plastic midframe. If you need help, you can always schedule a repair
Tools Used
Step 18


Or, you can try removing the proximity sensor from the midframe and attaching it to the motherboard first. It’s like a little puzzle! If you need help, you can always schedule a repair.
– Let’s get that proximity sensor reconnected during our re-assembly party! First up, line up the top edge of that snazzy plastic midframe with your phone.
– Grab your trusty spudger (the pointy end!) and gently align the proximity sensor connector with the motherboard socket. A little patience goes a long way here.
– Once you have that connector snug in place, feel free to give it a gentle nudge with your finger to make sure it’s firmly seated. It’s like giving it a high-five!
– Now, gently pry the proximity sensor out of its cozy spot in the midframe using the spudger again. It’s probably going to be a bit sticky, but no worries!
– Carefully lift that sensor out and plug its connector into the motherboard socket. Teamwork makes the dream work!
– Thread the sensor cable through the midframe like a champ and pop the sensor back into its little recess. Give it a soft press with your finger to fix it back in place—yes, you’re bringing it home!
Tools Used
Step 19


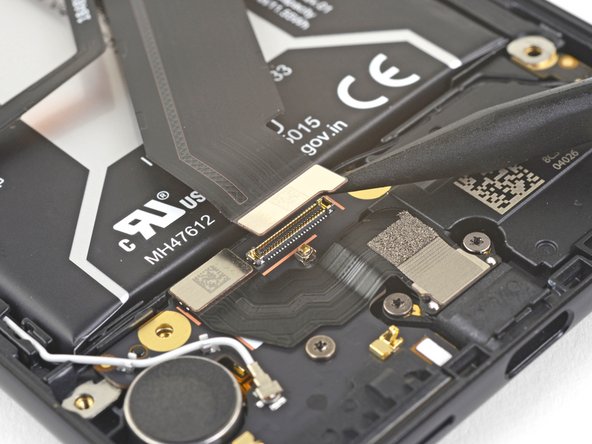
– Time to get started – use the point of a spudger to carefully pry up and disconnect the battery connector from its motherboard socket. Take your time, it’s easier than it sounds!
– Now, gently bend the battery flex cable so it won’t accidentally make contact with the socket. You’re doing great, keep it up! If you need help, you can always schedule a repair
Tools Used
Step 20


– Grab your trusty spudger and gently slide the tip in to lift and disconnect the interconnect cable from its cozy motherboard socket just above the battery. You’ve got this!
Tools Used
Step 21


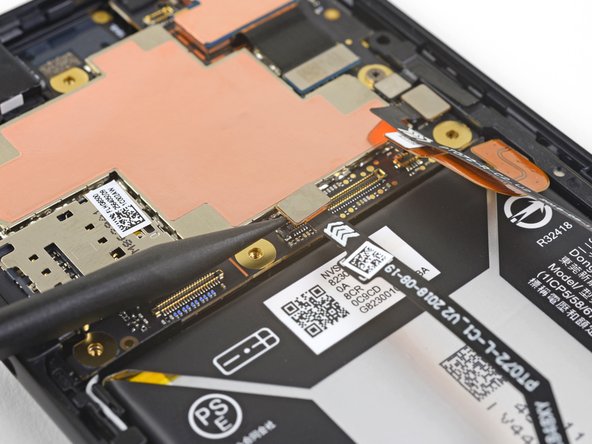
– Let’s get started by using the point of a spudger to carefully pry up and disconnect the interconnect cable from its daughterboard socket, which is located below the battery.
– Next, remove the interconnect cable from the device.
– When you’re reassembling, make sure to attach the cable in the correct orientation, just like it’s shown. If it’s reversed, it won’t work properly. If you need help, you can always schedule a repair with Salvation Repair for some expert assistance.
Tools Used
Step 22
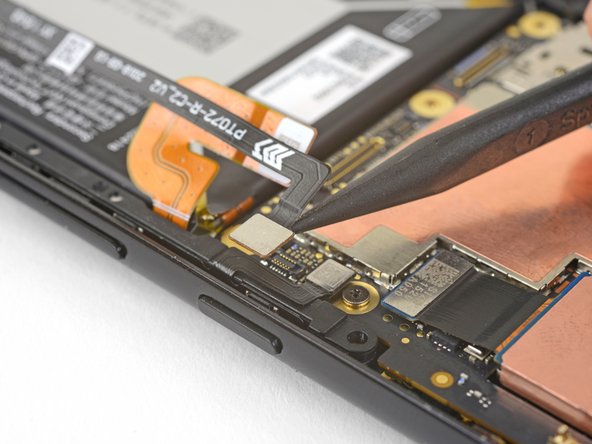

– Grab your trusty spudger and gently pry up the left squeeze sensor connector from its cozy spot on the motherboard, just above the battery. You’ve got this!
– Now, let’s do the same for the right squeeze sensor connector, which is hanging out near the power button. Easy peasy!
Tools Used
Step 23


Okay, buddy, let’s be extra careful here and make sure we don’t poke a hole in the battery with the tweezers. We don’t want any unexpected sparks, right? If you need help, you can always schedule a repair.
– Whoa, you’ve got some serious battery mojo! Just two small steps and you’ll be golden. First, loosen the grip of those stretch-release