Google Pixel 2 XL NFC Antenna Replacement Guide
Duration: 45 minutes
Steps: 26 Steps
This repair guide comes to you from the creative minds of the iFixit community and isn’t backed by Google. For more fun and informative repair guides, check out what we’ve got here.
Get ready to breathe new life into your Google Pixel 2 XL by replacing the NFC antenna. This step-by-step guide is brought to you by the experts at Salvation Repair, and we’re excited to help you get your device back up and running. If you need help or want some extra guidance, you can always schedule a repair. Our goal is to make this process as smooth and easy as possible, so let’s dive in and get started!
Step 1


– Alrighty, buddy, let’s get that SIM card tray out! Look for the teeny-tiny hole on the left side of your phone, near the bottom. It’s that squirrelly hole across from those snooze buttons. Now, jam a trusty SIM card eject tool or a good old paperclip into that hole and give it a decent press. You’ll know you’re doing it right when that tray pops out! If you need help, you can always schedule a repair.
Step 2

No worries, the SIM card will pop right out of the tray. It’s like it’s saying, ‘Hey, I’m ready for a new adventure!’
– Pop that SIM card tray out of your phone with ease. You’ve got this!
– When you’re putting the SIM card back in, just make sure it’s facing the right way in relation to the tray. Simple as that!
Step 3


Got a cracked display? No worries! Just grab some tape and cover that glass to keep your fingers safe and prevent any extra damage. Plus, it’ll create a nice flat surface for the suction cup to stick to. Sweet!
Just a heads up: the suction cup might not grip well on the curved edges of the glass. It’s all about that flat life!
– Whoa, check out that curve, dude! Here’s the tee-nee-tees on getting that sapling suction cup near the SIM slot edge without touching that wavy edge. Just ensure you zoom-zoom close but don’t go all wonky on the bendy one! Need help? You can always schedule a repair!
Step 4


This step takes some muscle and patience. Don’t worry, you’ve got this! If you’re having trouble, wiggle the suction cup and screen gently to loosen the adhesive, or give it a little heat with an iOpener, heat gun, or hairdryer. You’ll be a pro in no time! If you need help, you can always schedule a repair.
– Now it’s time to get a little leverage – pull up on that suction cup with some firm, constant pressure. As you’re doing that, slip an opening pick between the front panel and the rear case. If you need help, you can always schedule a repair
Step 5


As we dive into the next steps, let’s keep our eyes peeled and take a little extra care in specific areas to ensure your phone stays in tip-top shape!
– When using the pick, be gentle and don’t insert it more than 0.25 inches (6 mm) into the bottom edge of the phone. We want to avoid damaging that beautiful OLED display.
– Take care not to cut along the left edge, as there are some delicate display cables hiding out that can get damaged easily.
– In the upper left corner, make your cuts super shallow. Prying too deeply can put the front-facing camera at risk of damage. If you’re not feeling confident, you can always schedule a repair with the pros at Salvation Repair.
Step 6


– Now it’s time to get this phone opened up – slide the opening pick down the right side to loosen the display adhesive and get ready to take a peek inside! If you need help, you can always schedule a repair
Step 7


As you tackle these steps, remember to use the flat edge of the opening pick instead of a corner for cutting. This little tip will help you avoid pushing the pick in too far. You’ve got this!
– Gently slide that opening pick around the lower-right corner and along the bottom edge of the phone, just like you’re taking it for a little stroll. You’ve got this!
Step 8


– Now it’s time to get that pick back in action – reinsert the flat edge at the top-right corner of your phone and gently slide it around the corner and along the top edge. If you need help, you can always schedule a repair
Step 9


Hold up! Don’t go ripping that display off just yet. There are some delicate wires still holding it to the phone’s brains. You’ll want to be gentle, so you don’t accidentally pull something.
Step 10


Be gentle when prying to avoid damaging the cable or losing the cover – we want to get this fixed smoothly. If you need help, you can always schedule a repair
Hang onto this component – you’ll need it for reassembly later.
The clip that secures this cover is located along the bottom edge, so keep an eye out for it. If you need help, you can always schedule a repair
– Time to get started. Use the corner of an opening tool to carefully pry up and unclip the lower edge of the digitizer cable connector cover. Take your time, it’s easier than it sounds.
– Now, go ahead and remove the connector cover. You’re making great progress so far. If you need help, you can always schedule a repair
Step 11


– Use the pointy end of a spudger to carefully lift the digitizer cable connector up and out of its socket on the motherboard. Think of it like gently prying open a treasure chest!
– To re-attach press connectors like this one, carefully align and press down on one side until it clicks into place, then repeat on the other side. Think of it like snapping a puzzle piece back together! Just don’t press down on the middle, you might break it!
– If any part of your screen doesn’t respond to touch after your repair, re-seat this connector, making sure it clicks fully into place and that there’s no dust or other obstruction in the socket. Think of it like a little dance – making sure everything is in sync! If you need help, you can always schedule a repair
Step 12

– Time to get up close and personal with that display connector cover. Use tweezers to gently remove any tape that’s holding it in place. If you need help, you can always schedule a repair
Step 13


Don’t lose this little guy! You’ll need it when you put everything back together. 😉
Step 14


– Grab your trusty spudger and gently pry up the display cable connector. It’s like giving the cable a little high-five!
– Now, with the cable out of the way, you can carefully remove the display. You got this!
– Before putting everything back together, consider replacing the adhesive around the edges of the display. This will help keep things nice and snug. If you need help with this, you can always schedule a repair
Step 15

– Take out the eleven 3.8 mm Phillips screws holding the midframe. Pro tip: Keep track of those screws so they go back where they belong. If you need help, you can always schedule a repair.
Step 16


– Alrighty, let’s pop open this phone like a well-trained computer surgeon! Grab your trusty opening tool and slide it into that notch near the volume buttons. It’s like a puzzle, but with phones! Now, gently pry the midframe up and away from its pals. Once it’s up, remove the midframe and give it a pat for a job well-done. If you need help, you can always schedule a repair.
Step 17


– Let’s disconnect that battery! Use the flat end of a spudger to carefully pop the battery connector loose. If you’re ever unsure, you can always schedule a repair
Step 18
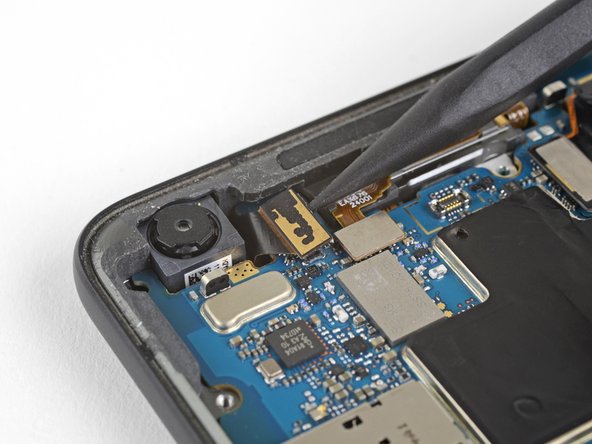

– Let’s get this party started! Use the tip of your spudger to gently disconnect the front-facing camera connector. It’s like giving the camera a little high five, but with a tool.
– When you’re putting things back together, it’s easier to attach the front camera to the motherboard first. Then, just slide that motherboard right in. No drama, just smooth sailing!
Step 19
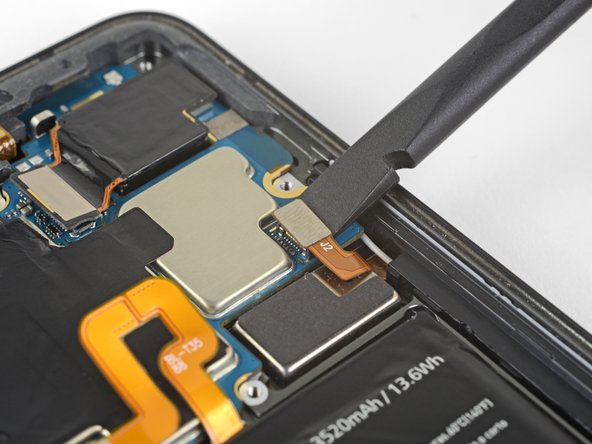

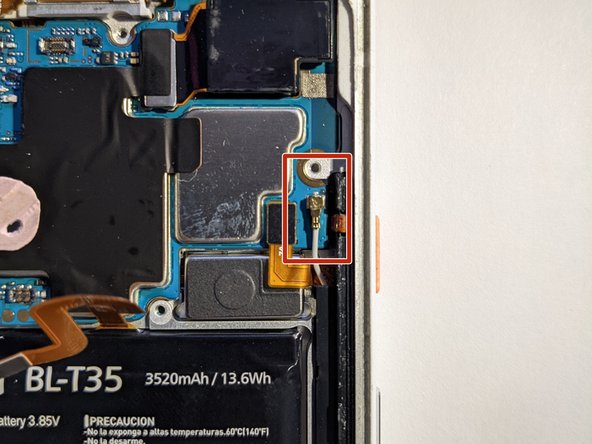
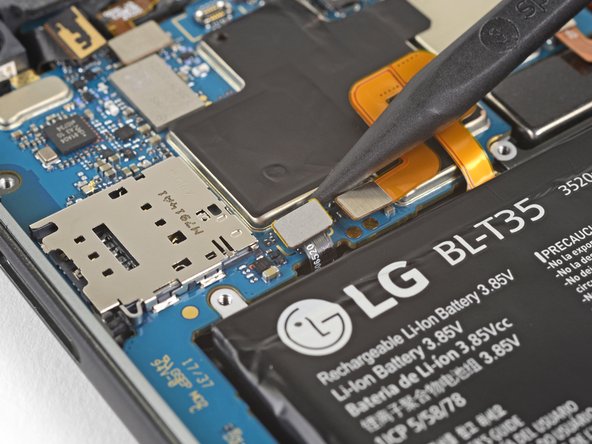
– Grab your trusty spudger and give that right Active Edge sensor connector a little nudge to disconnect it.
– Now, let’s disconnect that antenna cable. It’s like giving your device a break from the outside world for a minute.
Step 20

– Now it’s time to carefully disconnect the fingerprint sensor connector – use the point of a spudger to gently release it. If you need help, you can always schedule a repair
Step 21

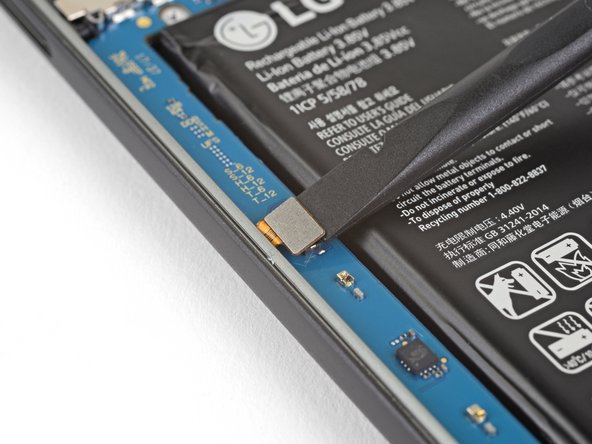
– Grab your trusty spudger and use the flat end to gently disconnect the left Active Edge sensor connector. It’s like giving the connector a little high five, but without the enthusiasm.
Step 22

– Now, grab your trusty spudger and use the flat end to gently disconnect the charging assembly connector. You got this!
Step 23


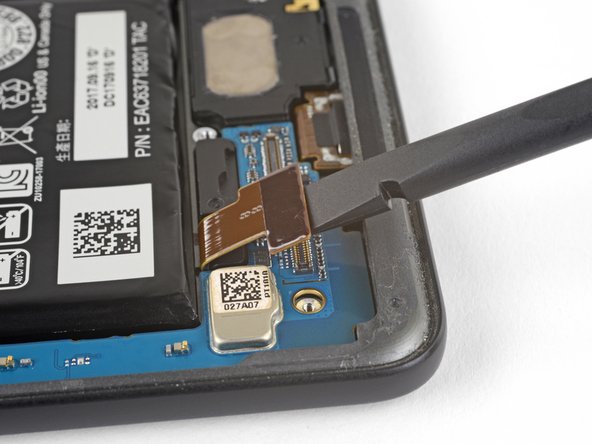
– Time to disconnect that front-facing sensor assembly connector! Use the pointy end of your spudger to gently pry it loose. You got this!
Step 24
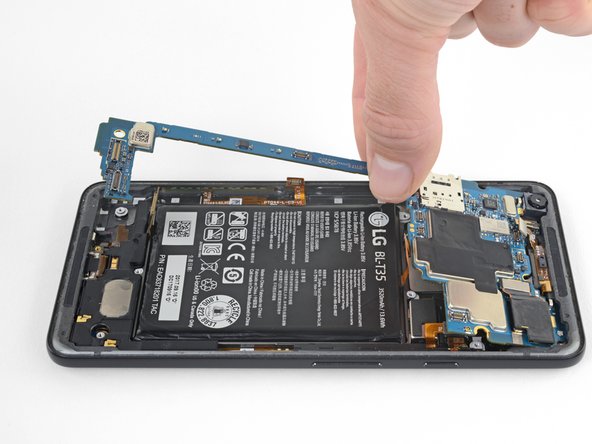


The delicate section of the motherboard is super sensitive. If you notice it starting to flex when you lift, pause for a moment and check if anything is stopping it from rising. It should pop up smoothly without any hassle!
– Alright, let’s get those cables and connectors out of the way! Use the flat end of your spudger to gently lift the motherboard. No need to be rough, just a little nudge is all it takes.
– Now, grab the wide part of the motherboard near the SIM card slot, and carefully slide it towards the bottom of the phone. Think of it like a little dance – you’re lifting it out while gently moving it down.
– Time to give that motherboard a little vacation! Gently remove it from the phone.
– Hey, keep that phone flat with the battery facing up after you remove the motherboard. You know, so that the front-facing camera doesn’t decide to take a spontaneous trip outside the phone.
– When you’re ready to put everything back together, make sure all those cables and connectors are hanging out of the way of the board. Line up those connectors with their sockets – they’re like little puzzle pieces. If you need help, you can always schedule a repair
Step 25
That suction cup in your iFixit kit? Yeah, it’s a bit of a beast. No worries, though! We’ve got your back. Just find something smaller that’ll do the trick and you’ll be good to go. And hey, if you need a little extra help, you can always schedule a repair.
– First, let’s get this repair started by applying some heat to the right side of the back glass – it’s time to loosen things up.
– Next, grab a small suction cup and gently pull the glass up to make room for an opening pick. This is where the magic happens.
– If you don’t have a suction cup handy, you can try using a jimmy to pry the glass open. Just keep in mind that this method might damage the enamel, so proceed with caution.
– Now, keep the heat coming and slowly work your way around the top of the phone with the opening picks. Take your time and be patient – we’re making progress.
Step 26

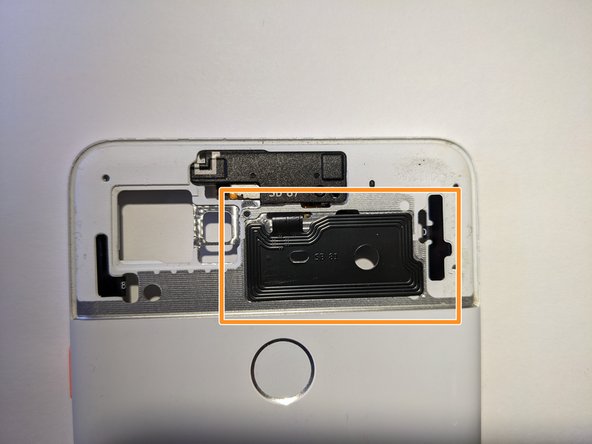
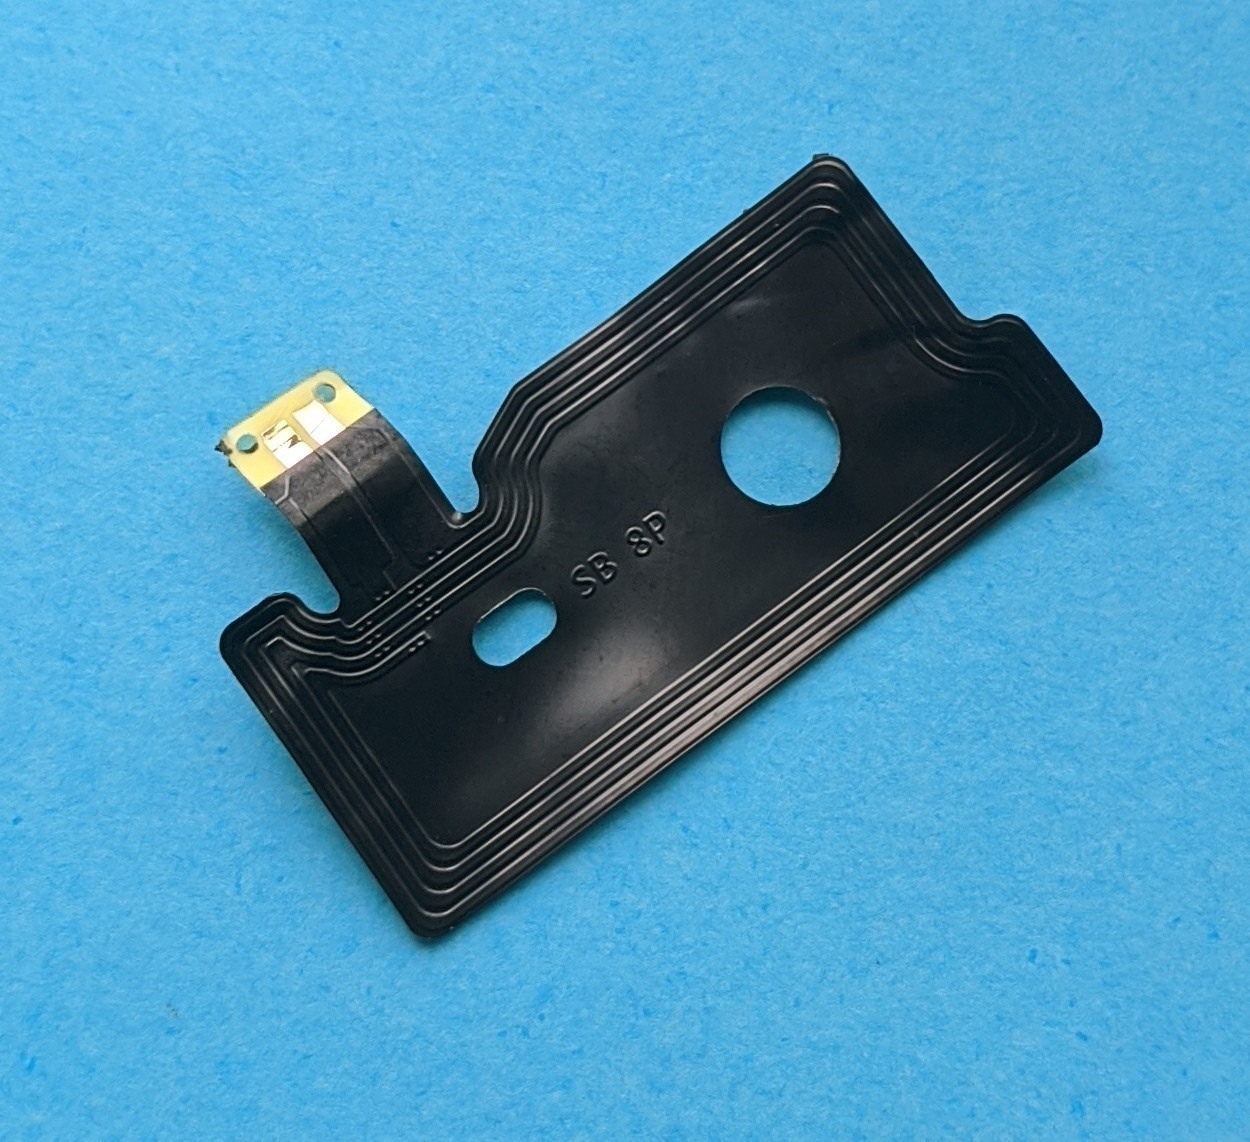
– Time to get this NFC antenna loose – gently heat up the contact point and carefully pry it away from the frame.
– Now, apply some gentle heat to the NFC antenna itself and slowly peel it off the frame. If you need help, you can always schedule a repair
