DIY Google Pixel 2 Charging Assembly Replacement Guide
Duration: 45 minutes
Steps: 29 Steps
Hey there! This repair guide was put together by the awesome team at Salvation Repair. We’re not affiliated with Google, but we’re all about getting you back in the game. Want to know more about our guides? Check out our website!
This clear and easy-to-read guide is brought to you by the team at Salvation Repair. It’s not from Google, but we’re just as good! We’re going to help you swap out that charging assembly. You know, the part that holds the USB-C port and is buddies with the vibration motor? No problem! We’ve got you covered. If you need extra help, you can always schedule a repair.
Step 1


The suction cup might struggle to stick well on the curvy part of the glass.
– Got a cracked screen? No worries! Just tape it up to keep those pesky shards in check and save your fingers from any accidental pokes while you work. Plus, a little tape creates a perfect surface for that suction cup to grab onto.
– Now, let’s get our suction cup ready! Place it as close to the edge near the volume button as you can, but steer clear of the curved edge. We want to make this as smooth as possible!
Step 2


Hey there! Just a friendly reminder that the display panel is a bit delicate. If you’re thinking about reusing your display, be sure to gently insert your tool just enough to break that adhesive seal. Pushing it in too far could hurt the OLED panel hiding behind the glass, and we definitely don’t want that!
And remember, keep that pick under 1.5 mm deep! Going deeper might just lead to some unwanted damage to your precious OLED. You’ve got this!
This part needs a little muscle and some patience. If you’re struggling, give the suction cup and screen a little wiggle to loosen the adhesive. You can also warm things up with an iOpener, heat gun, or hair dryer. Need a hand? You can always schedule a repair.
– Give that suction cup a good tug with steady pressure, and slip an opening pick right between the front panel and the rear case. You’ve got this!
Tools Used

Step 3


Hey there! Just a friendly reminder to tread carefully in certain spots to keep your device safe and sound:
Be mindful not to push an opening tool deeper than 1.5 mm into the sides of your device, or more than 9 mm into the top and bottom, as this could lead to some serious display damage.
– Keep that pick under control! Don’t push it more than 9 mm into the bottom edge of your phone. If it bumps into the folded part of the OLED panel, it could spell trouble for your display.
– When you’re making those shallow cuts in the upper left corner, remember to be gentle. Going too deep might put your front-facing camera in a tight spot!
Step 4


Heads up with those side bezels, they’re only 1.5 mm – pretty thin stuff! If you need help, you can always schedule a repair
When working through these steps, use the flat edge of the opening pick to pry here, rather than the corner. This technique will help you avoid inserting the pick too far and making things more complicated than they need to be. If you need help, you can always schedule a repair
– Gently slide the opening pick along the right side of the phone to break free that stubborn display adhesive. You’ve got this!
Step 5


There’s a spiffy mesh sitting over the earpiece speaker at the top edge of your screen. If you haven’t snagged a replacement mesh, just be careful not to misplace or damage this little guy!
– Gently glide the opening pick around the upper-right corner and along the top edge of your phone, like you’re giving it a little friendly massage.
Step 6


– Gently slide that pick around the top-left corner of your phone and then let it glide down the left edge. You’ve got this!
Step 7


Be super careful not to slide that opening pick in more than 9 mm – we want to keep that OLED panel safe and sound!
– Gently glide the pick around the bottom-left corner and along the base of the phone. Keep that pick at a slight angle away from the screen to keep those delicate OLED corners safe and sound.
Step 8


Hold your horses! Don’t go completely detaching the display just yet—there’s a delicate ribbon cable still linking it to the phone’s motherboard.
– Alrighty then, let’s rock this step! Pull out the old pal from the top edge and gently lift the display. And remember, if you’re feeling stuck or need a little extra hand, just visit our repair page to schedule a session with us. We’re here, ready to rock your tech’s world!
Step 9


– Gently place the display on top of the rear case, just like shown, and be careful not to bend or damage that delicate display ribbon cable.
– Unscrew those two little 4.0 mm T5 Torx screws that are holding the display cable bracket in place.
– As you work through this repair, keep an eye on each screw and make sure it finds its way back to its original home.
Step 10

– Time to set that display cable bracket free! Go ahead and remove it with care.
Step 11


Be careful not to touch the motherboard with your spudger’s tip – the components around the socket are super fragile, so handle with care. If you need help, you can always schedule a repair
– Grab your trusty spudger and gently lift that display cable connector right out of its cozy little home on the motherboard. Easy peasy!
– When it’s time to reconnect, carefully line up those connectors like you’re playing a game of Tetris. Press down on one side until you hear that satisfying click, then do the same on the other side. Remember, no middle squishing! Misalignment can lead to bent pins, and we definitely don’t want that.
– If your screen decides to play hard to get and doesn’t respond to your touch after your repair, give that connector another little nudge. Make sure it clicks in snugly and check for any dust or sneaky obstructions hanging around in the socket.
– Pause for a moment during reassembly and let’s get that adhesive back around the edges of the display. It’s like giving your device a fresh haircut!
Tools Used

Step 12

– Warm up that trusty iOpener and give a cozy two-minute hug to the proximity sensor located on the top edge of the midframe to loosen its adhesive. You’re doing great!
Tools Used
Step 13


– Time to get started. Carefully insert the point of a spudger under the proximity sensor cable, beginning from the side that’s closest to the front-facing camera – you got this.
– Now, gently pry up the edge of the sensor cable until it’s standing perpendicular to the midframe. Take your time and be patient, it’s a delicate step. If you need help, you can always schedule a repair
Tools Used
Step 14

– Carefully lift off the little piece of tape that’s hiding the screw right under the earpiece speaker. And hey, if there’s any tape over other screws, don’t forget to peel that back too!
– Now, let’s get those screws out! Here’s what you need to remove to free up the midframe:
– As you embark on this repair adventure, keep a close eye on those screws! They’ll want to go back to their original homes, so remember where each one belongs.
– Eleven 3.7 mm Phillips screws
– One 4 mm T5 Torx screw
Step 15


– Slide an opening tool into the little notch on the midframe near the hold button. You’ve got this!
– Gently pry the midframe up just enough to create a cozy gap between it and the phone case. Remember, the midframe isn’t ready to leave the party just yet!
Step 16


– Start by gently lifting the midframe from the bottom edge. You’ve got this!
– Once the midframe is at about a 45° angle to the rest of the phone, keep going and lift it straight up and away. Almost there!
– As you elevate the midframe, be sure to carefully guide the proximity sensor through the tiny slot in the midframe. You’re doing great!
Step 17


– Let’s get started by using the flat end of a spudger to carefully disconnect the battery connector. Remember to take your time and be gentle, and if you need help, you can always schedule a repair
Tools Used
Step 18


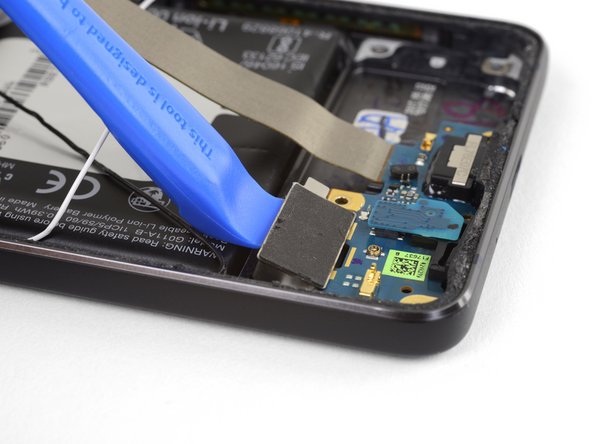
– Now it’s time to disconnect the charging assembly connector – simply use the flat end of a spudger to gently pry it loose. If you need help, you can always schedule a repair
Tools Used
Step 19


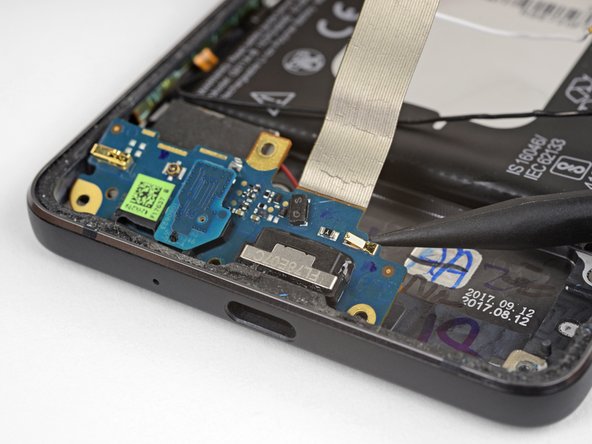
– Gently use the tip of a spudger to lift the white antenna cable connector straight up and detach it from the charging assembly board. If you need help, you can always schedule a repair.
Tools Used
Step 20

– Grab those tweezers and gently tug the white antenna cable straight up and out of its cozy metal clips on the board and out of the loudspeaker channel. It’s like giving it a little lift!
– Now, slide that cable to the left side of the phone—let’s keep it out of the loudspeaker’s way, shall we? We’re all about smooth sailing here.
– When you’re putting your device back together, remember to guide that antenna cable back into its happy place with care. You got this!
Tools Used


Step 23


– Use the tip of a spudger to carefully nudge the speaker cable connector out of its socket, a little at a time, alternating sides to avoid any damage. If you need help, you can always schedule a repair
Tools Used
Step 24


– Gently pry the loudspeaker assembly up from its spot in the phone using an opening tool – just enough to get a good look.
– Keep the silver charging assembly cable out of your way as you work, but be gentle so you don’t bend or strain it where it meets the charging assembly. If you need help, you can always schedule a repair
Step 25


– Twist the top right corner of the loudspeaker up towards the top of the phone while gently nudging the entire thing to the right.
– Take out the loudspeaker.
Step 26

– Unscrew one 2.4 mm Phillips screw and let’s get this show on the road!
Step 27

Hey there, just a heads up—leave the motor where it is; it’s still hanging out with the charging assembly. No need to disturb the party!
– Grab your trusty opening tool and gently coax the vibration motor away from its adhesive buddy that’s keeping it snug in the phone. You’ve got this!

Step 29

To take out the vibration motor, just desolder its wires from the charging assembly board. Easy peasy!
– First, let’s get that vibration motor loose – gently lift the charging assembly out of the phone, making sure the motor comes out with it, nice and easy.
– Next up, carefully remove the microphone board and transfer it to the new charging assembly. If you need help, you can always schedule a repair
