Kindle 7th Generation Teardown
Duration: 45 minutes
Steps: 10 Steps
Double teardown time! We’ve also cracked open the new $100 Kindle Fire HD 6 to see what makes it tick!
Amazon’s 7th-gen Kindle e-reader is here, and it’s bringing some fresh features, including a brand-new touch screen! But how easy is it to repair? Let’s dive in and see. Oh, and in case you’re into more tech tear-downs, we also tackled the Kindle Fire HD 6 for just $100. Check out our repair journey on Twitter, Facebook, or Instagram for more updates!
Step 1


– It’s that time again, not for Leif Erikson or Hug Your Cat day, but the moment when fresh Kindles arrive at our teardown doorstep.
– Today’s gadget of honor, the Kindle 7th Generation (yep, it’s got a touchscreen!):
– 6″ display with Pearl e-paper technology and a crisp 167 ppi
– 4 GB of storage (enough to hold thousands of books—impressive, right?)
– Wi-Fi compatibility with 802.11b, 802.11g, or 802.11n
– Touchscreen (just to reiterate, it’s touchscreen!)
– Up to 4 weeks of battery life (based on 30 minutes of daily reading with Wi-Fi turned off)
Step 2


The Kindle 7th Generation can be spotted by its model number WP63GW.
– In case you forgot which smiling benevolent overlord megacorp is responsible for your Kindle, simply turn it over and the answer shall present itself: Amazon.
– All of the Kindle’s numerous IO hardware features are conveniently located together on the bottom edge. Including and completely limited to:
– Power button
– Multicolored status LED
– Micro USB port
Step 3


– A thin plastic bezel is held in place by gentle adhesive and some plastic clips at the front of the Kindle. We found that trying to pry it open without applying heat worked well, as our opening tool easily released both the clips and the adhesive. As for the screws, forget about proprietary fasteners—these are just T5 Torx screws, making your job straightforward and hassle-free. If you need a hand along the way, you can always schedule a repair.
Step 4


Amazon went sleek and simple with the Seventh Kindle. They ditched the buttons and went full touchscreen—bold move, but it really paid off with a cleaner, more streamlined design.
– Carefully remove the screws, then gently pry the display assembly free from the rear case—minimal jostling is the key here.
– Keep in mind, the motherboard and battery are mounted on the back of the display’s midframe. We’ll disconnect a connector to access the internal components and handle the chemical parts safely.
Step 5


Amazon says you can expect about 4 weeks of use if you’re reading for about 30 minutes a day with Wi-Fi off. That’s roughly 14 hours of screen time and 658 hours of standby. Pretty solid, right?
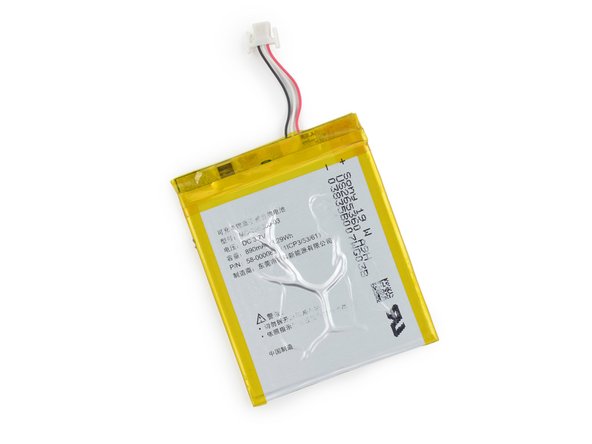
– Sometimes, a teardown goes smoothly until you hit your first real snag—like stubborn battery adhesive that just won’t quit. This is the kind that really sticks and takes some effort to get loose. No worries, just take your time and be patient. When dealing with the lithium-ion Polymer battery in the Kindle 7th Generation, which packs a 3.7 V and 890 mAh (that’s about 3.29 Wh of energy), it’s good to handle with care. Even though it might seem like a lot, it’s only half of what a Kindle Paperwhite’s 5.25 Wh battery can store. Ever wonder where all that power goes? Keep going, and you’ll find out! If you need help, you can always schedule a repair.
Step 6


– Let’s give those cables and screws a little talking-to and free up the motherboard for a closer inspection:
– Elpida (now Micron Technology) B2432BCPE-8D-F DDR2 Mobile RAM
– Freescale Semiconductor MCIMX6L7DVN10AB Applications Processor
– SanDisk SDIN7DP2-4G eMMC iNand Ultra 4 GB NAND Flash
– Atheros AR6803G-BL3B
– Maxim Integrated MAX77696A Power Management Integrated Circuit
– 24.000 430F
Step 7
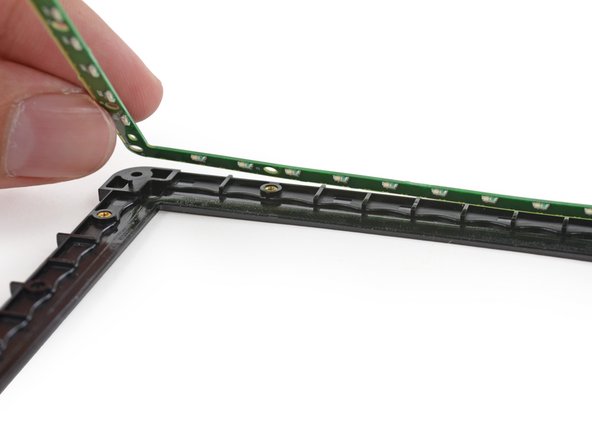


– Now, let’s head back to the front of the display assembly. Time to pop off a plastic bezel and uncover a sneaky little circuit board hiding around the edge.
– Looks like we’ve just stumbled upon the heart of the Kindle’s touch sensitivity. A neat grid of infrared LEDs and receivers is running across the display, powered by Neonode’s zForce tech.
– The LEDs shoot light out from the display, into small wells in the plastic bezel. These wells gather and bounce the light right back across the screen, in wide, flat bands, just waiting to be caught on the other side…
– …until your finger steps in and blocks the light, triggering a touch. Easy as that!
Step 8


We grabbed our trusty DIY infrared camera to check out what’s happening under the surface.
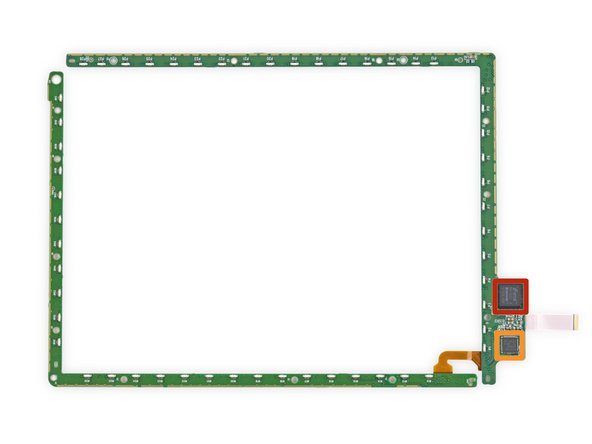
– The touch grid is made up of two separate circuit boards connected by a tiny ribbon cable.
– One board has LEDs that shine out from the top and left side of the Kindle’s display. The other is packed with IR receivers (probably phototransistors), and it forms the right and bottom edges of the display.
– There’s some circuitry on the receiver board that keeps track of any interruptions in the light and detects your touch:
– Neonode zForce NN1001 Single Chip Optical Touch Controller
– Texas Instruments MSP430G2 Ultra Low Power Microcontroller
Step 9
– The infrared LEDs like to chill in a low-power idle mode most of the time.
– But as soon as the grid senses a disruption in the beam, the LEDs kick into gear, getting noticeably brighter to more accurately detect and track your finger.
Step 10


Sometimes, replacement parts can be a little hard to find for certain Kindle models, which can put a damper on repair options. Fingers crossed this model doesn’t end up in the same boat!
– Kindle 7th Generation gets a solid 8 out of 10 for repairability (10 means a breeze to fix).
– Straightforward, modular design with clearly separated parts that can be swapped out one by one.
– Getting inside is a cinch—just a few clips and a gentle touch on the mild adhesive holding the front bezel.
– Heads up: the battery’s adhesive is way stronger than it needs to be, so taking it out can get tricky. Take your time, and if things get hairy, you can always schedule a repair.