Samsung Galaxy Mega Camera Replacement Guide: Step-by-Step DIY Tutorial
Duration: 45 minutes
Steps: 7 Steps
Get your selfie game back on track by replacing the front-facing camera in this easy peasy, lemon squeezy guide!
Step 1


– First things first, make sure your device is completely powered down. We don’t want any surprise wake-ups!
– Flip your phone over and find that little slot nestled in the top left corner on the back.
– Grab your trusty plastic opening tool or even your fingernail, and gently pry up the back plate. You got this!
– Once that corner is free, run your finger around the edge of the device between the back plate and the phone to release those connectors. Easy peasy!
Step 2


– Slide your fingernail into the slot at the bottom of the battery and gently lift it out – you got this!
– Now, go ahead and remove the battery. If you need help, you can always schedule a repair
Step 3


Feel free to swap out the plastic opening tool for a trusty metal spudger to kick off the seam opening. Just a heads up, it might leave a little mark on the outside.
– Pop out those 14 3.45 mm Phillips #000 screws from the assembly.
– Slide your plastic opening tool into the seam just above your phone’s volume buttons.
Tools Used

Step 4


Alright, let’s get this thing back together. Make sure your volume and power buttons are sitting just right!
– Time to get this thing open! Gently slide the plastic opening tool all the way around the device to free up those connectors inside.
– It should pop right open after you’ve gone all the way around. You got this!
Step 5

– Alright, time to loosen up that little 2.55 mm Phillips #000 screw holding the motherboard assembly together. It’s hanging out at the top left corner, waiting for you to set it free!
Step 6

– Let’s get that metal cover off! Grab your trusty plastic opening tool and gently pry it off. You got this!
Step 7
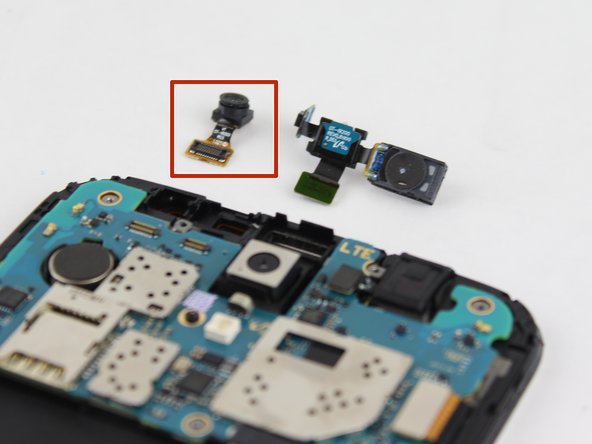

– Time to give that camera assembly a little wiggle room! Gently lift the motherboard connector and then say goodbye to the camera. It’s time to move on to the next step.


