DIY Samsung Galaxy Mega Earpiece Speaker Replacement Guide: Fix Your Device Now!
Duration: 45 minutes
Steps: 7 Steps
Ready to jazz up your device? This guide will walk you through the simple steps to swap out that front-facing speaker and LED blinker. Let’s get your tech sounding and shining like new!
Step 1


– First things first, make sure your device is completely powered off. You don’t want any surprises, right? 😉
– Now, on the back of your phone, you’ll find a little slot hanging out on the top left corner. Keep your eyes peeled!
– Grab your handy-dandy plastic opening tool (or your trusty fingernail) and give that back plate a gentle lift. We’re opening it up, baby!
– With that corner freed, slide your finger around the device between the back plate and the phone. This’ll loosen things up and help you release those connectors. You got this!


Step 3


If you’re having trouble getting started, don’t worry – you can use a metal spudger instead of a plastic opening tool to begin prying open the seam. Just keep in mind that this might cause some exterior cosmetic damage. If you need help, you can always schedule a repair
– Time to get those screws out! Grab your trusty screwdriver and remove the 14 screws measuring 3.45 mm with a Phillips #000 head from the assembly.
– Now, let’s get that plastic opening tool ready. Gently slide it into the seam right above the volume buttons on your phone. You got this!
Tools Used

Step 4


As you put everything back together, make sure the volume and power buttons click into place just right. You’ve got this!
– Now, let’s get this party started by gently sliding the plastic opening tool around the edges of your device. Think of it as a little dance, helping to loosen those internal connectors.
– Once you’ve given your device a full circle shimmy, it should pop right open! You’ve got this! If you need help, you can always schedule a repair.
Step 5

– Pop out the black 2.55 mm Phillips #000 screw.
Step 6

– Use that trusty plastic opening tool to gently lift off the metal cover like you’re peeling a stubborn sticker off a package. C’mon, you got this!
Step 7
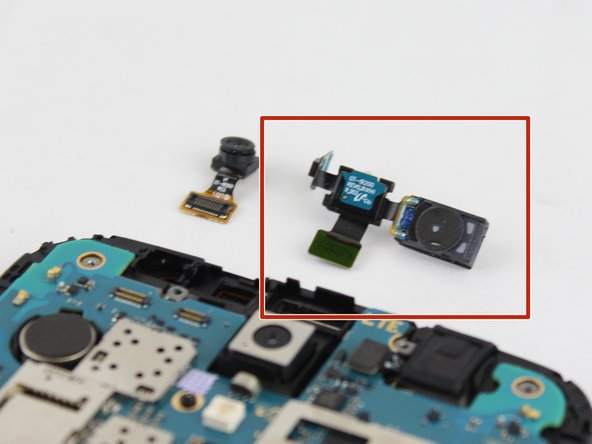

– Let’s free that speaker! Carefully remove the motherboard clip that holds the speaker assembly to the motherboard.
– Time for a gentle lift! Carefully lift the speaker and LED assembly out of the device.
– Hold on tight! If the speaker assembly seems a bit stuck, gently pry it loose. No need to force anything, just a little coaxing.