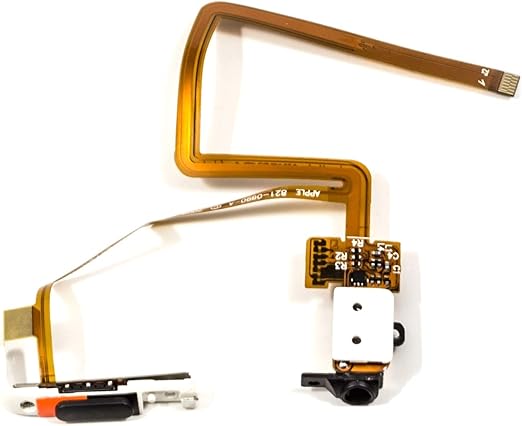
iPod Classic Headphone Jack & Hold Switch Replacement
Duration: 45 minutes
Steps: 31 Steps
No sound? Try swapping out that headphone jack! Having trouble unlocking? You’ll want to replace the lock switch – an important part of the headphone jack assembly.
Step 1

Play it safe—let your iPod battery run all the way down before you start taking things apart. That way, if the battery gets nicked, you’re way less likely to get any nasty surprises. If your battery is looking a bit puffy, handle it with care.
Go slow and steady—prying open your iPod can be a bit tricky, and pushing too hard might make things worse. It’s not unusual to chew up a few plastic opening tools, so having a couple of extras ready can be a lifesaver. You’ve got this!
Apple’s latest iPods are built like a fortress, with a metal faceplate, a metal backing, and no fewer than 13 metal clips holding everything together. This makes them one of the most challenging iPods to take apart without risking damage to major components. Before you get started, make sure the hold switch is in the locked position to prevent any accidental button presses. Patience and careful work are key—if you need a hand, you can always schedule a repair.
Step 2

Popping open this iPod can be a bit of a challenge, so don’t worry if it takes a few tries to get it right. A handy tip: when you’re sliding the plastic opening tool in, aim to keep the tip as upright as you can while still getting past the edge of the back panel. Patience and the right angle go a long way!
– Gently slide a plastic opening tool into the seam where the front and back of your iPod meet. Take your time, and don’t rush it – you’re on the right track!
Step 3

– Gently slide a plastic opening tool into the gap between the front and back of the iPod, keeping at least 1.5 inches of space between the tools to avoid cracks. Repeat as needed to work your way around the device. If you need help, you can always schedule a repair.
Step 4

Watch out! There are some sneaky metal rails along the inside of the rear panel. When you’re sliding in that putty knife, make sure to be gentle and avoid any damage.
– Start by gently angling your putty knife, and carefully slide it about 1/8 inch into the seam where the two opening tools meet.
– Once the putty knife clears the edge of the rear panel, rotate it to a vertical position, and with a steady but gentle motion, wiggle it straight down into the gap between the opening tools.
Step 5

Instead of fighting to keep the rear panel perfectly straight, this method has you gently bend it in a way that makes it much easier to pop back into shape later. The trick is to bend the sides so the lip of the rear panel pulls away from the iPod instead of pressing out against the curved edge. You’ll also be loosening up as many of those stubborn side clips as you can along the way.
– Gently press on the back panel behind the putty knife with your fingers to keep things from bending too much. Now, carefully bend the putty knife, just like in the picture, to help you free those tricky metal tabs on this side of the iPod.
Step 6

Try to avoid bending the corner of the rear panel if you can—it’s a tricky spot and could cause issues down the line.
– Slide the putty knife out and move it a bit closer to the corner, then give it another gentle wiggle—just like before.
Step 7

You might find it handy to gently flex the putty knife downward to give your opening tool a little more room to work with—just watch out for that corner, don’t let it get bent!
– Between the lock slider and headphone jack, insert a plastic opening tool into the seam between the front and back of the iPod.
– Gently pry the front and back of the iPod apart, starting from the bottom and working your way up, taking care not to damage any of the cables or internal components.
– Continue to carefully pry the two halves of the iPod apart until they come free from each other.
– Now that the iPod is disassembled, locate the logic board, which is held in place by several screws.
– Remove the screws that hold the logic board in place, and gently lift it out of the iPod.
– With the logic board removed, locate the battery, which is attached to the logic board via a connector.
– Carefully disconnect the battery from the logic board by prying the connector off the logic board.
Step 8

– Right in the middle of the display, gently slide your metal spudger into the gap you made earlier with the plastic tool.
– With your trusty spudger, pop loose the single clip hanging out at the top of the iPod.
Be careful when prying up the rear panel here—it’s easy to create a noticeable bump that’s tough to fix later. When you’re working with the metal spudger, aim to pivot on the edge of the rear panel rather than forcing it outward. Take your time and work gently—if you need a hand, you can always schedule a repair.
Tools Used


Step 9

– Head over to the other top corner and slide your opening tool into the gap between the iPod’s front and back covers.
Step 10

Try tilting your opening tool in the top corner to help pop open a good-sized gap.
– Flip the iPod over and carefully slide an opening tool into the seam where the front and back come together.
Step 11

– Carefully lift the plastic opening tool from the top corner and gently slide it into the seam between the front and back of the iPod, making sure to keep at least 1.5 inches of space between your tools on each side (just like on the other side). If you need help, you can always schedule a repair.
Step 12

Heads up! There are thin metal rails along the inside of the rear panel, so be extra careful when you slide that putty knife in.
– Hold your putty knife at a slight angle and gently slide it about 1/8 inch into the seam between the two opening tools.
– Once you’re past the edge of the rear panel, stand the putty knife upright and carefully wiggle it straight down into the iPod using the gap between the plastic tools.
– Use your fingers to press against the rear panel just behind the putty knife—this helps avoid bending. Give the putty knife the slightest flex to help pop most of the metal tabs on this side loose.
Step 13

The metal clips around the corners can be pretty stubborn, gripping the front panel tightly. To open up the device, you’ll need to carefully release these clips. Take your time, and if you need a hand, you can always schedule a repair.
– Gently slide a metal spudger into the area around the stubborn metal clip and give it a careful pry to loosen things up. If you need a hand, you can always schedule a repair.
Tools Used
Step 14

– Give the metal spudger a gentle wiggle until it slides all the way into the rear panel.
Tools Used
Step 15

Be careful not to create a visible bump on the rear panel here—it can be tricky to fix! When prying the tab free, try to have the metal spudger pivot on the edge of the rear panel rather than pushing the rear panel outward. That way, you’ll avoid unnecessary damage.
– Carefully start to loosen the clip from the front panel. Take your time, a gentle touch goes a long way.
Tools Used
Step 16

– Keep gently prying up the front panel with your metal spudger until you feel that metal clip pop free. Almost there!
Tools Used
Step 17

There are two ribbon cables linking the rear panel to the rest of the iPod. Make sure to handle them with care in the next step – they’re delicate, and we don’t want any surprises!
Take a deep breath and relax – you’ve got this!
– Hold the front panel assembly with one hand and the rear panel with the other. Get a good grip, but don’t overdo it!
– Now, gently (really gently) work on loosening those last few clips on the rear panel. Imagine the bottom of your device is a hinge, and slowly pull the tops of the front and rear panels apart. Be super careful with the ribbon cables holding everything together—this part needs a light touch. Take your time!
Step 18


The brown lock tab holding the battery flex cable is super delicate—treat it gently! Yank too hard or grab the white part, and you might accidentally pull the whole connector off the board, which is not a fun fix.
Hands off the white parts that run to the outer edges of the connector—they’re not for pulling!
When lifting the brown lock tab, slide it straight up. No twisting or sideways moves, or this fragile connector could snap.
If you’re using tweezers, don’t pinch right next to the socket. That’s a shortcut to shorting out the cable contacts.
– Take your angled tweezers or opening tool and gently pop up the brown locking latch—just about 1 mm. Give both sides a little lift at the same time.
– Grab the flex cable with your fingers or tweezers and pull it straight up to disconnect. Easy does it!
Step 19

– Keep the rear panel close to your iPod, but give that orange headphone jack cable some slack—no need to have it doing yoga stretches.
Step 20

– Gently lift the hard drive with one hand to get a clear view of the headphone jack ribbon hiding underneath.
– Grab your trusty spudger and flip up the little plastic tab holding the headphone jack ribbon—it’s like a mini drawbridge that pops up 90 degrees to set the ribbon cable free.
– Slide that orange headphone jack ribbon right out of its connector. Smooth moves!
– And just like that, the rear panel is totally free from the iPod. Nice work!
Tools Used
Step 21

– Time to undo a little chaos from opening your iPod Classic. Chances are, one or more of those metal clips on the back panel got bent up. Before putting the rear panel back, make sure every clip is bent downward where it belongs.
Step 22

Watch out not to bend or break those headphone jack clips while shaping them—stay gentle and keep it smooth!
– Use the flat, wide side of your metal spudger to gently press the clip down. Just be careful not to snag or bend that delicate metal rail on the back panel! If you’re feeling fancy, a pair of flat pin-nosed pliers can make the job even smoother and help avoid any accidental dings near the headphone jack.
Tools Used
Step 23

You might need to repeat this a few times to get the sides just right. It’s better to push the edges of the case in a little too much than too little, because reseating the front panel will help bend the rear panel into perfect alignment.
Now that the rear panel is looking great again, it’s time to move on to fixing the rest of the iPod!
– Place the rear panel on a clean, solid surface, with the side facing up. Gently yet firmly press down on the edge, rolling the lip back into its rightful place. Take your time and make sure everything aligns smoothly!
Step 24


– Grab a spudger and gently lift the battery along with the orange cable out of the iPod. Keep in mind, if you’re working with a 160 GB iPod, the battery might be a bit bulkier than the one shown in the picture.
The battery is glued to the back panel, so be careful when prying it off. Watch out for those orange ribbon cables for the headphone jack and hold button—don’t pull too hard!
Having trouble prying out the battery? No worries—try warming up the back of the device with a hair dryer or heat gun to loosen that stubborn glue. Just keep an eye on the temperature so you don’t overheat the battery. If you need a hand, you can always schedule a repair.
Tools Used
Step 25

– Hold the orange ribbon cables steady with one hand, and use your other hand to gently peel away the black tape that’s keeping them attached to the rear panel.
Step 26

– Start by unscrewing the two tiny black Phillips screws holding the headphone jack in place on the rear panel. These little guys are SMALL, so be sure to grab a size 00 screwdriver for the job.
– Take it slow and steady! If you’re not feeling sure about it, feel free to schedule a repair.
Step 27

– First, let’s tackle those screws. Here’s what you need to unscrew:
– One black Phillips screw holding the hold switch down near the corner of your device.
– One silver Phillips screw securing the other side of the hold switch.
Step 28

– Gently lift the hold switch out of its spot on the back panel. No need to take it all the way out yet, since it’s still connected to the same cable as the headphone jack.
Step 29

– Gently slide the headphone jack out from its spot on the back panel.
– Carefully lift out the headphone jack and hold switch assembly from your iPod.
Step 30


If you’re just looking to pop off the rear panel, feel free to skip Steps 30 and 31. No need to overcomplicate things!
Got a replacement headphone jack with the white plastic hold switch? Simply reinstall it, and when you’re placing the hold switch assembly, make sure you line up that little locating pin near the silver screw hole. Once that’s in place, the rest will fall into position. After everything is screwed in, don’t forget to peel off the backing tape on the contact pad right next to the jack. Easy as pie!
– If your replacement part doesn’t come with the plastic hold switch, no worries! Just follow the steps below to move it to your new headphone jack.
– First, grab your screwdriver and remove the single Phillips screw that’s closest to the hold switch.
– Now, gently lift the plastic part of the hold switch away from the orange ribbon cable.
– When putting everything back together, make sure the black notch fits perfectly with the gray slider. (Check out picture 2 for a visual guide!)
Step 31

– Grab the small iPod opening tool and gently lift the orange ribbon cable along with the black Hold switch from the metal backing. Be careful – slow and steady wins the race here!
– When it’s time to pop the replacement Hold switch back in, make sure those two little posts on the back of the switch line up perfectly with the holes in the metal backing. A little patience now will save you time later!