
Samsung Galaxy Watch Ultra Chip ID
Duration: 45 minutes
Steps: 6 Steps
Spot the chip ID on your Samsung Galaxy Watch Ultra here. Want to see the whole teardown in action? Check out our YouTube channel for all the details.
Step 1
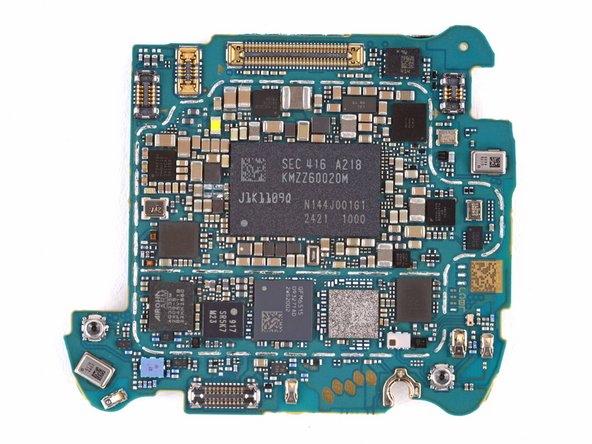

– Let’s get started by identifying the main components on your device. You’ll find the Samsung SC55535AHA Exynos W1000 application processor tucked underneath the Samsung KMZZ60020M-A218 32 GB NAND flash and 2 GB LPDDR5 SDRAM memory modules. Next, locate the Zinitix ZTM730 touchscreen controller—it’s the brain behind your display’s touch response. Keep an eye out for the Cirrus Logic CS40L27R haptic driver, responsible for those satisfying vibrations. The Texas Instruments audio amplifier is also present, boosting your sound quality. For wireless charging, you’ll find the ConvenientPower CPS4019A receiver ready to go. The Texas Instruments TUSB2E111 single port eUSB2 to USB 2.0 repeater handles your device connections smoothly, and the Goertek MEMS microphone captures your voice clearly. If you need help along the way, you can always schedule a repair with Salvation Repair to ensure everything gets done right.
Step 2

– Alright, let’s dive into these tiny tech parts and give them a friendly nudge. First up, locate the Samsung RF transceiver—think of it as the phone’s little radio buddy. Next, find the Qualcomm QFM6515 front-end module—it’s the front-line communicator. Then, look for the Qualcomm power amplifier module, which boosts signals like a champ. Don’t forget the Samsung Bluetooth & WiFi controller—your wireless wizard. Spot the Airoha AG3335M GNSS receiver—it’s the GPS guy keeping you on track. Find the NXP Semiconductors NFC controller—your near-field communications pal. Lastly, hunt down the Infineon BGA125N6 band L2/L5 GNSS low noise amplifier—this one tunes the satellite signals for better reception. If you hit any snags, you can always schedule a repair to get professional help.
Step 3

– Ready to tackle some tiny components? First, locate the Infineon BGA123N6 GNSS low noise amplifier and the Infineon BGSA14M2N10 antenna tuner on your device. Carefully heat the area with a hot air rework station to loosen the solder. Gently lift off the old parts with tweezers—patience is key here. Clean the pads thoroughly to prepare for the new pieces. Place the new components precisely where they belong, then reflow the solder with controlled heat. Double-check your work for solid connections. If you need help during this process, you can always schedule a repair to get professional support. Great job on getting this far—you’re well on your way to restoring your device!
Step 4

– STMicroelectronics motion sensor (accelerometer & gyroscope)
– AKM Semiconductor AK0991xC 3-axis digital compass
Step 5

– Chances are, it’s your antenna tuning switch acting up. It’s a common culprit, so take a deep breath and check it out.
Step 6

– Let’s dive into the world of the Texas Instruments AFE4510 biosensing analog front-end. You’ll be handling a critical part of the circuit, so take your time and work carefully. If you’re feeling unsure, don’t hesitate to schedule a repair with us. We’re here to help! Just follow the steps, and you’ll have your device back in no time.