Samsung Galaxy Note9 Earpiece Speaker Replacement Guide
Duration: 45 minutes
Steps: 29 Steps
Get ready to breathe new life into your Samsung Galaxy Note9 by replacing the earpiece speaker. Our step-by-step guide will walk you through the process. If you need help, you can always schedule a repair.
Step 1


– Time to get started – insert a SIM card eject tool straight into the hole in the SIM card tray, it’s easier than it sounds.
– Gently press the tool to eject the SIM card tray, and you’re one step closer to getting your device up and running. If you need help, you can always schedule a repair
Tools Used

Step 2

No worries, the SIM card should pop right out of the tray. Easy peasy!
– Pop out the SIM card tray like a pro!
Step 3

– First, switch off your phone – it’s time to get started with the repair. Make sure it’s completely powered down before you begin.
– Now, let’s loosen things up. Use a hairdryer, a heat gun, or an iOpener to warm up the adhesive on the right edge of the back of your phone. Just apply it for about a minute, and you’ll be ready to move on to the next step. If you need help, you can always schedule a repair
Tools Used

Step 4


If the adhesive is being stubborn, try applying a bit more heat – just be gentle, as too much force can cause the glass to break. If you need help, you can always schedule a repair
If the glass is super cracked, use some packing tape to cover it up. This will give the suction cup a nice, smooth surface to grab onto.
– First, attach a suction handle to the back cover – it’s time to get this repair started!
– Next, use that handy suction handle to gently lift the back cover and create a gap between it and the phone’s frame.
– Now, take an opening pick and carefully insert it into the gap you just created. You’re making great progress! If you need help, you can always schedule a repair
Tools Used

Step 5

If the adhesive gets a bit stubborn, don’t force it – just add some more heat and it should loosen up nicely. If you need help, you can always schedule a repair
– Hey, there’s extra sticky stuff along the top edge and around the camera, so be careful!
– When you’re cutting around the left edge near the fingerprint sensor, be super careful – that’s where the ribbon cable lives, and you don’t want to hurt it!
Step 6


Khanga na tu ucheche kunaweza kuvuta pande zote za kati ya simu, labtop, au taboradoku, japo usijua umepata vigezo! Utaacha kina cha sensa ya homoni au kamera zako, bali ugombane na kuiona mkono wa upata!
– Let’s get this adhesive outta here! Starting from the center, cut the adhesive up and down the right side with an opening pick. If you need help, you can always schedule a repair
Step 7


Watch out for the corner! The glass is a bit fragile there. Don’t worry, just apply a little more heat if you need to. You’ll be a pro in no time!
– Now it’s time to get started – leave an opening pick in the upper-right corner to help you get a grip on things.
– Next, grab another opening pick and carefully cut the adhesive around the bottom-right corner. You’re making great progress!
– Go ahead and leave that opening pick in the phone for now – if you need help or get stuck, you can always schedule a repair with the experts at Salvation Repair.
Step 8

– Warm up the left side of the rear panel with a heat gun, hair dryer, or a cozy heated iOpener for about three minutes. This little toasty session will help soften the adhesive hanging on tight underneath.
Tools Used
Step 9


Hey, be super careful around the corners—that’s where the glass is kinda delicate. Just sayin’!
Don’t go crazy with that opening pick on the left edge near the fingerprint sensor. You wouldn’t want to hurt that little ribbon cable inside. If you’re feeling nervous, you can always schedule a repair with us!
No worries if the opening picks fall out as the back cover starts to separate! We gotcha covered. If you need help, you can always schedule a repair.
– Let’s get this party started! Slide your opening pick into the lower-left corner of the back panel. It’s like a dance move – smooth and easy.
– Now, grab another opening pick and carefully cut the adhesive along the left edge of the rear panel. Just like slicing through a warm, gooey cake.
Step 10


Grab your trusty iOpener, hair dryer, or heat gun and warm things up a bit more where you’re slicing through that adhesive. You’ve got this!
– Alrighty, let’s have some fun! Using that snazzy opening pick you’ve got, carefully emoji-dance around the upper-left corner of the rear panel. And finally, it’s time to chop the last of that adhesive along the top of your phone. 😉✂️ If you need some help, you can always 😎schedule a repair!
Tools Used
Step 11


Hold your horses! Don’t pull that fingerprint sensor ribbon cable just yet. 😉
The fingerprint sensor cover might still be stuck to the midframe, so be prepared to gently coax it loose.
– First up, let’s tackle the right side of that rear cover. Gently separate it and give it your best effort!
– Now, tilt the cover upwards along the left edge. This should reveal the fingerprint sensor ribbon cable, like a surprise gift waiting for you!
Step 12


– Alright, friendo! Let’s give that fingerprint sensor ribbon cable a lil’ persuading lovin’ with our trusty spudger. Just carefully pry that bad boy up and out of its cozy little home. If you need help, you can always schedule a repair.
Tools Used

Step 13

– First things first, let’s pop off the back cover and get this party started!
– When it’s time to reattach the back cover, here’s what to do: Grab your tweezers and gently remove any leftover adhesive from the phone’s chassis. Next, take a lint-free cloth and some strong isopropyl alcohol (aim for 90% or higher) to clean the areas where you’ll be applying the new adhesive. No need to get every last bit of adhesive off, just make sure the big chunks are history!
– Before sealing everything up, power on your phone and give your repair a quick test. It’s always better to check before sticking things together for good.
– Now, carefully apply your new adhesive to the back cover. Line it up snugly with one edge of the phone chassis and press down firmly to secure it in place. You’ve got this!
Tools Used

Step 14


– Grab your trusty Phillips screwdriver and let’s tackle those nine 4 mm screws holding the upper midframe together. You’ve got this!
Step 15


The upper midframe clicks in and out like it’s playing a game of hide and seek.
– Let’s get this party started! We’re gonna gently pry the upper midframe off. Slide the tip of a spudger into the upper-left corner of the upper midframe.
– Now, with a little finesse, pry that upper midframe loose from the phone. Easy peasy!
Tools Used
Step 16


The adhesive might be feeling a bit shy, but no worries! Grab an opening pick and give it a little nudge to slice through if you need to.
– Gently peel away the wireless charging coil from the battery, starting from the left side to get things rolling smoothly.
– When putting everything back together, kick things off by snapping the midframe into position first, and then follow up by securing that wireless charging coil.
Step 17


– Gently pry the orange ribbon cable away from the motherboard using the tip of your trusty spudger. You’re doing great—keep it up!
Tools Used
Step 18

– Let’s get started by removing the nine 4mm Phillips screws from the plastic cover next to the battery. Take your time and make sure they’re all out before moving on to the next step. If you need help, you can always schedule a repair

Step 20


Don’t worry, this part is a snap! The lower midframe just pops in and out.
– Let’s get this lower midframe out! Slide the tip of your spudger into the top of the lower midframe.
– Gently pry the lower midframe away from the phone.
– Now just pop that lower midframe right off! You’re doing great!
Tools Used
Step 21


– Grab your trusty spudger and gently lift the front camera connector straight out of its cozy little socket.
– With a steady hand, use some tweezers to carefully take out the front camera.
Step 22


– Gently pry that iris scanner off the motherboard using the tip of a spudger, like a little dance move for your phone!
– Now, with your trusty tweezers, give that iris scanner a little send-off. It’s time for it to go on an adventure.
Step 23


– Now, it’s time to gently coax that front sensor connector out of its socket! Use the flat end of a spudger, give it a little wiggle, and it should pop right out. If you’re feeling a little nervous, don’t worry, it’s totally normal! You’re doing great. If you need help, you can always schedule a repair.
Tools Used
Step 24


– Now, grab that trusty spudger and use the flat end to gently disconnect the display cable from the motherboard. It’s like a little dance – one quick move and you’re ready for the next step! If you need help, you can always schedule a repair.
Tools Used
Step 25


– Grab your trusty spudger and use the flat end to gently pry away the touchscreen cable from the motherboard. You’ve got this!
Tools Used
Step 26


– Now it’s time to disconnect the charging assembly from the motherboard. Use the flat end of a spudger to gently pry them apart. If you need help, you can always schedule a repair
Tools Used
Step 27


– Alright, let’s get this party started! Remove those three 4mm Phillips screws holding the motherboard in place. You’ll see little triangles next to the screw holes. They’re like little party hats, pointing you in the right direction.
– If you need help, you can always schedule a repair.
Step 28


Gently set those ribbon cables aside as needed. Make sure not to yank the motherboard out if it gets caught on any cables.
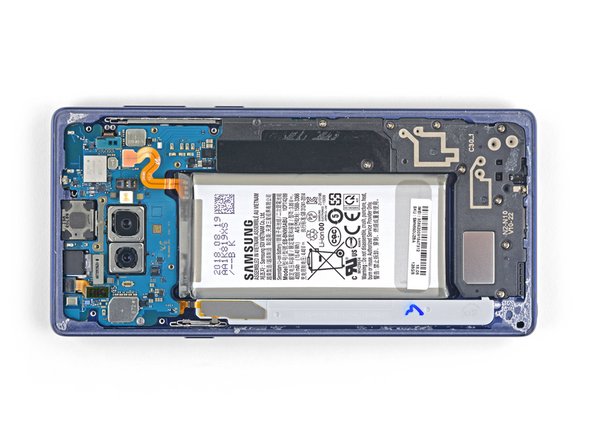
– Grab your trusty spudger and gently nudge that motherboard up from the upper-left corner like you’re lifting a sleepy cat.
– Now, with care and finesse, go ahead and take out the motherboard. You’ve got this!
Tools Used
Step 29


Be gentle with that tweezer! Just use the very tip if you want to keep your earpiece speaker safe and sound.
– Slide one side of your trusty angled tweezers into the little gap at the side of the phone’s earpiece speaker slot.
– Gently coax the earpiece speaker away from its sticky bond.
– Carefully lift the earpiece speaker out of its cozy little nest.
Tools Used