Replace Galaxy Note8 NFC
Duration: 45 minutes
Steps: 10 Steps
Before you start taking your phone apart, make sure the battery is below 25% charged. This reduces the risk of it catching fire or exploding if accidentally punctured – safety first!
If your battery is swollen, avoid heating up your phone, as this can cause more damage.
Be careful not to damage the waterproof sealing, so your device can continue to function normally.
And don’t worry about the loose water-protection – we’ve got you covered. If you need help, you can always schedule a repair
Ready to give your Samsung Galaxy Note8 a new lease on life? This guide will walk you through replacing a broken NFC antenna and charging coil assembly. Before we get started, let’s make sure your phone is chill. Discharge the battery below 25% so we can keep things cool. A punctured battery can be a bit of a fire hazard, but the risk is way lower if it’s not fully charged. If your battery is looking a little puffy, don’t even think about heating up the phone. If you need to, you can use a dropper or syringe to add some isopropyl alcohol (90+%) around the edges of the back cover to loosen up the adhesive. Puffy batteries are not cool, so wear your safety goggles and be careful. If you’re feeling unsure, always schedule a repair with Salvation Repair. Opening up the Galaxy Note8 will mean saying goodbye to that waterproof seal, so if you don’t replace it, your phone will be working just fine, but you won’t have that water-resistant protection anymore. This repair involves taking off the back glass cover, so you’ll need some new adhesive to stick it back on. Let’s get started!
Step 1

– First things first, let’s power down that phone of yours.
– Next up, grab an iOpener to help loosen the sticky stuff on the back of your Note8.
– Once you’ve got that ready, place the iOpener on the back of your Note8, right along the side where the power button is located.
Tools Used

Step 2


Don’t go crazy with that opening pick! We want to keep that back cover in tip-top shape. Give it a gentle tug with the suction handle, and use the pick to carefully cut through the adhesive. It’s all about being a smooth operator, right?
To tackle that back cover, remember it’s a bit curvy at the edges—so slide in the opening pick at a gentle angle from underneath. Think of it like giving your device a little lift!
If you find the pick is starting to feel like it’s stuck, no worries! Just reheat that iOpener and give the back cover another warm hug. You’ll be back in business in no time!
– Grab your trusty suction handle and give that back cover a gentle lift! Once you’ve got a little gap, slide in your opening pick. Easy peasy, right?
– Start at the middle of the side, and carefully cut the adhesive while keeping the suction handle pulling up. Think of it as a tiny, precise dance!
– Slide that pick towards the bottom corner, and leave it there like a little guard dog to keep the adhesive from sticking back.
– Now for the grand finale! Grab another pick and move it to the top corner. You’re almost there!
Tools Used

Step 3


– Grab another opening pick and gently glide it around the corner and along the top edge.
– If things are feeling a bit stiff, give it a warm hug with an iOpener.
– Leave that pick resting in the top right corner to stop the adhesive from getting cozy again.
Tools Used
Step 4


– Now it’s time to get this device opened up – rotate it and use another opening pick to start loosening the adhesive at the bottom.
– Leave that pick in place at the bottom right corner to keep everything from sealing back up – you’re making great progress! If you need help, you can always schedule a repair
Step 5


Hey, don’t get too rough! If the back cover is stuck or bending, use an iOpener again to loosen up that glue. It’ll make things easier. If you need help, you can always schedule a repair.
– Alright, champ, let’s get this adhesive peeled! When it’s all separated on those three sides, you can gently lift the back cover. Just remember to be careful with that fingerprint sensor connector when you’re flipping it open – you might need to disconnect it, which is covered in the next step. If you need help, you can always schedule a repair.
Tools Used
Step 6

Hey, sometimes that connector pops off when you open the back cover. No worries, we’ve got this!
– Time to get a little delicate – use a pair of tweezers to carefully disconnect the fingerprint sensor. If you need help, you can always schedule a repair
Tools Used

Step 7

– Take off the back cover – it’s time to get started on this repair.
– Now, let’s get ready for reassembly. Remove any leftover adhesive from your phone and give the glued areas a good clean with some isopropyl alcohol and a lint-free cloth. If you need help, you can always schedule a repair
Step 8

– Let’s tackle those ten Phillips #00 screws! Grab your trusty screwdriver and get ready to twist them out with a smile.
Step 9


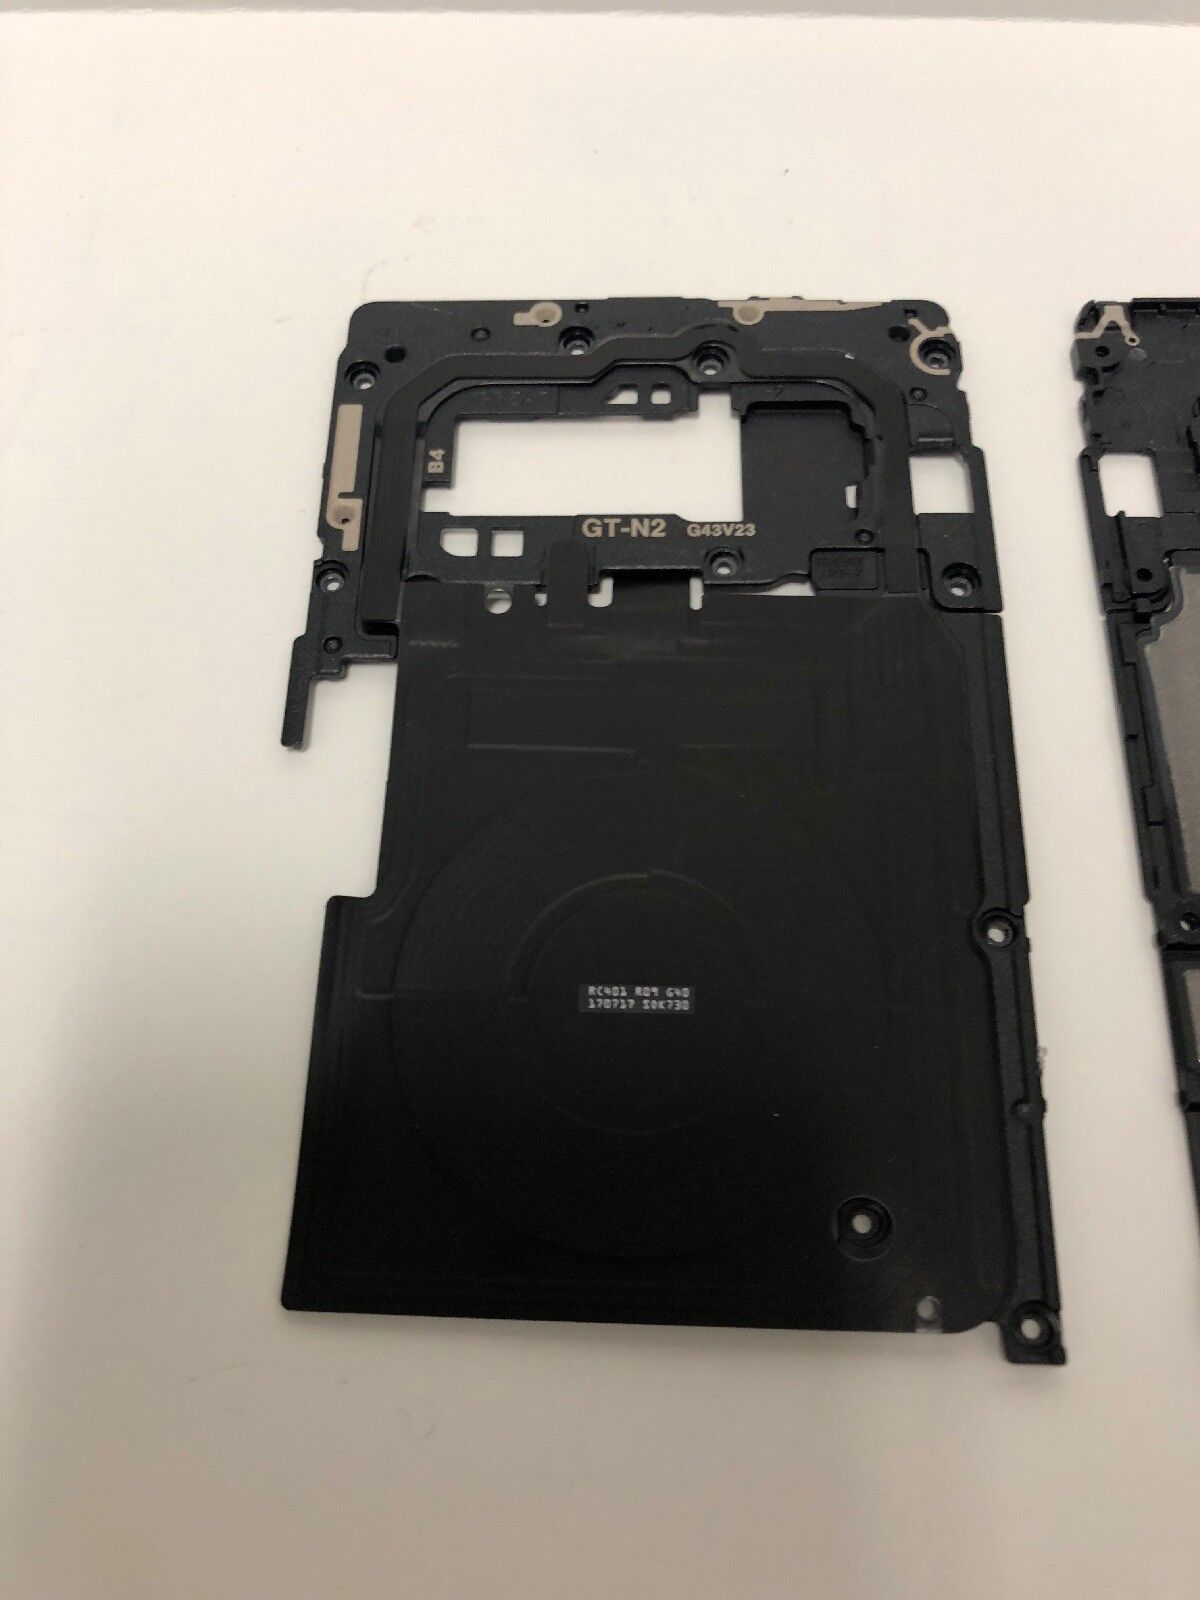
– Alright, let’s get this party started! Use an opening pick at the top edge to gently slide between the NFC antenna and charging coil assembly and the case.
– Now, with a little bit of finesse, lever the top of the assembly out of the case. Don’t worry, it’s like opening a treasure chest! If you need help, you can always schedule a repair
Step 10

Don’t worry, that bottom left part is just giving a little hug to the frame. It’s just a bit glued down. We’ve got this!
– Time to get that charging coil and NFC antenna assembly out! Gently lift it up, being careful not to damage anything.

