Samsung Galaxy S7 Edge Display Replacement Guide: Step-by-Step DIY
Duration: 45 minutes
Steps: 32 Steps
Heads up
If the frame is messed up or crooked
Let’s get this Samsung Galaxy S7 Edge display swap done! This guide is for replacing the display while keeping the original frame and battery. Now, the curved edges and strong adhesive can be a bit tricky, but don’t worry! Just take your time, use a bit of heat, and keep pulling gently. The adhesive will eventually give in. Heads up, some replacement screens come with a new frame (a.k.a. chassis), which means you’ll need to transfer all your phone’s internal parts and install a fresh battery. Make sure you’ve got the right parts before you dive in. If your frame’s damaged or bent, it’s a good idea to replace it so your new screen fits snugly and doesn’t get squished. Separating the display from the frame usually means the display goes ‘poof’, so this guide is for when you’re ready for a display swap. If your screen’s shattered, protect your peepers with eye protection and use tape to hold the glass shards in place. Need help? You can always schedule a repair.
Step 1


On the top edge, you’ll spot two holes. The one you’re looking for is nestled within a sleek, long rectangular cutout.
– Time to get your gadget ready! Grab a SIM card opening tool, a SIM eject bit, or even a trusty paperclip and gently poke it into the tiny hole on the top edge of your phone.
– Give that opening tool a little push to pop the tray out. You got this!
– Now, carefully pull the SIM/SD card combo tray out from the phone. Easy peasy!
Step 2

You can use a hair dryer, heat gun, or hot plate to help out, but watch out for overheating your phone! The OLED display and internal battery are both a bit sensitive to heat, so keep it cool and steady.
Opening up your phone? Just a heads-up, it might mess with those waterproof seals! Make sure you’ve got some replacement adhesive handy before diving in, or be extra careful to keep it away from any liquids if you decide to put it back together without swapping the adhesive.
You might find yourself giving that iOpener a little extra love—rehheat and reapply it a few times to get your phone toasty enough. Just follow the iOpener instructions to keep things from getting too toasty!
– Warm up your iOpener and give it a cozy hug to one of the long edges of your phone for about two minutes. Let’s get that adhesive ready to party!
Tools Used

Step 3

The suction cup might struggle to stick on the curved edges of the glass. No worries, though!
If the back cover of your phone is cracked, the suction cup might not want to cooperate. Give it a shot with some strong tape, or for a better grip, you can superglue the suction cup in place and let it set before moving forward.
Remember, with that curvy glass, you’ll be pushing up instead of sliding in parallel to the phone. Think of it as lifting, not just inserting!
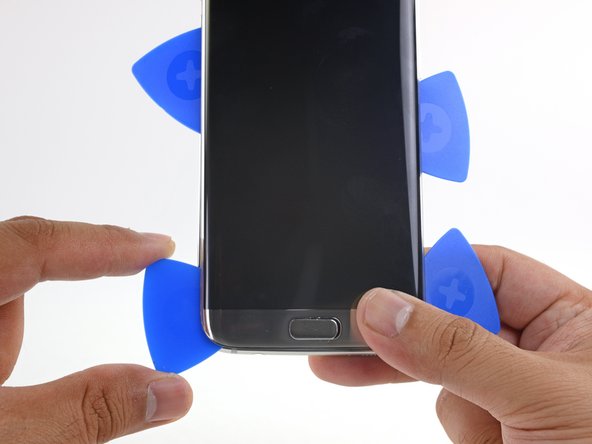
– Now that the back panel is warm, it’s time to get a grip – literally. Apply a suction cup as close to the heated edge as possible, being careful not to get too close to the curved edge.
– Give the suction cup a lift and slide an opening pick under the rear glass. You’re making great progress, and if you need help, you can always schedule a repair

Step 5


Take your time to ensure the tip stays snug in the seam. If it starts to feel like a struggle, just give it another warm-up with the iOpener and try again!
– Gently slide the opening pick along the side of your phone to loosen the adhesive – you’re making great progress!
– Leave that pick right where it is, and grab a second one to move on to the next step. Keeping the pick in place will help prevent the adhesive from sticking back together, making your repair a whole lot easier. If you need help, you can always schedule a repair
Tools Used
Step 6


– Now, let’s keep the momentum going! Just like before, heat things up and gently cut away at the remaining three sides of your phone. You’ve got this!
– And hey, don’t forget to pop an opening pick on each side as you move along. This little trick will keep that pesky adhesive from sticking back down. Easy peasy!
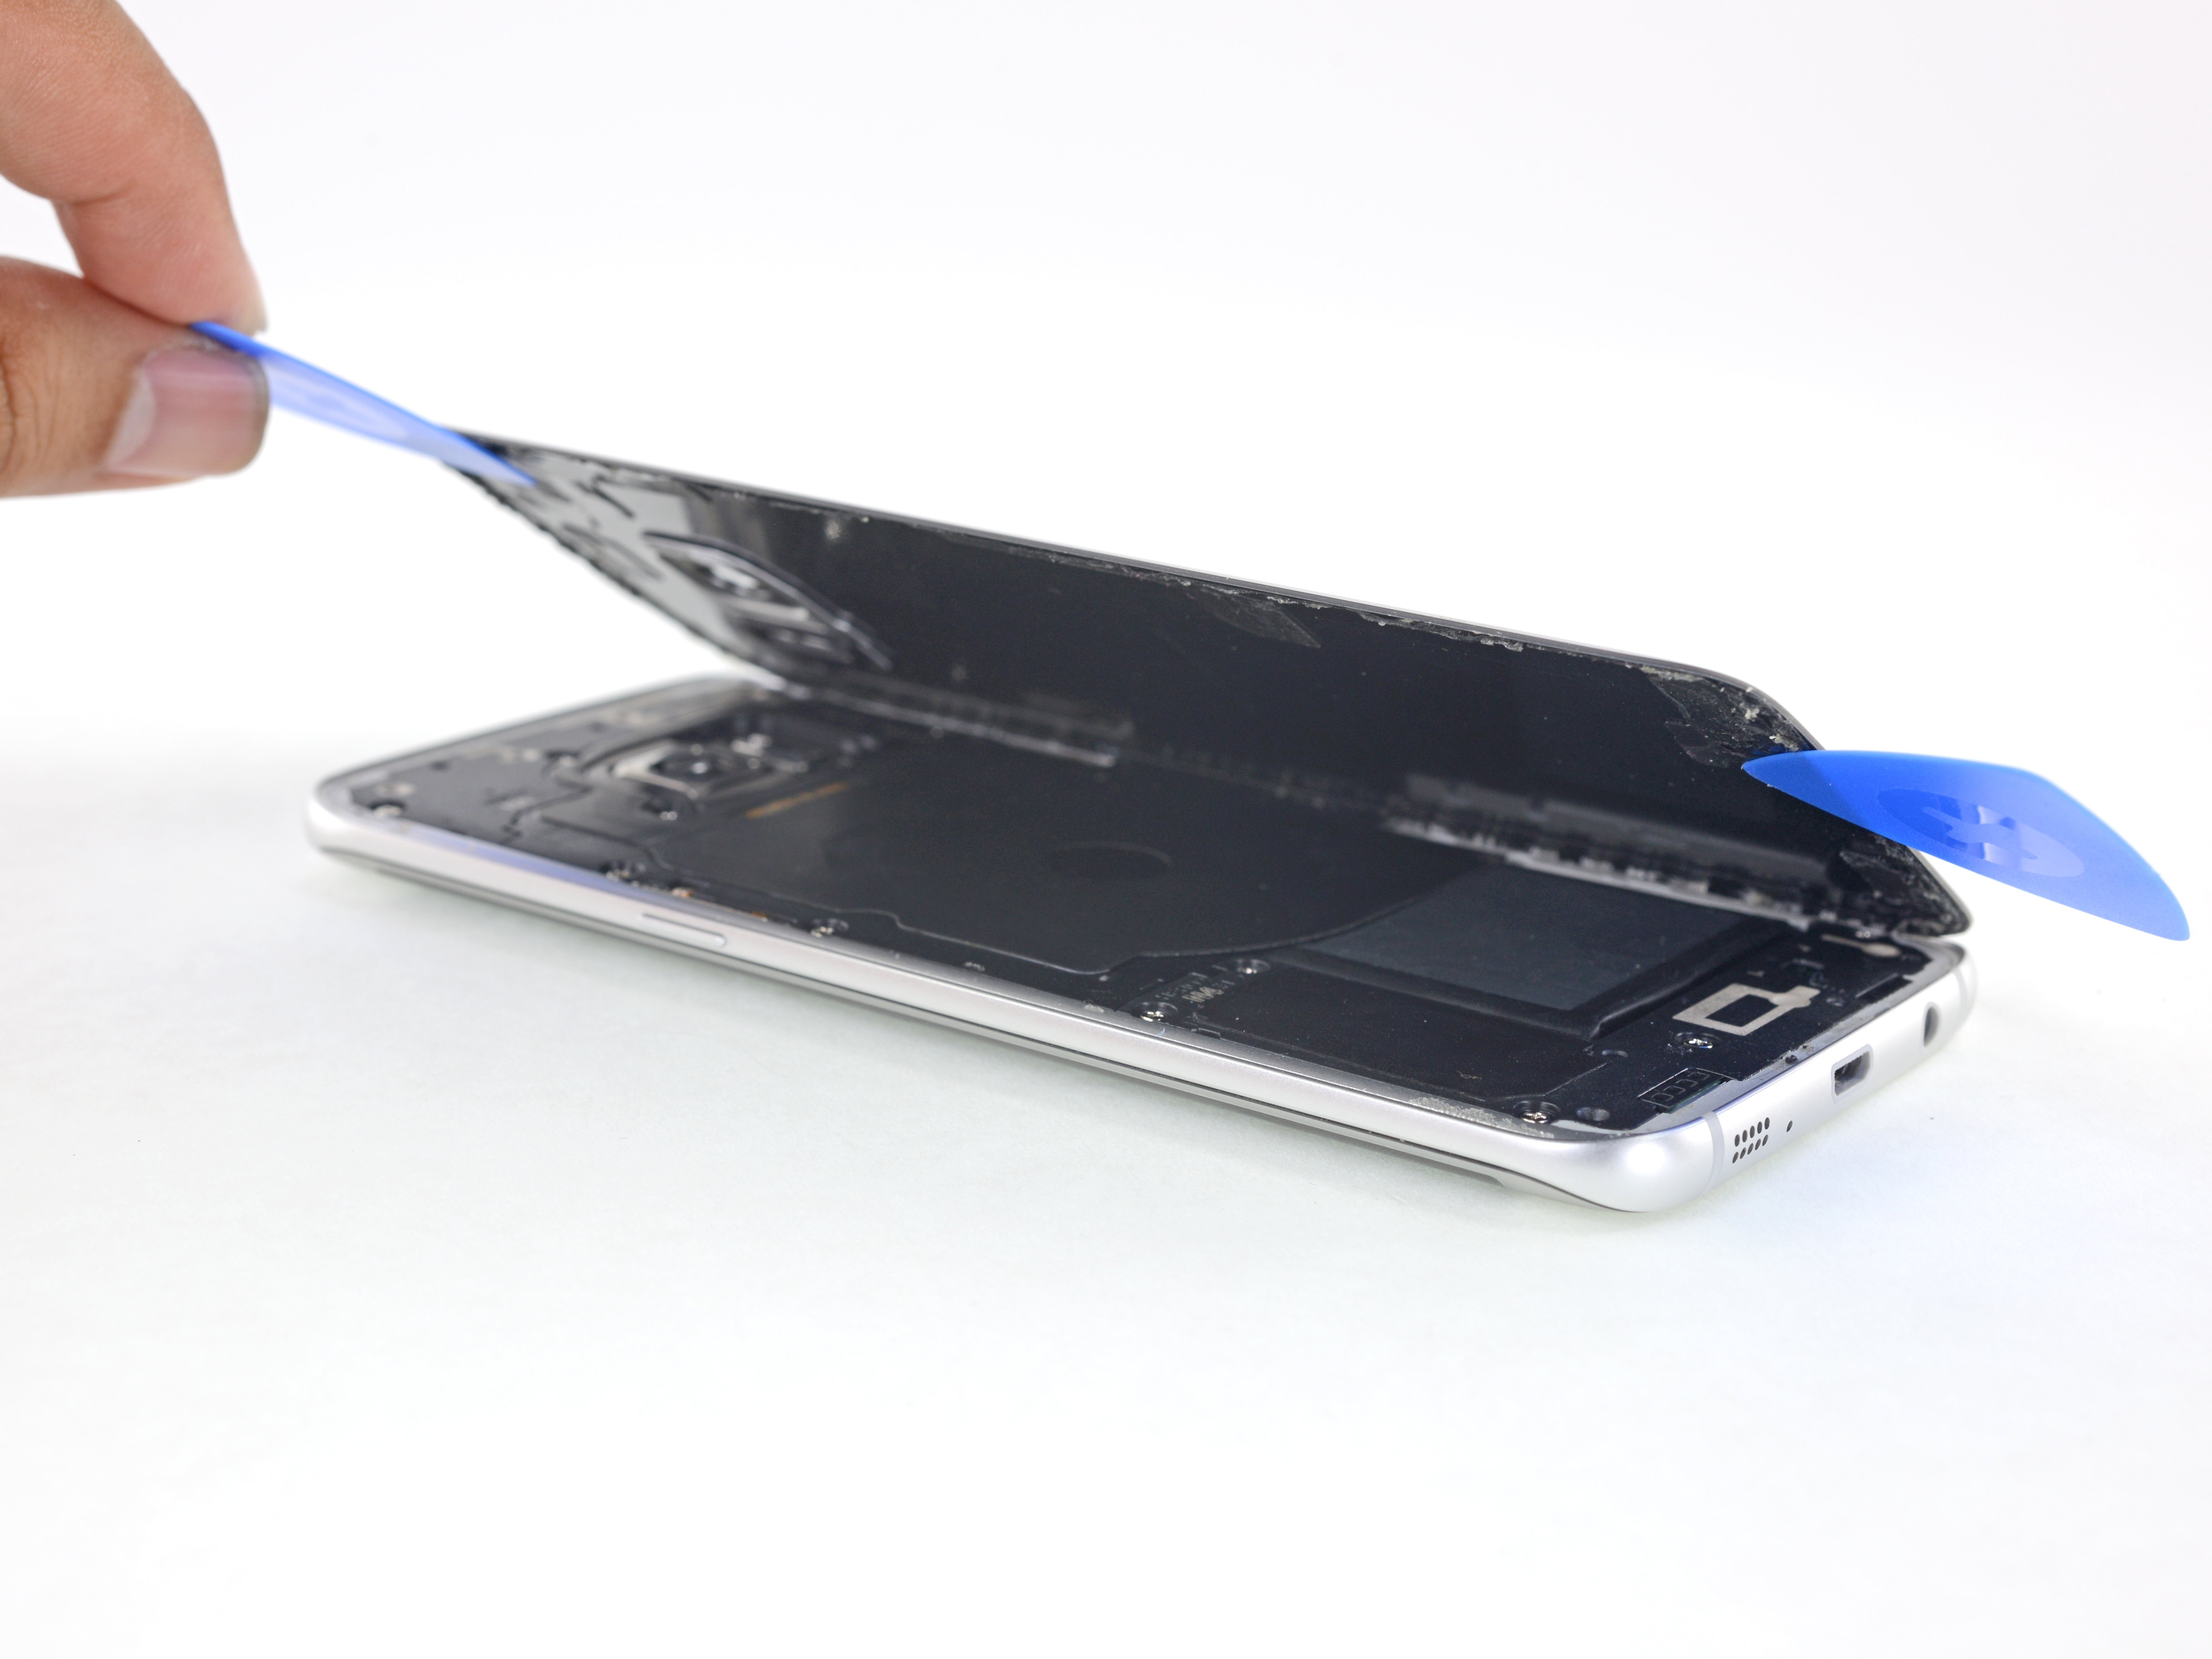
Step 7


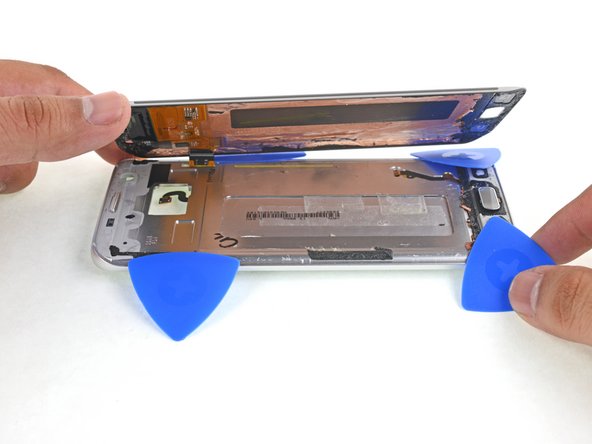
– Carefully lift the glass and gently set it aside from the phone.
Step 8


Feel free to pop the back cover back on without reapplying the adhesive if you’re feeling chill about it. Just make sure to clear away any big bits of adhesive that might keep the cover from laying flat. Once you’ve got it on, give it a little heat and some good ol’ pressure to make sure it sticks. It won’t be waterproof, but trust me, the glue’s usually strong enough to do the job!
Don’t forget to power up your phone and give your repair a test run before you go ahead and seal everything up with fresh adhesive.
– Time to give your device a fresh back cover! Let’s get started:
– If you’re putting the old back cover back on, or if you’ve got one that’s adhesive-free, we’ve got a handy guide for you right here.
– Grab some tweezers and gently remove any leftover adhesive from your phone’s chassis. After that, clean the areas where the adhesive will stick with some high concentration isopropyl alcohol (aim for at least 90%) and a lint-free cloth to make sure everything’s ready for the new adhesive.
– Now, peel off the backing from the new rear glass, line it up just right with one edge against the phone chassis, and give it a good press to secure it in place. You’ve got this!
Tools Used

Step 9

– Unscrew those twelve 3.5 mm Phillips screws with style and grace! You’ve got this!
Step 10


– Grab that nifty little notch on the lower left of the upper antenna and gently pry it out of the phone. You’ve got this!
– Now, go ahead and remove the upper antenna. Easy peasy!
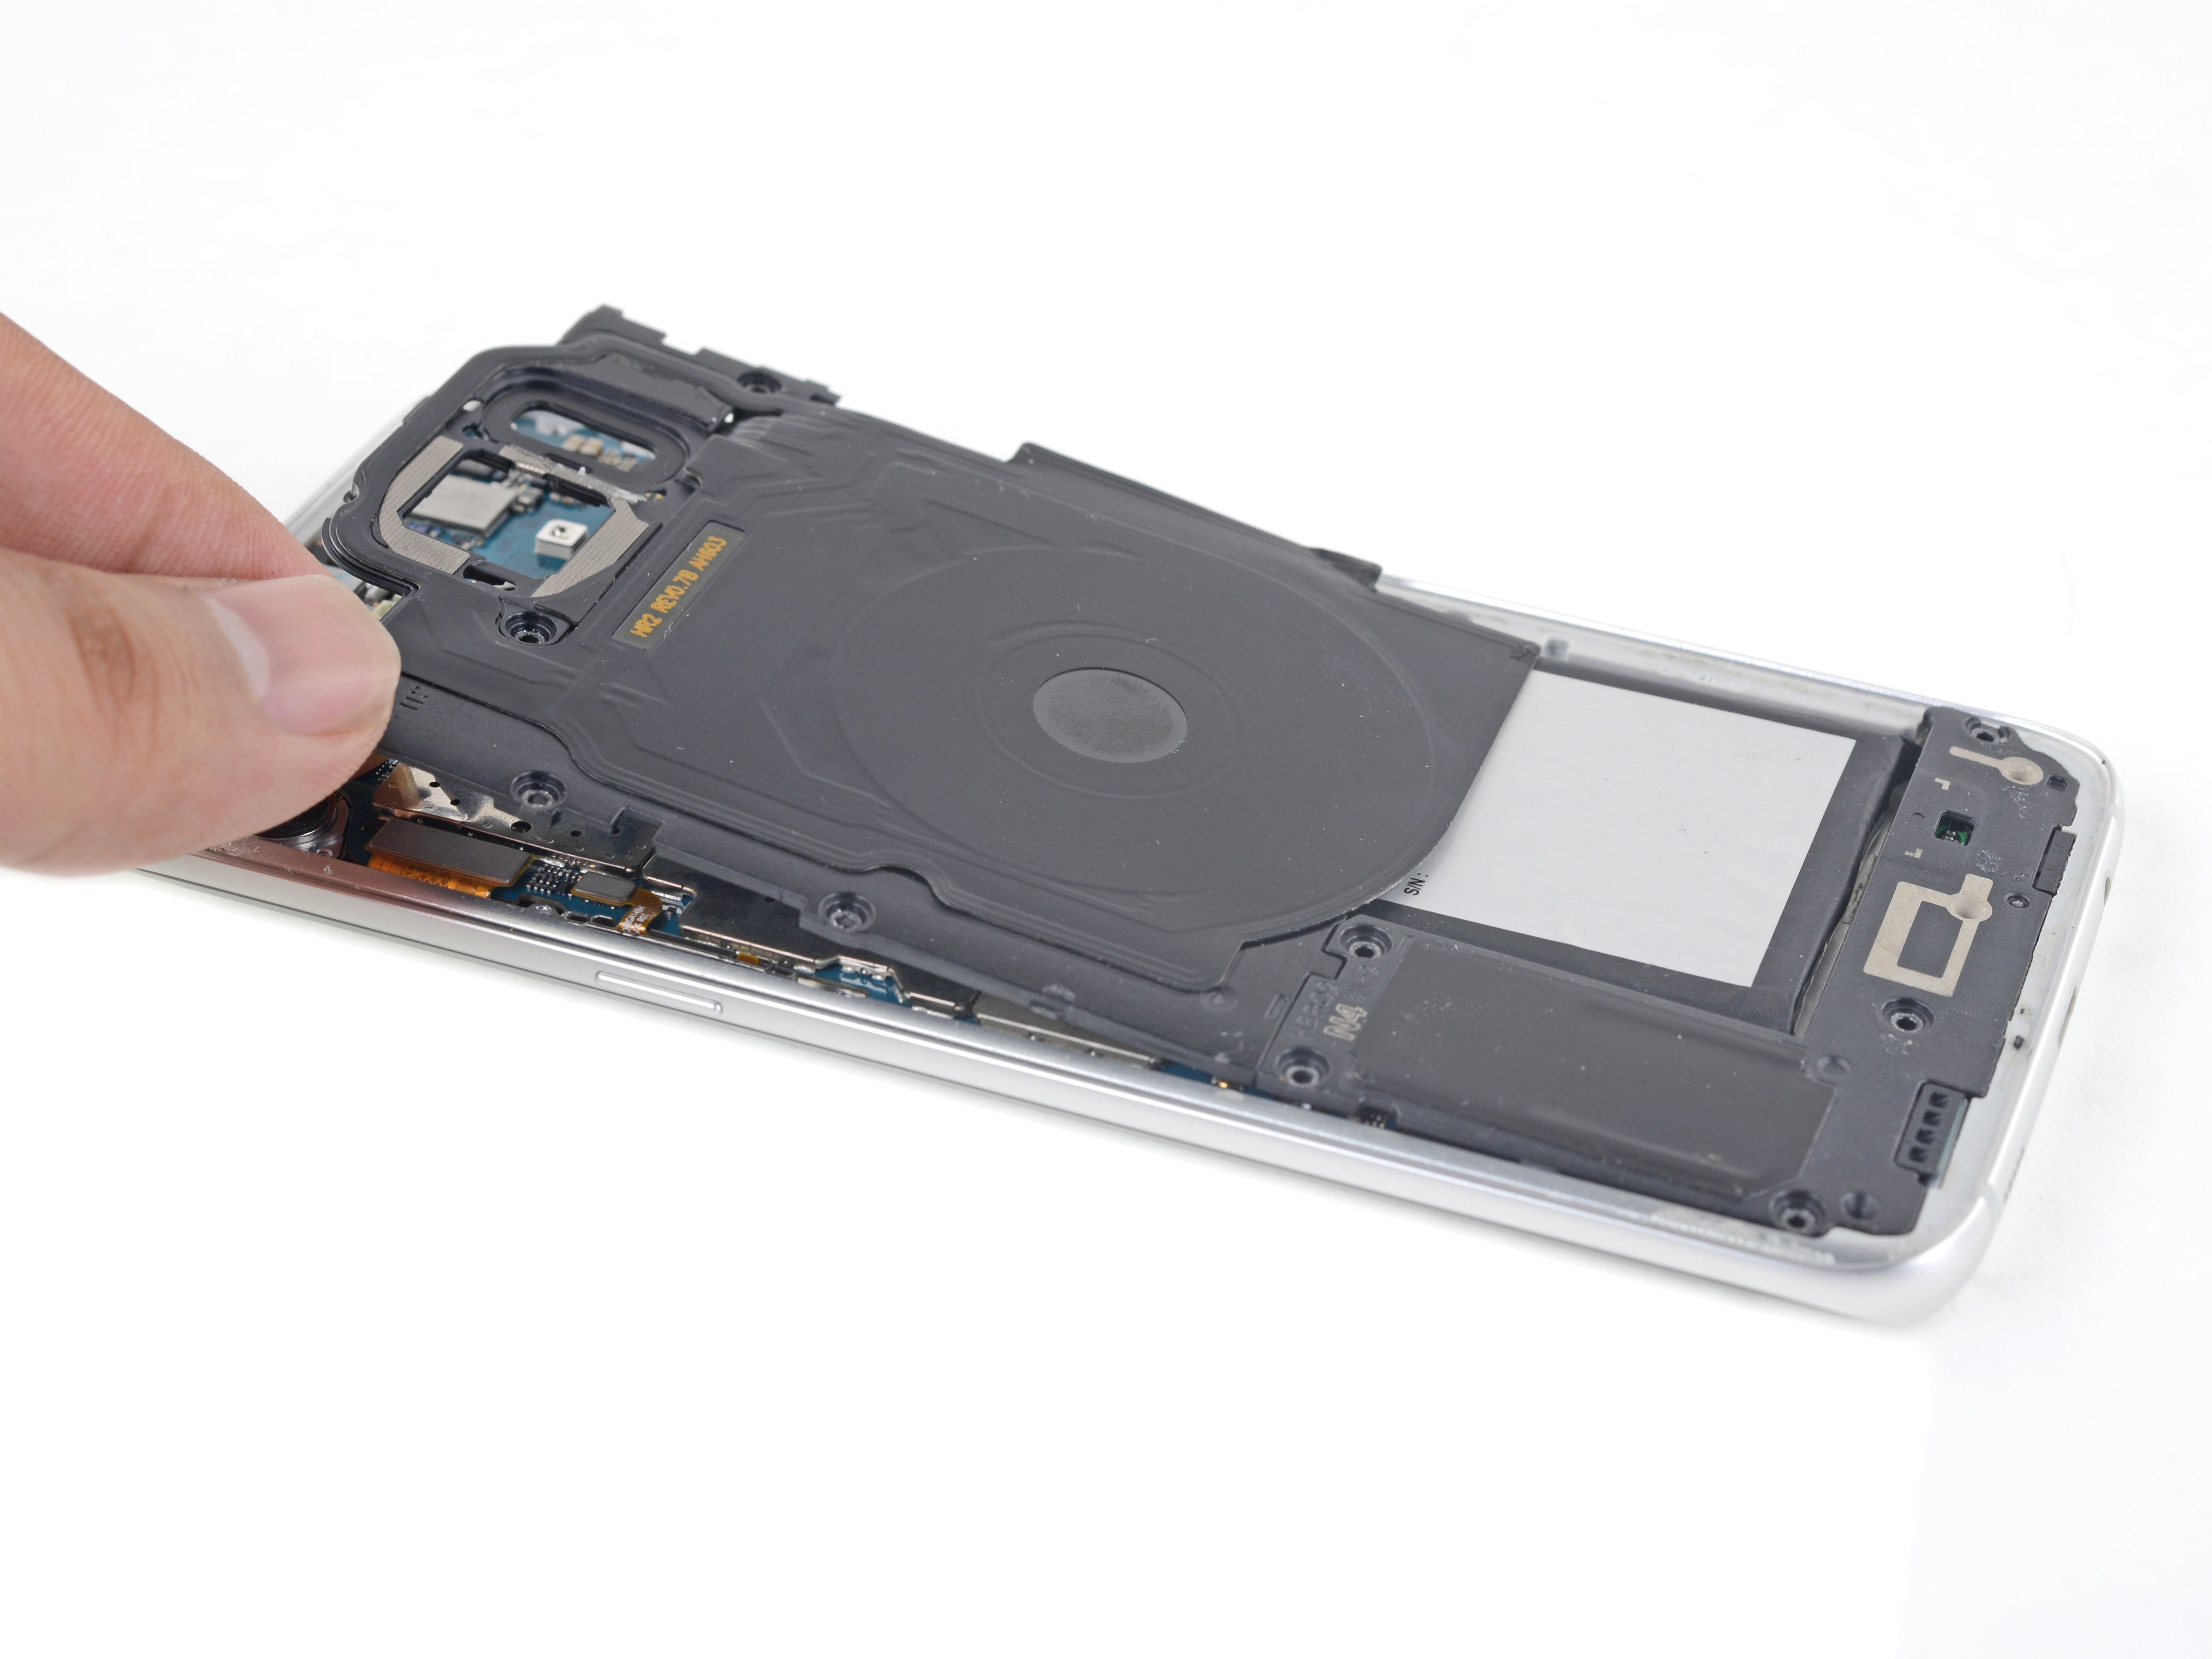
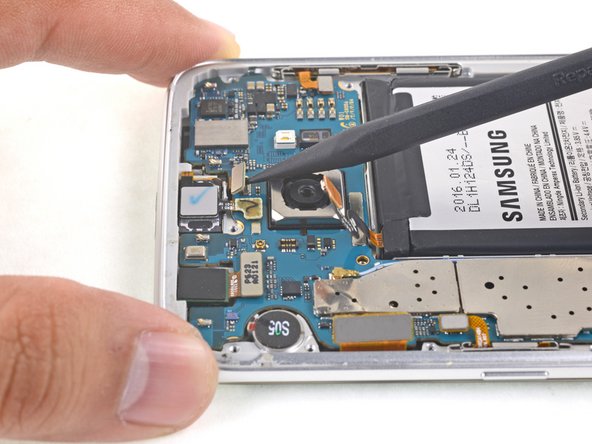
Step 11

– Time to get started – carefully lift and remove the wireless charging coil from your phone. If you need help, you can always schedule a repair
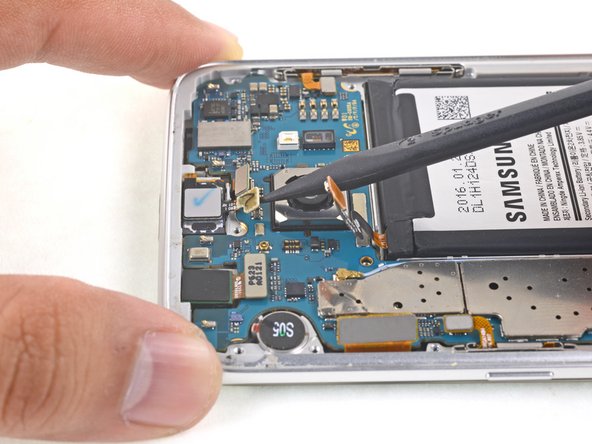
Step 12

– Time to get this phone singing again – gently lift and remove the loudspeaker from your phone.


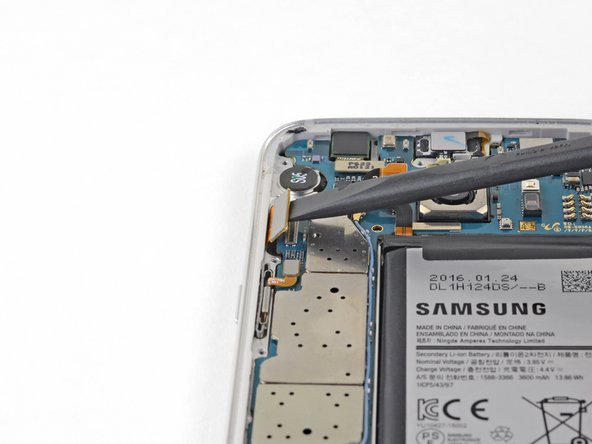

Step 15

– Grab your spudger and use its pointed end to gently disconnect the power button cable. You’ve got this!
Tools Used


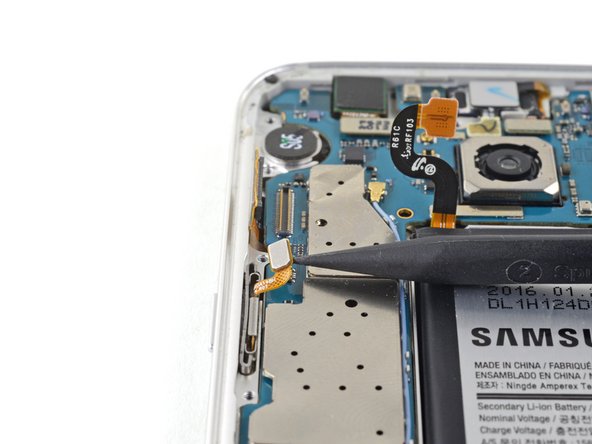
Step 17


– Grab your trusty spudger and gently pry the home button connector apart like a pro.
Tools Used

Step 19

– Grab your trusty spudger and use the pointed end to carefully detach the volume button cable. You’ve got this!
Tools Used
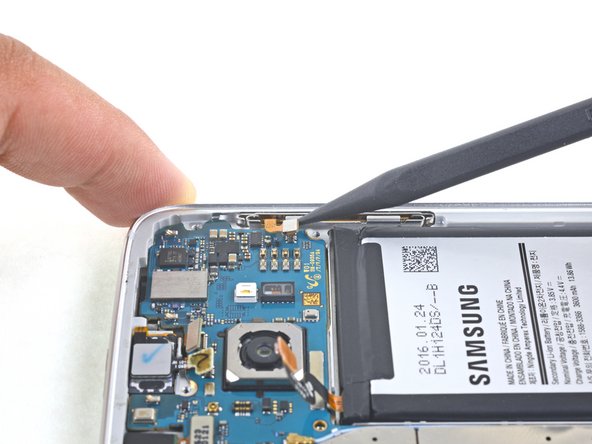
Step 20


Remember, keep that motherboard snug! It’s still connected to the daughter board by a cable, so don’t pull it out completely.
– Time to get this motherboard out – use the flat end of a spudger to carefully loosen it.
– Now, grip the edges of the motherboard and slowly hinge it up. As you do this, use your spudger to gently nudge any cables out of the way. If you need help, you can always schedule a repair
Tools Used
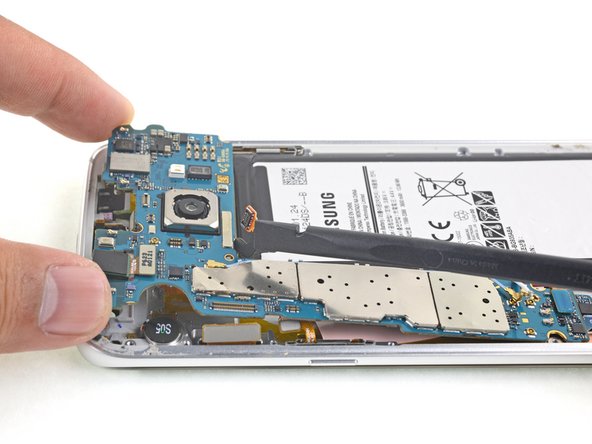
Step 21


– Grab your trusty spudger, and give that daughterboard ribbon cable a little nudge to disconnect it from the motherboard. It’s like a little dance, just a gentle push.
– Now, the motherboard is ready to come out! Let’s give it a little lift and say ‘see ya later’ to that motherboard.
Tools Used
Step 22

You can use a hair dryer, heat gun, or hot plate to help out, but watch out for overheating your phone! The OLED display and internal battery are both a bit sensitive to heat, so keep it cool and steady.
While you’re letting that adhesive do its thing, why not take a peek at the next step to get a head start on where to pry?
You might find yourself reheating and reapplying the iOpener a couple of times to warm up the phone just right. Just keep an eye on the iOpener instructions to avoid any overheating mishaps!
Step 23


As we dive into the next steps, remember to tread carefully in certain spots to keep your phone safe and sound!
As you swap out the OLED panel and display cable for the shiny new display, remember to treat those capacitive buttons like the precious gems they are! Handle them with care to avoid any mishaps.
If you accidentally happen to break any of the capacitive buttons or ribbon cables, no worries! You can easily replace the daughterboard assembly, which comes complete with brand new capacitive buttons.
– Get ready to tackle that display assembly – the edges are stuck down with some seriously strong foam adhesive, so be prepared for a bit of a challenge.
– You’ll find strong double-sided tape covering the entire copper surface, so take your time and work carefully to avoid any damage.
– The capacitive buttons are attached to the display and can be super easy to tear, so be gentle – they need to be reused for the repair to be successful. If you need help, you can always schedule a repair
Step 24


This adhesive is super strong, so you might need a few tries. Warm things up following the iOpener instructions, and keep at the heat-suction-lift routine until you can slide a pick in.
For shattered screens, lay down a layer of tape first, and then give it a try with strong tape to lift the display.
You might have to use some muscle, but just create a tiny gap with the suction cup to slide your tool in.
– First, warm up the edge and then apply a suction cup as close to the top edge as you can, being careful not to overlap the speaker grill – we don’t want any accidents!
– Now, gently lift the suction cup to create a small gap under the top edge of the display. You’re making great progress!
– Next, carefully insert an opening pick into the gap, but don’t go too far – about 0.25 inches is perfect. If you need help, you can always schedule a repair
Tools Used
Step 25

– With the opening pick securely in place, grab your trusty iOpener and give it a little love by applying some heat to the top edge once again. This will help loosen up that pesky adhesive, making your repair journey a bit smoother!
Tools Used
Step 26


Whoa there, champ! Don’t go crazy with the pick! A little too far and you might accidentally give your phone a new look… maybe a little less camera and a little more speaker hole. If you’re feeling nervous, you can always schedule a repair.
– Gently glide the opening pick along the top edge of the display, but be careful not to go deeper than 0.25 inches—let’s keep it light and breezy!
– Once you’ve got that pick in place, leave it there to stop the adhesive from sealing back up. You’re doing great!
Step 27


The display cable hangs out just above the midpoint on the right side. Don’t dig too deep, or it might mess with your pick.
– Give those long edges some love with another round of heating and cutting! Just hold off on the bottom edge for now, okay?
– As you work your magic, keep a little opening pick on each edge. This will help stop that pesky adhesive from sticking back together while you move on to the next step.
Step 28


This nifty move lets you slide the pick right between the display and the capacitive button, keeping that button cable safe and sound!
– Let’s get this party started! Slide an opening pick into the bottom right corner of your device.
– Now, gently wiggle that pick upward, like you’re giving the adhesive a little high five.
– Once the pick cuts through the adhesive, leave it in place to keep things from sticking back together. You got this!
Step 29

– Let’s get this party started by sliding an opening pick into the bottom left corner. We’re gonna gently wiggle it around like it’s a dance party in there!
– Now, carefully slide that pick upwards. Imagine it’s like a little elevator for your phone’s display. It’s gonna gently pry the screen apart.
– Once you’ve created a little gap in the corner, leave the pick in place. It’s like a security guard, keeping the adhesive from re-sealing.
Step 30

– Grab those trusty opening picks and gently glide them around the home button to cut through the adhesive, as well as any other stubborn sticky spots. You’ve got this!
– Now, let’s give the phone a little wiggle! Start by opening it just a smidge from the edge that’s opposite the display cable. Easy does it!


Step 32

Before you dive into installing that shiny new display, make sure to clear away all the old adhesive from the frame. And keep an eye out for those pesky little glass shards—they can be sneaky!
– Once you’ve bid farewell to all that pesky glue and shattered glass on the frame, it’s time to give the adhesion areas a good scrub! Grab some 90% (or higher) isopropyl alcohol along with a lint-free cloth or a coffee filter. When you’re cleaning, remember to swipe in just one direction—let’s keep it smooth and simple!
– To get that shiny new screen all snug and secure, use a custom-cut double-sided tape. Stick it on the back of the screen, then gently guide that display cable through the frame. Now, align your screen just right and press it into place like a pro!