
DIY Samsung Galaxy Note8 Display Replace Guide: Step-by-Step
Duration: 45 minutes
Steps: 33 Steps
Hey there! Before you dive into disassembling your phone, make sure to juice that battery down to below 25%. We want to keep those sparks and explosions at bay in case it gets a little too adventurous in there! Plus, it’s easier on the seals that keep your phone nice and cozy against water.
Alright, let’s get this Note8 display swap party started! First things first, make sure that battery is chillin’ at 25% or lower. We don’t want any fireworks happening, so be cool with the power. Heads up, we’re gonna be taking off the back glass cover, so you’ll need some fresh adhesive to put it all back together. One more thing: taking apart this phone means saying goodbye to that waterproof seal. Don’t worry, your Note8 will still be rockin’ even without it, but just know it won’t be a pool party buddy anymore. If you need help, you can always schedule a repair.
Step 1

– Start by switching off your phone – safety first!
– Get your iOpener ready to soften the adhesive on the back of the Note8. This will make the repair process a whole lot easier.
– Now, apply the iOpener to the back of the Note8, focusing on the side with the power button. If you need help, you can always schedule a repair
Tools Used

Step 2


Hey, be careful not to go crazy with that opening pick! We don’t want to see a broken back cover. Instead, pull gently with the suction handle and use the pick to help you cut the adhesive. It’s like a delicate dance, you know? 😉
To get started, insert the opening pick at a lower angle from underneath the back cover – it’s slightly curved at the edges, so be gentle.
If the pick gets stuck, don’t worry! Just reheat the iOpener and apply it to the back cover again. If you need help, you can always schedule a repair
– Let’s get started by using a suction handle to carefully lift the back cover and create a gap – just enough space to sneak in an opening pick.
– Now, begin at the middle of the side and gently cut the adhesive while pulling up with the suction handle. You’re making great progress!
– Next, slide the pick towards the bottom corner and leave it there to keep the adhesive from resealing to the case. You’re doing fantastic!
– Finally, grab another pick and move it to the top corner. If you need help or feel unsure, you can always schedule a repair with Salvation Repair.
Tools Used

Step 3


– Grab another opening pick and gently slide it around the corner and along the top edge.
– If things are getting a bit chilly, give it a warm hug with an iOpener.
– Keep that pick planted at the top right corner to stop the adhesive from making a comeback.
Tools Used
Step 4


– Now, give that device a little spin and start peeling back that sticky stuff at the bottom using another opening pick. It’s like a little dance, right?
– Leave that pick chillin’ at the bottom right corner to keep the adhesive from sticking back together. You got this!
Step 5


Whoa there, partner! Don’t force it. Try our magic iOpener to soften that adhesive for an easier peelin’ of the back cover. If you’re feeling stuck, you know what to do – we’re here to help!
– Once you’ve carefully loosened the adhesive on all three sides, you can gently lift up the back cover.
– Keep an eye on the fingerprint sensor connector while you’re flipping the back cover open. You might need to disconnect it in the next step, but no worries, we’ll guide you through it!
Tools Used
Step 6

Hey, that connector might have already popped out when you opened up the back cover. No worries, we’ve got this!
– Grab a trusty pair of tweezers and gently disconnect that fingerprint sensor. You’ve got this!
Tools Used

Step 7

– Take off the back cover – it’s time to get started on this repair.
– Now, let’s get your phone ready for reassembly. Remove any leftover adhesive and give the glued areas a good clean with some isopropyl alcohol and a lint-free cloth. If you need help, you can always schedule a repair
Step 8

– Unscrew the ten Phillips #00 screws and set them aside like the little champions they are!
Step 9


– Let’s get this party started! Slide an opening pick along the top edge to gently separate the NFC antenna and charging coil assembly from the case.
– Now, give that assembly a little lift and pop it out of the case. You’re doing great!
Step 10

The bottom left corner of the assembly has a little bit of glue holding it to the frame. Just a gentle nudge should do the trick!
– Gently lift the entire charging coil and NFC antenna assembly like you’re raising a tiny, precious treasure. You’ve got this!


Step 12

– Get ready to tackle that stubborn battery by using an iOpener on the display for at least two minutes – this will help loosen the adhesive underneath. If you need to, reheat and reapply the iOpener to get the job done.
– If the battery is being super stubborn, don’t worry, we’ve got a trick for that too. Try applying some isopropyl alcohol under each corner of the battery and let it sit for a few minutes to help weaken the adhesive. And remember, if you need help along the way, you can always schedule a repair
Tools Used
Step 13


Handle that battery with care, my friend! Soft-shell lithium-ion batteries are a little temperamental and could leak some nasty stuff, catch fire, or even go boom if you get too rough with them. So, let’s keep it gentle and avoid using any metal tools to pry—no one wants a battery tantrum!
As you get ready to pry, remember you’re working right above the mainboard. Tread lightly to steer clear of any nearby components that might be feeling a bit sensitive!
– Let’s get started by using the flat end of a spudger to carefully pry the battery loose from the top right corner. Take your time and work gently to avoid any damage.
– Now, use your trusty spudger to continue prying the battery up until you’ve got enough room to slip an opening pick in and keep the adhesive from resealing. If you need help, you can always schedule a repair with the experts at Salvation Repair.
Step 14


When you’re getting ready to pry, remember to stick to the areas marked in orange. The red zone in the center is a no-go; that’s the back of the display, and we want to keep that safe and sound!
– Let’s get that battery out! Using the flat end of your spudger, gently pry up the top left corner of the battery where the flex cable is located.
– Now, slide that spudger along the side of the battery to break apart any remaining adhesive. We’re almost there!
Tools Used
Step 15

Hey there, this is important! Don’t try to use that old battery again after you take it out. It’s time for a new one! It’s for your safety, we promise. If you need help, you can always schedule a repair.
– Alrighty, let’s get started! First, whip out that battery and kick it outta the case. Then, scrub off any remaining glue residue with some good ol’ isopropyl alcohol and a soft cloth. To keep things tight and snug, check out our guides on installing battery adhesive and custom-cut adhesives. If you need help, you can always schedule a repair!
Step 16


– Gently pop in your trusty SIM card ejector tool into the tiny hole located on the left side at the top of your phone.
– Give it a little press to release the tray.
– Carefully pull out the SIM card tray from your phone, and you’re all set!
Step 17

– Let’s get started by removing the six Phillips #00 screws from the loudspeaker assembly located at the bottom of your phone. Take your time and make sure they’re all out before moving on to the next step. If you need help, you can always schedule a repair
Step 18


Be gentle as you pry above the mainboard and the antenna cable. We want to keep those nearby components happy and intact, so take your time and be careful!
– Grab your trusty spudger and gently nudge up that loudspeaker assembly. It’s just a little push!
– Once you’ve given it a lift, go ahead and remove the loudspeaker assembly like a pro.
Tools Used
Step 19


When replacing your display assembly with a frame, removing the coax cables is optional, but we recommend doing so to prevent any potential damage or strain on them. If you need help, you can always schedule a repair
– Let’s get started by removing the two coax cables that connect the daughterboard to the motherboard. Gently pull them out to begin the process.
– Next, use a pair of tweezers to carefully release both ends of the white coax cable. Once it’s free, you can remove it. If you need help, you can always schedule a repair
Tools Used


Step 21


– Hey there, tech warrior! It’s time to untether the display and touchscreen from their current abodes. Use the flat end of your trusty spudger to break ’em free. You’ve got this! If you need help, you can always schedule a repair.
Tools Used
Step 22


– Grab that trusty spudger and gently pry away the power button flex cable. You’ve got this!
– Next up, let’s disconnect the flash and proximity sensor cable. Just a quick tug and you’re one step closer!
Tools Used
Step 23

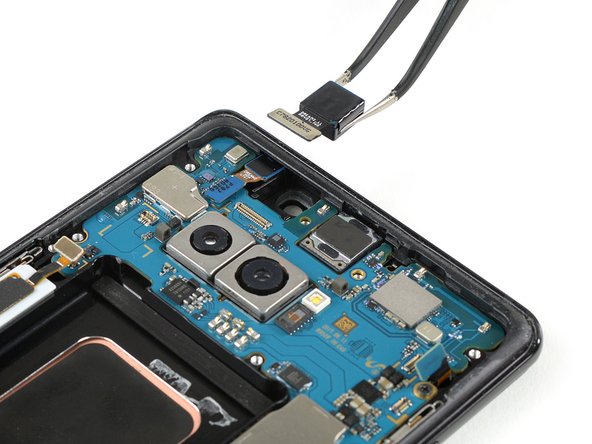
– Let’s get that front-facing camera out! Gently pry the flex connector loose using the flat end of your spudger. Then, carefully remove the camera with your tweezers – those little guys are pretty delicate. No worries if you’re feeling a bit unsure, you can always schedule a repair with Salvation Repair. We’ve got your back!


Step 25

– Let’s get started by removing the five Phillips #00 screws that secure the motherboard, daughterboard, headphone jack, and charging port in place. Take your time and make sure you’ve got all of them before moving on to the next step. If you need help, you can always schedule a repair
Step 26


– Time to say goodbye to that old headphone jack! Use the flat end of a spudger to disconnect the connector. It’s like giving it a little nudge, you know?
– Now, with a pair of tweezers, gently remove the headphone jack. It’s like giving it a little farewell wave. If you need help, you can always schedule a repair
Step 27


Hold up there, champ! That microphone’s still hanging out with the daughterboard. Let’s leave it where it is for now. You’ll be able to see it soon enough.
– First things first, grab your trusty iOpener and place it on the bottom section of the phone. This will help soften up that stubborn adhesive hanging out under the microphone flex cable.
– Next up, take a pair of tweezers and gently lift the microphone out of its snug little home. Give it a little wiggle to detach it from the mid frame.
Step 28


If you’re thinking about removing the motherboard without the daughterboard, just remember to tread carefully! We wouldn’t want you to accidentally bump into any nearby components while disconnecting that flex cable. You’ve got this!
You can totally remove the motherboard without messing with the daughterboard, but you’ll need to wiggle the flex connector a bit to get it off. It’s kind of like a little dance!
The motherboard hangs out a bit, so you can get a spudger under it to lift it up. Just be careful not to bump into any of the other parts, okay?
– Now, let’s get that motherboard out! Use the pointy end of your spudger to gently pry up the motherboard until you can get a good grip. If you need help, you can always schedule a repair.
Tools Used
Step 29


– Gently pry up the motherboard – it’s like lifting a delicate flower, but, you know, a motherboard.
– To free the daughterboard from its cozy little home, slowly pull both components upwards while easing them towards the top of the phone. Take your time, and don’t worry if it takes a little wiggle – you got this! If you need help, you can always schedule a repair.
Step 30

– Get ready to unlock your phone’s secrets. Start by using an iOpener to loosen the adhesive under the vibration motor at the bottom and the earpiece speaker at the top. If you need help, you can always schedule a repair
Tools Used
Step 31


Check if the new display assembly you’ve got comes with an earpiece speaker already attached. If it does, you’re all set – no need to remove it. But hey, it’s always a good idea to keep the old one as a spare, just in case. If you need help, you can always schedule a repair
– Let’s gently remove that vibration motor using a pair of tweezers. Be careful with the cable—we don’t want to accidentally yank it out, right?
– Time to pop out the earpiece speaker with those tweezers. Easy peasy!
Tools Used
Step 32


– Grab a trusty pair of tweezers and gently lift the flash and proximity sensor cable, taking care to loosen the tape that’s keeping it snug against the mid frame.
– Once that’s done, go ahead and remove the flash and proximity sensor assembly with confidence!
Tools Used
Step 33

– Alright, champ! Let’s put your phone back together. Take all the parts you pulled out and place them on your new display assembly, making sure everything is nestled in the frame. Don’t forget to stick those little adhesive pads back in place where they belong. If you’re feeling overwhelmed, remember you can always schedule a repair. You got this!

