Replace Samsung Galaxy Note5 Battery
Duration: 45 minutes
Steps: 17 Steps
Before you get started, make sure your phone’s battery is chillin’ below 25%. We don’t want any surprises, ya know?
And hey, don’t heat up your phone. We’re all about keeping things cool and collected here! If you need help, you can always schedule a repair
Ready to give your Samsung Galaxy Note5 a new lease on life? Let’s swap out that battery! First things first, make sure the battery’s power is below 25%. We don’t want any fireworks, so play it safe. If your battery’s looking a bit puffy, take extra care (or head over to schedule a repair if you’re not comfortable). No need to heat things up! If you’re having trouble removing the back cover, a little isopropyl alcohol (90% or higher) around the edges can do the trick. Safety first, wear those eye protection glasses! Once you’re done with this quick battery swap, don’t forget to give that new battery a little calibration. You’ve got this!
Step 1
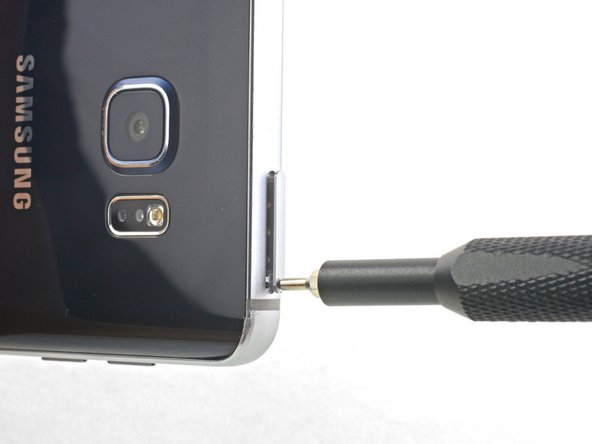


– Grab your trusty SIM eject tool, a SIM eject bit, or even a straightened paperclip, and gently pop it into the tiny hole on the SIM card tray at the top of your phone.
– Give it a little push to nudge that tray out. Don’t be shy; it might need a bit of elbow grease!
– Carefully pull out the SIM card tray and voilà!
Step 2


– Time to unleash that S-Pen! Use your fingernail to give that button a gentle push until it pops out with a satisfying click.
– Now, grab the S-Pen and say hello to your friendly neighborhood stylus!
Step 3

Hey, you know how much we love your phone? Don’t melt it! Use heat from a hairdryer, heat gun, or hot plate, but keep it cool, because that OLED display and battery don’t like to get too toasty. If you need a little extra help, you can always schedule a repair.
If the glass back is cracked, get ready to play some tape-tastic protection! Stick packing tape over the entire surface like it’s a superhero shield.
You might need to give your phone a little warm hug with the iOpener. Heat it up, then heat it up again – you know the drill! Don’t worry, we’ve got you covered with the iOpener instructions. Just follow the steps and avoid burning your device. If you need help, you can always schedule a repair
– Warm up the bottom of the phone with a heated iOpener for a couple of minutes. If you need help, you can always schedule a repair.
Tools Used

Step 4


Be gentle with that rear glass – it’s super fragile and can break if you use too much force or try to pry it with metal tools. If you need help, you can always schedule a repair
If that back cover is cracked, the suction cup might be a bit grumpy about sticking. No worries! You can try lifting it with some strong tape or, if you’re feeling adventurous, you can give that suction cup a little superglue love and let it dry before you move on. You’ll be back in action in no time! If you need help, you can always schedule a repair
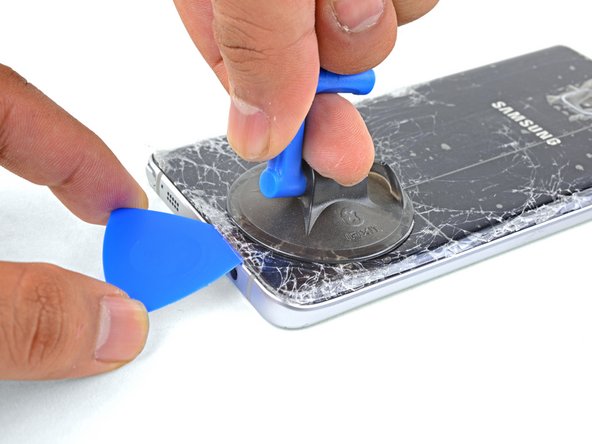
– First, place a suction cup as close to the bottom edge of your phone as you can – this will be your trusty sidekick for the next step.
– Now, gently lift the suction cup and carefully slide an opening pick under the rear glass, making sure not to push too hard. If you need help, you can always schedule a repair
Step 5

– Now that the pick is in place, give the edge a little extra love with the iOpener for another minute. If you need help, you can always schedule a repair
Tools Used
Step 6


Take it slow, buddy! Don’t let the tip slip out of the seam. If it starts to get tough, just give it another blast with the iOpener and try again.
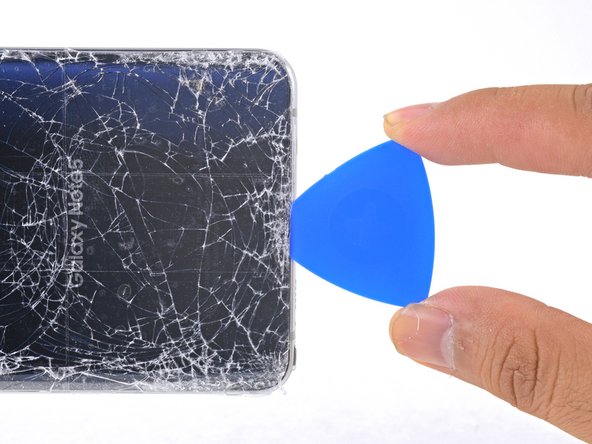
– Gently slide the pick along the bottom edge of your phone, like it’s a smooth dance move.
– Keep that pick in place to stop the adhesive from being a party crasher, and grab another pick to keep the groove going in the next step.
Tools Used
Step 7


The back of your device has a stylish curve, but that means the glass is super delicate, especially at the corners. Take your time and give it another go with the iOpener if a corner is putting up a fight. You’ve got this!
– Now, take another pick and carefully slide it around the corner of the phone. You’ve got this!
Tools Used
Step 8

– Before you dive deeper into the repair, give that long edge a little love with a warm iOpener.
Tools Used
Step 9


– Now, let’s keep the momentum going! Just like before, warm up and slice away at the next three sides of the phone. You’ve got this!
– As you tackle each side, pop an opening pick into every edge to keep that pesky adhesive from sticking back together. You’re on the right track!
Step 10


– Time to break out the opening pick! Gently slice through any remaining adhesive holding the glass in place.
– With a little wiggle and a whole lot of love, lift the glass and free it from the phone.
Step 11

Want to skip the adhesive replacement? No problem. You can still reinstall the back cover – just remove any big chunks of old adhesive that might get in the way. Once it’s back on, heat it up and apply some pressure to secure it. Keep in mind it won’t be waterproof, but the adhesive is usually strong enough to hold everything in place. If you need help, you can always schedule a repair.
If you do want to replace the adhesive, you can get a pre-cut sheet that matches the back cover’s contours perfectly. If that’s not an option, a high-bond double-sided tape like Tesa 61395 will do the trick. Just be aware that this method can leave some gaps that might let liquids in. For a worry-free repair, consider reaching out to the pros at Salvation Repair – you can schedule a repair if you need a hand.
– Time to put the back cover back on:
– Use tweezers to gently remove any leftover adhesive from both the back cover and your phone’s chassis. Easy does it!
– Now, clean the adhesion areas with some high-concentration isopropyl alcohol (we’re talking at least 90%) and a lint-free cloth. Just swipe in one direction – no back and forth, please! This will get the surface ready for the new adhesive.
– Before you add new adhesive and seal your phone, make sure to turn it on and test your repair. You’ve got this!
– Once the rear cover is back on, apply some strong, steady pressure to your phone for a few minutes. You can try placing it under a stack of heavy books. If you need help, you can always schedule a repair
Tools Used

Step 12

– Let’s get those twenty 3.3 mm Phillips screws out of there!
Step 13


Don’t forget to pop out that SIM tray first!
There’s a bit of adhesive in each corner holding the midframe to the display assembly. Keep applying steady force until the midframe separates. If you need help, you can always schedule a repair
– Grip the midframe by its edges and lift it up while pressing down on the battery with one finger.
– Take out the midframe.
Step 14


– Hey there! You CAN do this! Let’s gently lift that battery connector straight up from its nice little socket on the motherboard. If you’re feeling unsure, you can always schedule a repair with our awesome techs!
Tools Used

Step 15


Be gentle when handling the battery to avoid causing damage. These soft-shell lithium-ion batteries are like avoidant pandas when it comes to being poked! Use your gentlest, metal-tool-free touch to keep things safe. If you need help, you can always schedule a repair
That battery is stuck in there good! To give it a little nudge in the right direction, you can warm it up with a heated iOpener for about a minute. Or, if you’re feeling brave, you can put a bit of isopropyl alcohol under each corner and let it hang out for a few minutes to soften up that adhesive. No worries if you need a little extra help, you can always schedule a repair
– Gently slide an opening pick under the bottom edge of the battery and slowly pry it up from the case. If you need help, you can always schedule a repair
Tools Used
Step 16


– Now it’s time to get that battery out – use an opening pick to gently pry it loose from any remaining adhesive, working your way up the side.
Step 17


Hey, listen up! Once you’ve taken out that battery, don’t try to put it back in. It’s not a good idea, and it can be a little dangerous. Pop in a fresh battery, and you’ll be good to go! If you need help, you can always schedule a repair.
– Start by gently lifting the battery out of its snug little home.
– Ready to bring in a new battery? Here’s how to do it:
– First things first – remove any leftover adhesive from the phone and give the sticky spots a good clean with isopropyl alcohol and a lint-free cloth. We want it spick and span!
– Next up, let’s get that new battery secured! Use pre-cut adhesive or some trusty double-sided adhesive tape. When applying the new adhesive, make sure you’re placing it in the phone, not directly on the battery. Just outline around the edge of the battery compartment, steering clear of that rectangular cutout in the middle (that’s just the back of your display).
– Now, gently press the new battery into place for about 5-10 seconds. You’ve got this!