Samsung Galaxy S24 Rear Cameras Replacement
Duration: 45 minutes
Steps: 36 Steps
Let’s swap out that rear camera in your Samsung Galaxy S24! This guide will walk you through the process. Keep in mind, though, that your phone’s water resistance might take a hit depending on how well you reapply the back cover adhesive. But hey, don’t worry! If you need help, you can always schedule a repair.
Step 1

Give your phone’s battery a little break by letting it chill below 25% before starting. We wouldn’t want any surprises, especially if you’re working with a charged lithium-ion battery. Safety first, friends! If you need help, you can always schedule a repair.
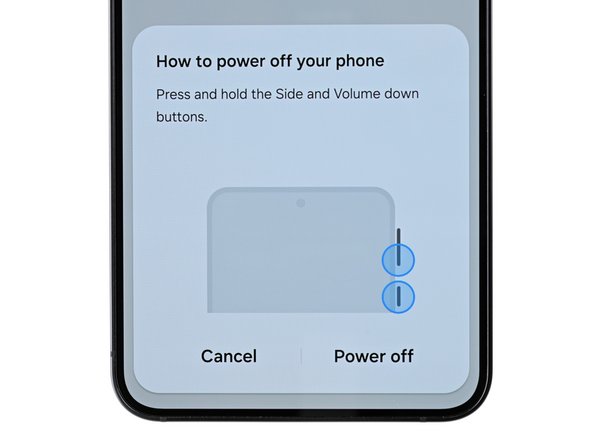
– First things first, let’s give your phone a little break! Power it down completely and unplug all those pesky cables.
Step 2

Hey, be careful not to overheat the phone! We don’t want to melt that battery, now do we? 😉 If you need help, you can always schedule a repair.
If you need a little extra help getting that back glass warm, grab a hairdryer or heat gun. Heat the right edge of the glass until it’s nice and toasty to the touch. Don’t worry, we’re not trying to cook anything! We just need to loosen up the adhesive a bit. If you need a hand with this step, you can always schedule a repair
– Warm up that iOpener and stick it on the right edge of the back cover for a solid two minutes. You’re doing great!
Tools Used
Step 3
If you’re still having trouble, try pumping up the heat to help the adhesive go from clingy to chill!
– Grab your trusty suction handle and stick it to the back cover, aiming for the center of the right edge. Get a good grip!
– Now, pull up on that suction handle with some serious force – we’re talking about making a gap between the cover and the frame! You got this.
– With that gap open, slide in your opening pick. Nice work!
Tools Used
Step 4
– Let’s get this party started! Slide your opening pick along the right edge between the back cover and the frame. This is how we break through that adhesive.
– Keep your opening pick in the bottom right corner so the adhesive doesn’t get all sticky again. We don’t want to be cleaning up a mess!
Step 5
– Warm up your iOpener and place it on the bottom of the back cover for a cozy two minutes.
Tools Used
Step 6
– Give that opening pick a little twist around the bottom right corner to break free from the adhesive’s grip.
Step 7
– Alright, now let’s get this party started! Slide a second opening pick into the bottom edge of the device, to the left of the first one. Let’s get that adhesive sliced up!
– Keep that opening pick in place, that’ll keep the adhesive from sticking back together, just like that!
Step 8
– Time to warm things up! Grab your trusty iOpener and give the left side of the back cover a good two-minute hug. This will help loosen things up for the next step. If you need help, you can always schedule a repair.
Tools Used
Step 9
– Let’s loosen that adhesive! Take your opening pick and give the bottom left corner a little spin. You got this!
Step 10
Be careful and only slide your pick in about 4 mm deep to keep those rear cameras and flash safe and sound!
– Now it’s time to bring in some extra help – insert a third opening pick above the last one and gently slide it along the left edge to cut through the adhesive. You’re making great progress!
– Leave that opening pick right where it is, in the top left corner, to keep the adhesive from sealing back up. You’re doing a great job, and if you need help, you can always schedule a repair
Step 11
– Get your iOpener nice and toasty in the microwave for a couple of minutes. Then, give the top of the back cover a warm hug with the iOpener for a solid two minutes. It’s like a spa treatment for your phone! If you need help, you can always schedule a repair.
Tools Used
Step 12
– Twist the opening pick around the top left corner to break free the adhesive.
Step 13
– Slide a fourth opening pick into the top left corner, keeping it at the same depth. Then, glide it along the top edge and around the top right corner to cut through that pesky adhesive.
Step 14
Hey there! Just a friendly tip: keep that pick no deeper than its center point to steer clear of any mishaps with the rear cameras. You’ve got this!
– Let’s get this show on the road! Slide a fifth opening pick right above the camera flash.
– Now, slide the pick under the top of the back cover until you feel it catch on that sticky flash glue.
– Keep going until you feel that back cover pop right off! You’re doing great!
Step 15
Still stuck? No worries, just slide the tip of an opening pick around the edges until your cover comes off completely.
Now’s a great time to turn your phone back on and make sure everything’s working as it should. Just remember to power it back down before moving on. If you need help, you can always schedule a repair
– Ready to have a blast fixing your device? Awesome! Let’s start by gently picking up the back cover with your fingertips and carefully prying it off. You’ve got this!
– During reassembly, let’s embrace the adhesive challenge! Use those pointy tweezers or your trusty fingers to remove any leftover chunks. If you’re having trouble, apply some heat and 90% isopropyl alcohol magic to make your life easier.
– Don’t worry, we’ve got your back! If you’re using custom-cut adhesives, check out our handy-dandy guide. And if you prefer double-sided tape, we have a guide for that too!
– Feeling confident? Great! Just remember, if you ever need a hand, you can always schedule a repair with us!
Tools Used
Step 16
– Alright, let’s get this wireless charging coil connector unplugged. Grab your trusty spudger and gently pry it up from the motherboard. No need to be rough, we’re all about gentle persuasion here.
– Now, let’s reconnect that bad boy. Line up the connector with its socket and give it a little fingertip press. First one side, then the other, and watch it click into place. Don’t force it, just be patient. If things aren’t cooperating, give it a slight reposition and try again. You got this!
Tools Used
Step 17
– Grab your trusty Phillips screwdriver and remove the thirteen 3.5mm-long screws that hold the wireless charging coil and loudspeaker in place:
– You’ll find six screws securing the wireless charging coil – take those out first
– Next, remove the seven screws that keep the loudspeaker locked down. If you need help, you can always schedule a repair
Step 18
– Time to get this repair started. Insert the point of a spudger into the notch on the left edge of the loudspeaker assembly – it’s the perfect spot to begin.
– Gently pry up the loudspeaker to release its clips. You’re making great progress, and if you need help, you can always schedule a repair
Tools Used
Step 19
– Alright, let’s get this wireless charging coil and loudspeaker assembly out of there. Use your fingernail or the flat end of a spudger to gently pry it up from the frame. It might take a little finesse, but you got this!
– Now, carefully remove the wireless charging coil and loudspeaker from your phone. You’re doing great!
– When putting things back together, press around the edges of the loudspeaker to clip it securely to the frame before you reinsert the screws. It’s all about getting that snug fit. If you need help with any of this, you can always schedule a repair.
Tools Used
Step 20
– Gently slide the flat end of a spudger under the battery cable press connector on the motherboard and give it a little nudge to disconnect it. You’ve got this!
Tools Used
Step 21
– Time to get this earpiece speaker connector disconnected. Carefully slide the tip of a spudger under the left side and gently pry it up. If you need help, you can always schedule a repair
Tools Used
Step 22
– Grab your trusty Phillips screwdriver and give those five 3.5 mm long screws securing the earpiece speaker a little spin. They’re ready to come off! If you need help, you can always schedule a repair
Step 23
– Time to set that earpiece speaker assembly free. Use the flat end of a spudger to carefully pry it up from the bottom, working it loose from the chassis.
– Now that it’s loose, go ahead and remove the earpiece speaker. If you need help, you can always schedule a repair
Tools Used
Step 24
– Take the point of a spudger and slip it under the secondary interconnect cable connector labeled ‘MAIN’ (bottom right corner of the motherboard) and gently pry it up to disconnect.
– Do the same for the primary interconnect cable connector.
Tools Used
Step 25
– Now, let’s do the same thing for the display and 5G mmWave cable press connectors. They’re chillin’ on the bottom left edge of the motherboard. Let’s disconnect them! You got this!
Step 26
– Alright, champ, let’s tackle those cables! Repeat this process to disconnect the two interconnect cable press connectors that are chilling on the daughterboard, and don’t forget about the display cable connector hanging out to the left of the daughterboard. You got this! If you need help, you can always schedule a repair
Step 27
– Alright, let’s get those cables unplugged! Carefully remove the two interconnect cables and the display cable from your phone. If you need help, you can always schedule a repair
Step 28
Hey there, techie! Just a friendly heads-up: Be careful when prying things open. If you see anything on the surface, like a tiny chip or something, just gently steer clear to avoid any accidental mishaps.
– Let’s get that 5G mmWave antenna press connector disconnected! Using the tip of your spudger, gently slide it under the bottom left corner of the connector (you’ll find it on the right side of the motherboard).
– Now, with a little gentle prying, you’ll pop that connector right off. Nice work!
Tools Used
Step 29
– Gently slide the flat end of your trusty spudger beneath the front camera press connector, and with a little finesse, pry it up to unplug it. You’ve got this!
Tools Used
Step 30
– Grab your Phillips screwdriver and pop out those two 3.5 mm screws holding down the rear cameras and motherboard. If you need help, you can always schedule a repair
Step 31
– Now, grab your trusty spudger (you know, that handy little tool) and carefully slide the flat end underneath the top edge of the motherboard. Give it a little pry, but be gentle! You’ll want to keep going until you can see the front camera and mmWave antenna cables peeking out.
Tools Used
Step 32
– Alright, let’s move those front camera and mmWave antenna cables outta the way of the motherboard. Just give ’em a little nudge to get them out of the picture.
– Now for the grand finale! Gently lift the motherboard until it’s completely free. You got this! Now you can carefully remove it from your phone. If you need help, you can always schedule a repair.
Step 33
– Gently slide the tip of a spudger under the ultrawide camera press connector and give it a little nudge upwards to disconnect it. You’ve got this!
Tools Used
Step 34
– That ultrawide camera is holding on tight to the motherboard and main camera with its two little metal buddies. Don’t worry, we’ll get it loose!
– Give the camera a little twist! Rotate it 45 degrees upwards towards the motherboard. This’ll free up those metal pegs.
– Now for the grand finale! Pull the camera directly away from the motherboard. It’s like a little dance, but with less music.
Step 35
– Grab your trusty spudger and gently pry up the main camera press connector to disconnect it. You got this!
– Once it’s free, carefully lift the main camera off the motherboard and set it aside. Easy peasy!
Tools Used
Step 36
– Let’s get that telephoto camera out! Use the tip of a spudger to gently pry up and disconnect the camera’s connector.
– Now, carefully lift the telephoto camera off the motherboard and set it aside.
– When you’re putting everything back together, remember to install the rear cameras in reverse order. That way, they’ll all fit together like puzzle pieces!