Google Pixel XL Earpiece Speaker Replacement Guide
Duration: 45 minutes
Steps: 17 Steps
This repair guide was brought to you by the Salvation Repair crew and hasn’t been given the thumbs-up by Google.
The Pixel XL’s display is as delicate as a bubble wrap pillow.
This handy guide is brought to you by the fantastic folks at Salvation Repair. While Google hasn’t given it a thumbs up, we promise it’s packed with useful tips! If your Google Pixel XL’s earpiece speaker is acting up, this is your go-to guide for a smooth replacement. Just a heads up: the Pixel XL’s display panel isn’t the toughest cookie in the jar and is glued pretty firmly to the frame. This means things can get a bit tricky, especially if there are existing micro-fractures. So, be generous with the heat and take it slow when you’re prying it open. Remember, if you need help, you can always schedule a repair!
Step 1
You can use a hair dryer, heat gun, or hot plate to warm things up, but watch out! Overheating your phone can lead to trouble—the display and battery are both easily damaged by excessive heat. If you need help, you can always schedule a repair.
– Let’s get started by heating an iOpener and applying it to the top edge of the display for about two minutes – this will help loosen things up.
– Before you dive in, take a moment to familiarize yourself with the following areas to avoid any potential pitfalls:
– There’s a thin layer of adhesive stuck to the display panel, so be gentle
– And a thicker layer of adhesive that might require a bit more effort to remove
– You’ll also want to be mindful of the OLED display panel, which can be pretty fragile
– Not to mention the display cable, which is easy to damage if you’re not careful while prying – if you need help, you can always schedule a repair
Tools Used
Step 2
Keep that pick under 13 mm (0.5 inches), or you might just give your display assembly a little too much love!
Feeling adventurous? Grab a playing card instead of that opening pick to help you sneak in for the first entry!
– Once you feel the edge is warm, grab a suction cup and stick it near the edge.
– Give a little lift on the suction cup and slide an opening pick into the gap.
– If it’s being stubborn, give the edge another warm-up and try again.
Step 3
Remember, you want to keep your cuts shallow—no deeper than 13 mm (0.5 inches) to avoid any display disasters!
Don’t forget about the mesh that protects the earpiece speaker at the top of the screen. If you don’t have a spare mesh handy, just be careful not to harm or misplace it!
– Gently glide the opening clip along the top edge to break through that pesky adhesive.
– Place an opening pick in the seam to keep the adhesive from making a comeback.
Step 4
Hey there! Just a quick heads up: make sure to keep that pick under 1 mm (1/32″) when you’re along the edge. Go too deep, and you might just invite some trouble for the display assembly!
– Warm up an iOpener and give it a cozy spot on the right edge of your phone for a solid two minutes.
– Gently slide an opening pick in near the top edge of the phone, right where you’ve already loosened that stubborn adhesive.
– Take it slow and guide the pick around the right corner like a pro.
– Carefully glide the pick down the right edge of the phone to slice through the adhesive like butter.
– Now, go ahead and repeat that magic on the left edge of the phone.
Tools Used
Step 5
Hey, buddy! Keep it cool and don’t cut deeper than 8.5 mm (1/3”) or you’ll mess up the display cable. If you need help, you can always schedule a repair.
– Warm up the bottom edge with an iOpener for a cozy two minutes.
– Slide a pick in near the right edge where you’ve already loosened that sticky adhesive.
– Gently guide the pick around the corner like a pro.
– Glide the pick along the bottom edge to slice through the adhesive like butter.
Tools Used
Step 6
Hold up! Don’t try to yank off the display assembly just yet. It’s still got a flex cable hangin’ on.
– After you’ve made your way around the edge of the phone, gently lift the display assembly a bit from the right corners.
– Grab an opening pick and glide it through any leftover adhesive like a pro.
Step 8
As you tackle this repair, remember to keep an eye on each screw! They’ll want to return to their cozy homes just where you found them.
– Time to unscrew! Grab your trusty T5 screwdriver and take out those two 4 mm screws holding down the display cable bracket.
– Once those screws are out, gently lift off the display cable bracket and set it aside.
Step 9
To reconnect those little connectors, start by gently lining them up. Press down on one end until you hear it click—now that’s music to your ears! Then, go ahead and repeat the same on the other side. Just a friendly reminder: avoid pressing down on the middle! If things get a bit off-kilter, those tiny pins might bend, and we definitely don’t want any permanent damage. Remember, if you need help, you can always schedule a repair.
– Grab your trusty spudger and gently lift to disconnect that display cable from its connector. You’ve got this!
Tools Used
Step 10
– Start by gently removing the display assembly. You’ve got this!
– For a detailed walkthrough on reinstalling the Pixel XL display, check out this guide.
– If your new display is missing a speaker grille, no worries! Use tweezers to carefully peel the adhesive grille from your old display and transfer it to the new one.
– Before you pop in that shiny new display, make sure to clear away any leftover adhesive from the frame. A spudger or opening tool will do the trick, and a little high-concentration isopropyl alcohol will help you get rid of any stubborn residue.
– If you’re putting back the same display assembly, don’t forget to clean off all the adhesive residue from both the panel and the frame before applying fresh adhesive.
– Remember to power on your phone and test your repair before sealing everything up with new adhesive. It’s always good to double-check!
– During the boot-up after reassembly, the screen will go through a calibration sequence. Hands off the screen during this time to avoid any touch calibration hiccups!
Step 11
– Let’s get those screws out so we can free the midframe from the back! Here’s what you’ll need to do:
– Unscrew seven sleek black 4 mm T5 screws.
– And don’t forget to remove the two shiny silver 3 mm T5 screws.
Step 12
– The midframe is secured snugly by some plastic clips that snugly fit into the edges of the back case.
Step 13
– Spot the tiny notch hanging out in the bottom left corner of the frame and pop in an opening pick.
– Gently glide that opening pick along the bottom edge of the phone, making your way to the bottom right corner, and let it chill there.
Step 14
This might be a bit tricky due to the snug fit, so be prepared to put in some elbow grease! If you’re finding it tough, a playing card can be your best buddy—just slide it in and give it a gentle nudge.
– Slide a trusty opening pick into the right edge of your phone, just a smidge above the bottom.
– Gently nudge the pick upwards along the seam until you hear that satisfying pop of the first clip releasing.
– Once that clip is free, keep the opening pick in place to stop the midframe from sealing back up on you.
Step 15
No need to poke that pick in more than 2 mm into the edge! If you go too deep, you might accidentally mess with those delicate flex cables.
Now, the right edge of the midframe should be free as a bird from the case. If it’s still stuck, just give an opening clip a little dance up and down along the right edge.
– Gently slip an opening pick along the right edge of the phone and glide it upward to reach the top right clip. Keep it cool and patient as you go!
– Carefully slide the pick past the clip to release it from the frame. You’ve got this! For any assistance, schedule a repair.
Step 16
– Grab the right edge of the midframe by the corners and gently lift it up like you’re opening a treasure chest.
– Once the left edge starts to feel a bit wobbly, pause your lifting and raise the midframe straight up.
– Carefully take out the midframe and give yourself a pat on the back for a job well done!
– To put the midframe back in, line it up with the case and give it a gentle squeeze around the edges until all the clips click back into place. If you’ve done it right, the midframe should sit nice and flat.
Step 17
– Turn the midframe upside down.
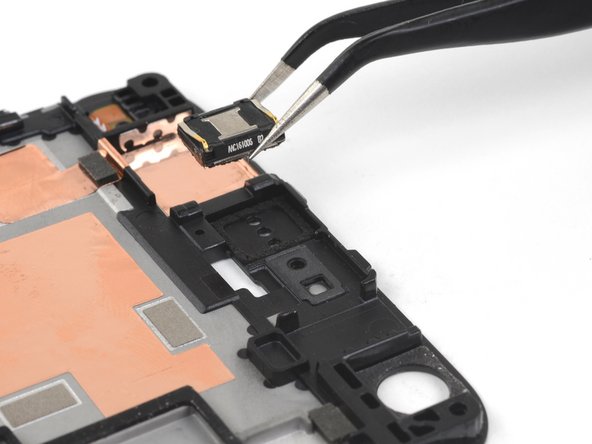
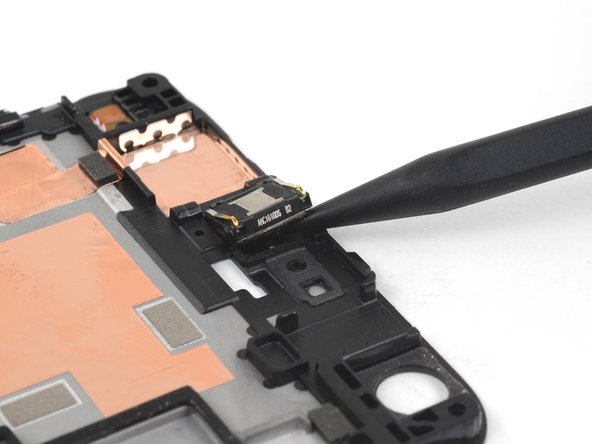
– Grab a spudger and gently pry up the earpiece speaker from the plastic midframe. It’s like giving it a little nudge!
– Carefully take out the earpiece speaker.
– When putting everything back together, make sure to install the new part the right way around. The shiny gold clips should be facing the camera hole, just like a selfie!
Tools Used


