Microsoft Surface Pro 4 Charging Asembly Replacement
Duration: 45 minutes
Steps: 28 Steps
Heads up—this display panel is pretty delicate, so take it slow and steady to avoid any accidental cracks.
Ready to swap out the SurfaceConnect charging assembly on your Microsoft Surface Pro 4? It’s a bit of a delicate operation, so proceed with care! The display panel is pretty fragile, so keep your cool while you’re heating things up and slicing through that adhesive. It’s a good idea to wear safety glasses, just in case things go sideways and the glass decides to make an exit. Stay focused, and remember, if you need help, you can always schedule a repair.
Step 1
Put on your safety glasses to keep your eyes protected, and watch out for that delicate LCD display—no pressure!
Using some tape to secure the glass shards keeps everything contained and adds extra strength when you’re prying and lifting the screen. It’s like giving your screen a little bubble wrap to stay safe and hold together.
– Cracked screen glass? Let’s keep those shards in check and your fingers safe by covering the surface with tape.
– Layer strips of clear packing tape across your Surface’s screen until the whole thing is sealed up.
– Carry on with the rest of the guide as usual. Just a heads-up: once the glass is already cracked, it might keep breaking as you go. You may need a metal prying tool to gently lift out stubborn pieces.
Step 2
Keep it cool! Overheating your Surface can cause some serious damage to the screen and internal battery, so watch that temperature closely.
No hot plates here! If the screen’s been taped up, don’t go using a hot plate—it’s just asking for trouble.
You can also grab a hair dryer, heat gun, or hot plate to warm up the Surface if you prefer. Just make sure it’s not too hot!
If it’s not warm enough yet, you might need to give the iOpener a few more tries. Follow the iOpener’s instructions closely to keep things from getting too steamy.
– Warm up an iOpener and get it cozy with the right edge of the screen for about two minutes. The heat will help loosen things up, making the repair easier. If you need help, you can always schedule a repair
Tools Used
Step 3
– Before diving in, take a moment to check out the adhesive layout on the screen:
– These sections are all about the adhesive, so feel free to trim them up – no worries here!
– The display board and flex cables are sitting pretty close to the edge. Go easy with the cut and avoid pushing the pick in more than 1/8 inch (3 mm).
– There are fragile antenna cables hiding under this part of the screen. Be sure to follow the steps in step 13 carefully to keep them safe. Also, this is where the adhesive is extra thick, so take it slow!
Step 4
Be gentle when inserting the pick—no deeper than about 0.45 inches (12 mm). Pushing it in too far could harm the LCD, so take your time and proceed carefully.
– Pop an opening pick into the speaker cutout at the top-right of the screen, then glide it between the glass and the speaker grille.
Step 5
– Twist the pick down toward the bottom edge of your Surface, sliding it right under the lower edge of the speaker opening.
Step 6
As you work your way along, if you hit a stubborn spot and feel resistance, stop and give it a moment to reheat. Pushing too hard with the pick might crack the glass — better to be safe and gentle!
– Gently slide the pick along the right edge of the Surface to cut through the adhesive holding the screen in place.
– Keep this opening pick in the right edge to stop the adhesive from sealing back up as you work.
Step 7
Keep the Surface cool—too much heat can mess with the screen and battery.
Skip the hot plate if your screen’s taped up.
Feel free to use a hair dryer, heat gun, or even a hot plate to gently warm up the Surface. Just make sure you’re keeping things at a steady pace and not overdoing it!
– Warm up your iOpener until it’s nice and toasty, then gently press it against the bottom edge of the Surface’s screen for about two minutes. This helps loosen things up and makes the next steps smoother. If you need a hand, you can always schedule a repair.
Tools Used
Step 8
Be careful not to push the opening pick too deep—just 0.25 in (6 mm) around the bottom-right corner. Going too far might mess with your LCD.
When working along the bottom edge, don’t insert the pick more than 0.45 in (12 mm). Going too deep could cause some trouble.
– Pop an opening pick into the bottom-right corner and glide it around the corner toward the bottom edge.
– Cruise the pick along the bottom edge to slice through that sticky screen adhesive.
– Let the pick chill in the bottom edge so the adhesive doesn’t try to stick things back together.
Step 9
Take it easy with the heat—your Surface screen and battery aren’t big fans of getting toasty.
Skip the hot plate if the screen’s taped up.
You can also use a hair dryer, heat gun, or hot plate to warm up the Surface—whatever gets things toasty!
If the tablet’s still playing hard to get, reheat and reapply the iOpener until it’s nice and warm. Just stick to the iOpener instructions so you don’t accidentally turn your device into a hot potato.
– Warm up your iOpener and gently press it against the left edge of the Surface screen for about two minutes. Let the heat do its magic!
Tools Used
Step 10
– Start by gently sliding a fresh opening pick into the bottom left corner. Glide it around the corner toward the left edge – it’s like a little dance move for your tool.
– Now, slide that pick along the left edge of the Surface to slice through the screen adhesive. Keep it steady, you’re almost there!
– Leave the pick in place along the left edge to stop that adhesive from sealing itself back up. Nice job – you’ve got this!
Be cautious when working near the lower 2.5 inches (65 mm) of the left edge. Avoid inserting the opening pick more than 1/8 inch (3 mm) in this area, as the display cables are tucked close by and can be easily nicked. Take your time and handle with care—if you need a hand, you can always schedule a repair.
Once you’ve cleared the display cable zone, go ahead and re-insert the pick to about 0.45 inches (12 mm). Keep it gentle and steady—you’re almost there!
Step 11
Keep it cool—too much heat can upset the Surface’s screen and battery.
Skip the hot plate if the screen’s got tape on it.
If you’re feeling a little extra, you can grab a hair dryer, heat gun, or even a hot plate to warm up the Surface. It’s all about finding that sweet spot!
The adhesive loves to hang out thickest along this edge, so you might need to heat it up and reapply the iOpener a few times to get the tablet toasty enough. Just follow the iOpener instructions so you don’t go overboard with the heat.
– Heat up your iOpener until it’s nice and warm, then gently press it along the top edge of the Surface’s screen for about two minutes to soften things up.
Tools Used
Step 12
– Let’s start by rounding the left corner with your trusty opening pick – carefully slide it along the top edge until it’s about 2.75 inches (70 mm) away from the left edge. Take your time and make sure everything is in place before moving on to the next step.
Heads up! The top 6 inches (15 cm) of your case’s edge is home to the left and right antennas, nestled between the case and the screen bezel. Be sure to follow the upcoming steps carefully so you don’t accidentally damage these sensitive components. If you need help, you can always schedule a repair.
Step 13
Heads up! There are delicate antenna cables tucked just under the top edge of the screen. Take it slow here so you don’t accidentally give them a bad day.
– Start by slipping the pointed end of your pick just beneath the screen at your current cut line. Be careful not to push it past the edge of the bezel.
– Gently tilt the pick to the right, pressing its long side into the adhesive under the bezel to cut through the glue. Remember, don’t drag the pick along the edge of the Surface — just lift and tilt.
– Repeat the process: insert the pick at your starting point, then tilt it to the right to cut the adhesive along the top edge. Keep doing this all the way until your pick is about 2.5 inches (64 mm) from the right side of the Surface.
Step 14
– Once you’ve sliced through the adhesive near the antennas (about 8.5 inches, or 22 cm, from the left edge), slide the pick along the top edge to finish the job. Don’t forget to gently round that top right corner to cut through any leftover adhesive. Keep it smooth and steady!
Step 15
Hold up! The screen is still tethered to the motherboard by two cables—don’t pull it off just yet.
– Gently start lifting the screen assembly away from the Surface case. If it feels stuck, don’t force it—double-check that you’ve sliced through all the adhesive first.
– Take your opening pick and glide it through any stubborn adhesive that’s still holding on.
Step 16
– Gently lift the top of the screen assembly away from the case while sliding the bottom of the screen closer to the motherboard’s display connectors.
– Carefully lay the screen flat on the case with the connectors facing up, making sure not to pinch or crease the display cables.
Step 17
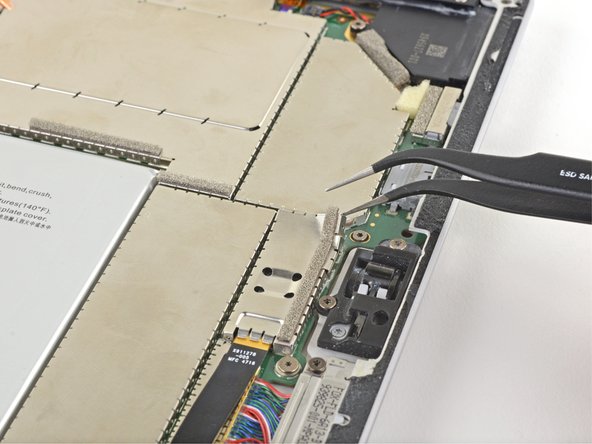
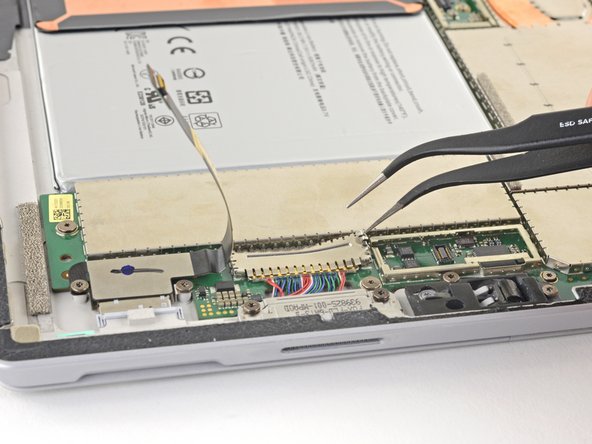
Be careful not to squish the shields too much—you’ll need to put them back during reassembly, and we want them in good shape.
Make sure all the ‘teeth’ are snug against the metal rim, and not hiding under the EMI shield. We want them standing tall.
Also, double-check that the ‘teeth’ are making contact with the gold conductive strips on top of the ribbon cables. It’s a good connection!
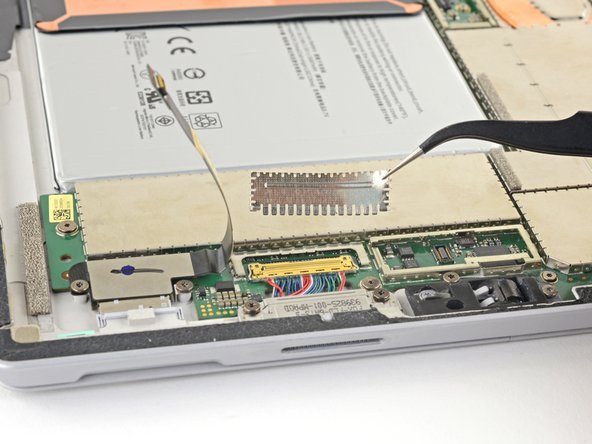
Here’s how to pop off any EMI shields you run into while working through your repair:
– To get the EMI shield back in shape, gently fix any bends if you can, make sure the ‘teeth’ are lined up with the rim on the motherboard, and then press down around the entire edge of the shield to snap it into place.
– Use the tip of a pair of angled tweezers to carefully pry up the EMI shield from the gaps between the ‘teeth.’
– Repeat this gentle prying around the perimeter until the shield is completely free. If you need extra hands, you can always schedule a repair.
Tools Used
Step 18
– Grab your trusty tweezers and carefully lift away the two EMI shields hiding the display cable connectors. If you need a hand with this step, you can always schedule a repair.
Tools Used
Step 19
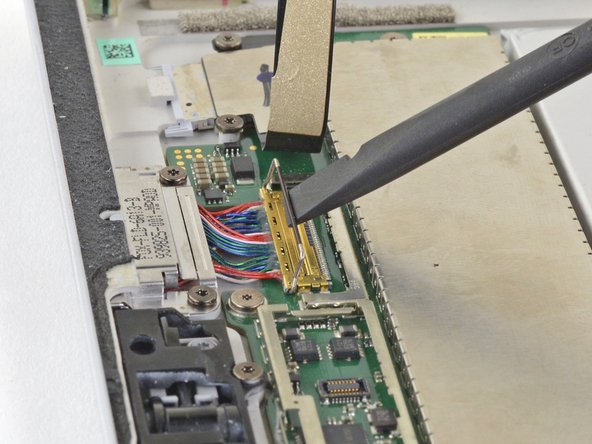
– Gently pry up using the flat end of your spudger to detach each display cable from the motherboard. Take it slow, and remember, you’re in control here!
Tools Used
Step 20
– Gently lift off the screen from your Surface.
– When putting things back together, take a moment here to swap in fresh screen adhesive for a solid finish.
Step 21
Keep the shield in good shape—you’ll want it looking sharp for reassembly!
– Grab a pair of tweezers and gently insert one tip into the gap along the edge of the EMI shield that covers the microSD card reader cable and connector.
– Carefully use the tweezers to pry the EMI shield away from the motherboard, working slowly and avoiding any bending or bending the shield too much.
– Once loosened, lift off and remove the shield to continue with the repair.
Tools Used
Step 22
– Gently slide the flat end of your spudger underneath the microSD card reader’s connector and lift it up carefully from its socket. It should pop right out!
Tools Used
Step 23
Gently bend the cable only as much as you need to reach the EMI shield—no sharp folds or extreme angles! Treat it with care so it lives to tell the tale.
– Gently lift the microSD card reader cable out of its spot, making sure it clears the EMI shield covering the charging assembly. Take your time so nothing gets snagged or damaged. If you need help, you can always schedule a repair.
Step 24
Be gentle with the shield—try not to bend it too much, since you’ll need to put it back in place during reassembly. Take your time, and if you need a hand, you can always schedule a repair.
– Grab a pair of tweezers and gently slide one tip into the gap along the edge of the EMI shield covering the charging port assembly.
– Carefully use the tweezers to pry the EMI shield away from the motherboard, working slowly to avoid bending or damaging it.
– Once loosened, lift and remove the shield to expose the components beneath.
Tools Used
Step 25
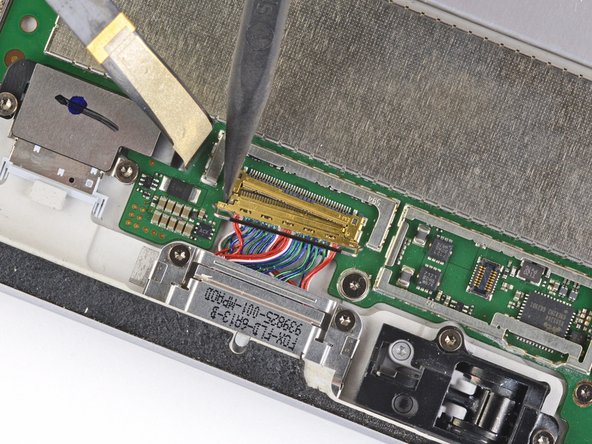
– Grab your trusty spudger and use the flat end to gently lift the retaining lock that’s holding the charging assembly cable connector in place.
Tools Used
Step 26
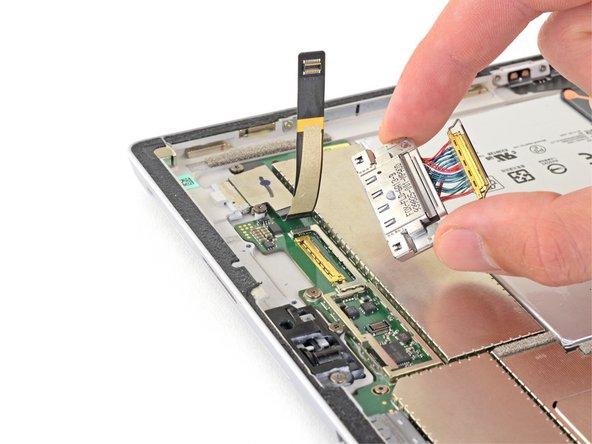
– Gently use the tip of a spudger to nudge each side of the connector, one at a time.
– Switch back and forth between sides, softly ‘walking’ the connector out of its socket. Keep it steady and patient—you’re doing great!
Tools Used
Step 27
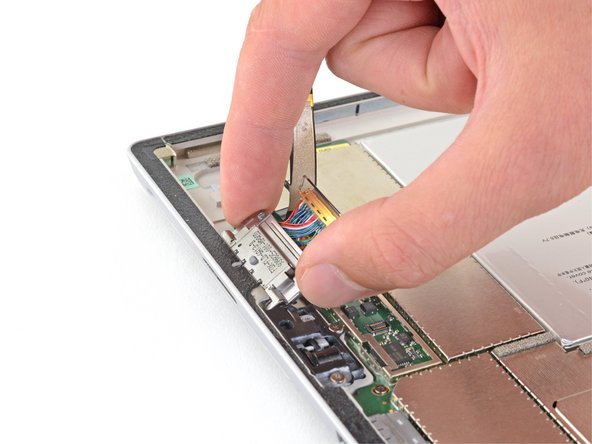
– Grab your T5 Torx screwdriver and go ahead and remove those two 3.7mm screws holding the charging assembly in place. You’ve got this!
Tools Used
Step 28
– Ready to put it all back together? Just reverse the steps above.
– Got old parts? Give them a new life by recycling at an R2 or e-Stewards certified center.
– If things aren’t working out, try some basic troubleshooting, or hop into our Answers community for a hand.
– Still feeling stuck? You can always schedule a repair with us.
Success!


