
Asus D550MA Screen Replacement Guide: Step-by-Step Tutorial
Duration: 45 minutes
Steps: 17 Steps
Hey there! Just a friendly reminder to take your time and be careful while working on your device. If you run into any bumps along the way, don’t hesitate to reach out for help. You can always schedule a repair if you need a hand!
Step 1


First things first, let’s keep things safe! Make sure to power down your laptop and unplug it from the wall before diving in.
– Grab your trusty Philips #1 screwdriver and get ready to tackle those nine screws holding the back cover in place. Let’s get this thing opened up!
Step 2

Take it easy when you’re popping the lid open! You should hear each plastic clip give a little snap as you glide the spudger along the edge. No need to muscle it; just let it do its thing!
– Flip your laptop over and pop open that display like it’s the lid of a treasure chest.
– Take the flat edge of your trusty spudger and slide it into the gap of the keyboard cover.
– While keeping the spudger nestled in that crease, gently work it along the edge to pry open the casing. You’ve got this!
Tools Used

Step 3


Ensure that all the clips have released their grip on the cover, so it can come off smoothly.
– Gently lift the laptop cover from the front, but keep it attached for now—no need to take it off completely just yet!
– Take a moment to notice where those three white and blue data cables are connected to the keyboard and the main board of your computer.
Step 4

If you’re just swapping out the battery, feel free to breeze past this step and the next one! Gently move the keyboard module away from the display, making sure those delicate flex cables are comfy and not under any stress.
To unlock a ZIF connector, grab a spudger or your trusty fingernail and flip up that tiny, hinged locking flap. With care, slide the cable out of the socket like a pro!
– Unplug the trio of data cables from the motherboard, and let’s keep this repair journey rolling!
Tools Used
Step 5

– Gently detach the keyboard module from the laptop, making sure it’s fully disconnected. You’ve got this!
Step 6


– Unscrew those two little screws holding the battery in place with a Phillips #1 screwdriver. You got this!
Tools Used

Step 7


The battery is snugly connected to the motherboard on the left side. Think of it as a cozy little home for your power source!
Remember, gentle hands make for happy devices! Avoid using too much force or prying the battery with tools, as that might lead to some unwanted damage to your laptop.
Step 8


You’ll find two screws holding the motherboard in place and another two that are snugly attached to the case. Let’s get those unscrewed and keep moving forward!
– Grab your trusty Philips #1 screwdriver and go ahead and unscrew those four little screws holding the hard drive snug in its spot. You’ve got this!
Step 9

Make sure to completely unplug the hard drive from the motherboard to avoid any damage to those delicate connectors. You’ve got this!
If you need to, go ahead and unbolt that old hard drive from its cozy spot and snug the new one right into place. You’ve got this!
– Gently slide the hard drive to the right to pop it off the motherboard and lift it out like a pro!
Step 10


– Grab your trusty Phillips #1 screwdriver and gently unscrew that lone screw keeping the drive snug as a bug. You’ve got this!
Tools Used
Step 11

Be careful to lift the drive straight out—sliding it to the right could give your motherboard a bad day!
– Gently slide the drive to the right side of the laptop to pop it off the motherboard. Easy peasy!
Step 12


As you tackle those screws, grab your trusty tweezers to keep them in check. It’s a handy way to stay organized and avoid any runaway screws!
– Carefully unscrew the 9 screws from the motherboard with your trusty Philips #1 screwdriver. You’re on your way to success!
Tools Used

Step 13


Avoid tugging on the cables by their wires. Doing so could cause some serious damage to them.
You might find some clear tape keeping the screen connector snug and secure.
– Unplug the three cables from the motherboard, and let’s get this party started!
– The big, black cable is your screen’s lifeline. Gently wiggle it out by holding the black tape with your fingers—think of it as a little dance!
– The fan and speaker cables are like cousins with similar looks. Use your trusty black spudger or carefully grip the sides of each connector with your fingers to ease them out. Take it slow and steady!
Tools Used
Step 14

– Gently nudge the motherboard to the right to free it from the laptop’s peripheral connections.
– Carefully lift the motherboard out of the laptop like a pro!
Step 15

– Gently untangle those black and white RF cables that are snaking along your laptop’s casing and speaker area. You’ve got this!
Step 16
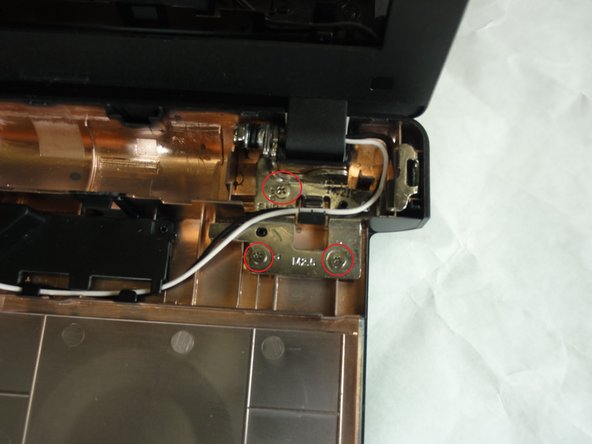

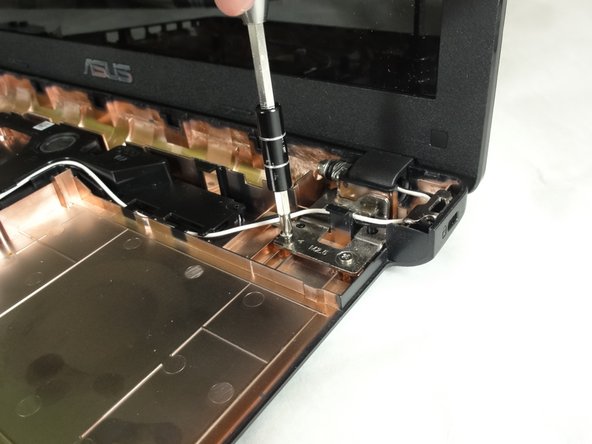
To successfully detach the Screen Module Anchors, make sure to keep a steady grip on the screen while you tackle these next steps. This will help avoid any unexpected screen drops!
There’s one screw hanging out on the left anchor, while three of its buddies are having a party on the right anchor.
– Grab your trusty Philips #1 screwdriver and get ready to unscrew those 4 little screws holding the Screen Module Anchors in place. You’ve got this!


