How to Replace Acer Chromebook 15 cb3-532-c47c Touchpad DIY Guide
Duration: 45 minutes
Steps: 10 Steps
Hold on to your hats! Before diving in, remember to power down your device and unplug it. Safety first, folks! If you find yourself in a jam, don’t hesitate to schedule a repair. Let’s keep those gadgets safe and sound!
Get ready to give your Acer Chromebook 15 CB3-532-C47C’s touchpad a little makeover! This nifty piece helps you glide and click around your Chromebook just like a mouse would on a desktop. If your touchpad is acting all sluggish or just not responding, it might be time for a swap! Before diving into the replacement, check out the troubleshooting page for some handy tips, like giving your touchpad a good clean. And remember, safety first: make sure to power off and unplug your device before you get started!
Step 1


– Make sure to power off your laptop before getting started with the replacement.
– Grab your trusty Phillips #1 screwdriver and delicately remove a total of eighteen 7 mm screws from the back panel of your device.
Tools Used

Step 2


– Grab a plastic opening tool and gently work it around the edges of your laptop to pop off that back panel. Easy peasy!
Step 3

– Gently press on the sides of the connector using a plastic spudger to delicately separate the cable from the motherboard.
Step 4


– Grab your trusty Phillips #1 screwdriver and get ready to tackle those two sleek black 5.5 mm screws holding the battery in place.
Tools Used
Step 5

– Go ahead and remove the battery from the laptop.
Step 6

– Lift up the cool latch that’s keeping the touchpad cable cozy with the motherboard.
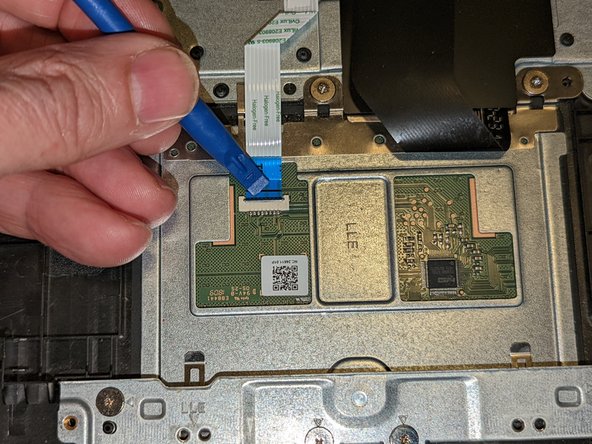
Step 7

– Gently slide the ribbon off the touchpad, giving it a little sideways wiggle to free it from the motherboard.
Step 8

– Grab your trusty Phillips #1 screwdriver and let’s tackle those three 3.2 mm screws that are keeping the touchpad snug in the laptop. Unscrew them like a pro and give your device the love it deserves!
Tools Used
Step 9


– Gently lift the keyboard ribbon cable along with the insulating sheet right beneath it, making way for the touchpad to wiggle free.
– Slightly raise the touchpad from the top.
– While lifting, pull the touchpad toward the motherboard, sliding it out from beneath the retaining fingers at the bottom.
Step 10


When you’re diving into the reinstalling process:
– First up, let’s get that touchpad off! It’s time for a little separation.
– When you’re putting the touchpad back in its rightful place, make sure it slides right under those two retaining fingers – they’re there to give it a warm welcome.
– You’ll know you’re golden when the guide pins next to the left and right screws slip perfectly into their holes. That’s how you know everything is aligned just right!