How to Replace Acer Aspire E1-572-6829 Keyboard and Touchpad Assembly
Duration: 45 minutes
Steps: 7 Steps
Hey there! Looks like it’s time to roll up our sleeves and dive into the repair process. Don’t worry, we’ve got this! Remember, if you need help, you can always schedule a repair.
The keyboard and touchpad are your trusty sidekicks on the Acer Aspire E1-572-6829 laptop. If they’re acting up and our troubleshooting tips aren’t doing the trick, it might be time for a little replacement action. The keyboard and touchpad assembly is basically the entire top panel, which needs to be removed to get to the motherboard and other internal goodies. This guide will walk you through the steps to disassemble and swap out the top panel assembly on your Acer Aspire E1-572-6829. Just remember to power down your device and unplug the charger before diving in!
Step 1

Before you dive in, double-check that your laptop is powered down and the charger is unplugged. Safety first, my friend!
Step 2


– Give that battery lock switch a friendly slide to the open position using your finger or a trusty plastic spudger.
– While you’re holding that switch open like a pro, use your other hand to gently slide the battery out from the back of the laptop.
– Boom! Your battery is out. Feel free to let go of the lock switch now.
– When you’re ready to pop the battery back in, just make sure those tabs are perfectly lined up with the laptop and that it’s facing the right way. Then, simply slide it straight back in—no need to mess with the lock switch this time!
Step 3


– Grab your trusty Phillips #0 screwdriver and tackle those seventeen 8 mm screws holding the back panel in place.
– Next, take a plastic spudger and gently work it into the top edge to pry that lower back panel open.
– Once you’ve got it loose, just lift that panel up and out—it’s time for some serious tech access!
Tools Used

Step 4


You can now gently slide out the hard disk and its trusty 2.5 inch tray. Easy peasy!
– Grab your trusty Phillips #0 screwdriver and unscrew the three 8 mm screws hiding on the inner side of the lower back panel. They can be a bit shy, but they’re just waiting to be freed!
– Now, with a gentle tug, use the pull tab on the left side of the 2.5 inch hard disk tray to slide it right out of the SATA port. It’s like giving it a little nudge to encourage it to come out and play!
Tools Used
Step 5


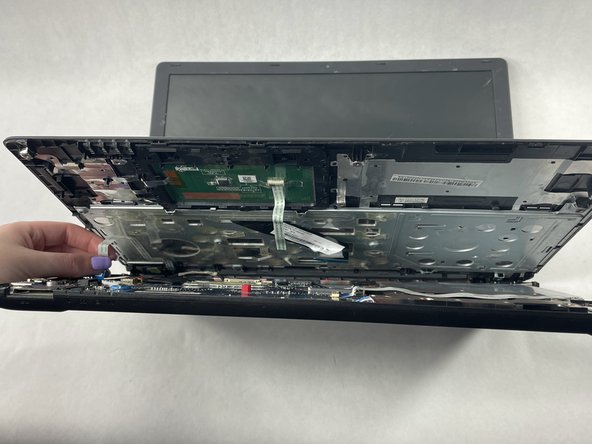
Gently does it! Remember, those sneaky ribbon cables are waiting on the inside. Give them the respect they deserve by carefully disconnecting them before you can liberate the assembly.
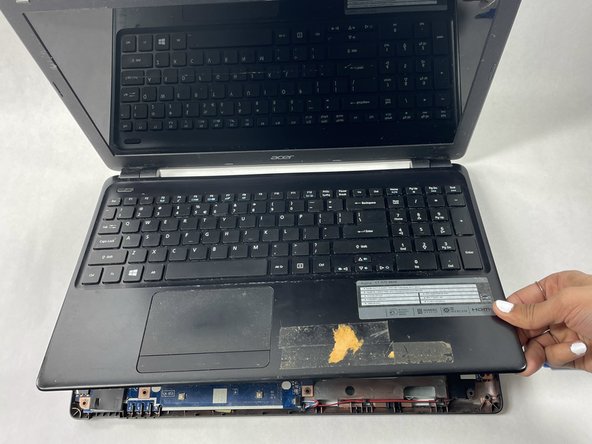
– First things first, flip your laptop over and open that lid wide so the keyboard is showing off its best side.
– Grab a plastic pry tool and gently work your way around the edges, popping open those sneaky tabs that are holding the top panel in place.
– Once those tabs are free, carefully lift up the top panel just a bit to give yourself some room to breathe.
Step 6
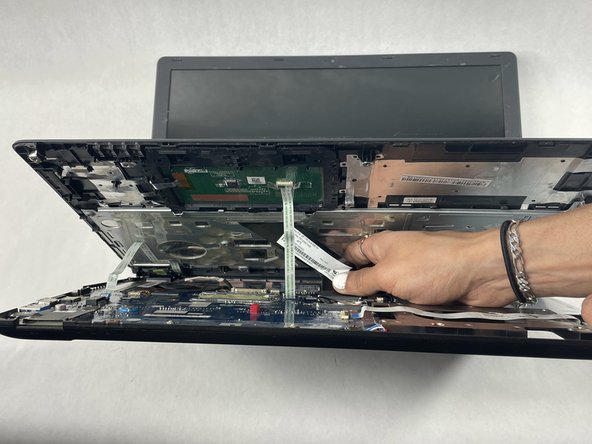

Hey there! When it’s time to remove those pesky ribbon cables, just remember – some of them have sneaky little plastic tabs that you need to lift up before detaching the cable. Stay cool and handle them with care!
– Gently unplug the three ribbon cables that link the top panel to the motherboard. You’ve got this!
– From left to right, the trio of cables is for the power button, the touch-pad, and the keyboard. Easy peasy!
Step 7


– Once you’ve skillfully detached those ribbon cables, it’s time for the grand finale! The top panel, housing the magnificent keyboard and touch-pad assembly, can now be safely whisked away from your dear laptop.


