How to Replace Nintendo Switch Battery Step-by-Step Guide
Duration: 45 minutes
Steps: 21 Steps
For your own safety, make sure to drain that battery to below 25% before diving into disassembling your Switch!
Let’s get that old battery swapped out in your Nintendo Switch! The Switch uses JIS screws, but you can use a Phillips screwdriver if needed. Be careful not to strip the screws. Salvation Repair’s Phillips bits are cross-compatible with JIS-style screws. When you remove the shield plate, make sure to replace the thermal compound between the plate and the heatsink. Standard thermal paste won’t bridge large gaps, so the best replacement is K5 Pro viscous thermal paste. This guide, and the part we sell, are compatible with the original Nintendo Switch model released in 2017, and the refreshed model released in 2019 (model numbers HAC-001 and HAC-001(-01)). For your safety, discharge the battery below 25% before disassembling your Switch. This reduces the risk of a fire hazard if the battery is accidentally damaged during the repair. If your battery is swollen, take appropriate precautions.
Step 1
Before diving into this repair adventure, ensure your device is fully powered down. Let’s keep it cool while we work our magic!
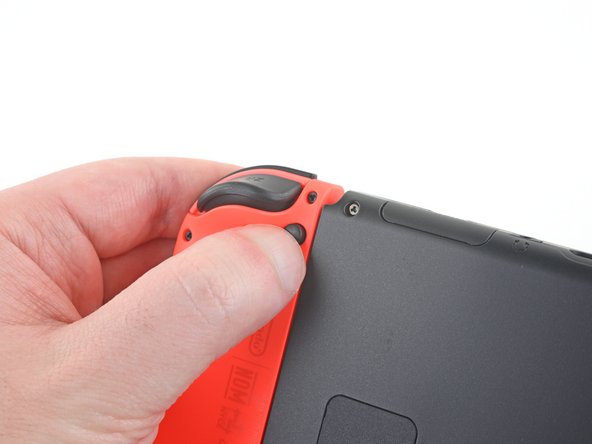
– Grab the small round button on the back of the Joy Con controller and hold it down.
– While holding the button, slide the controller upward. If you need help, you can always schedule a repair
Step 2
Give that other Joy Con the same loving attention and care as the first one!
– Keep on sliding that Joy Con upwards until it’s completely free from the console.
Step 3
As you embark on this repair adventure, keep an eye on every screw and make sure it finds its way back home, just like a boomerang!
– Grab your trusty Y00 screwdriver and carefully unscrew those four 6.3 mm-long screws holding the rear panel in place. You’ve got this!
Step 4
To avoid stripping these tight screws, press down firmly, take your time, and if they’re still stuck, try using a JIS 000 or PH 000 driver. If you need help, you can always schedule a repair.
– Grab your trusty JIS 000 driver or the official iFixit PH 000 driver, and let’s get those screws out! Start by removing the following screws that are holding the rear panel in place:
– One little 2.5 mm-long screw at the top edge of your device
– Two more 2.5 mm-long screws at the bottom edge of your device
Step 5
– Grab your JIS 000 screwdriver or iFixit PH 000 driver and unscrew those two 3.8 mm center screws from each side of the device. One on each side. If you need help, you can always schedule a repair
Step 6
Before you move on to the next step, let’s do a quick check! If there’s a microSD card hanging out in its slot, go ahead and gently pop it out. It’ll be much easier to continue without it!
– Give that kickstand a little nudge with your finger and watch it pop up from the back of your device!
Step 7
– Grab your trusty JIS 000 screwdriver or the official iFixit PH 000 driver and go ahead and remove that pesky 1.6 mm screw hiding in the kickstand well. You’ve got this!
– Now, gently close the kickstand and give yourself a pat on the back for a job well done!
Step 8
The game card cartridge flap is like a little buddy that connects to the other half of the plastic shell, making it tricky to fully lift the rear panel if it’s closed. Just a heads up as you dive into the repair!
– Flip open the game card cartridge flap.
– Gently lift the rear panel from the bottom of the device and take it off.
Step 9
– Grab your trusty JIS 000 screwdriver or the official iFixit PH 000 driver and gently unscrew the 3.1 mm screw that’s holding the microSD card reader in place. You’ve got this!
Step 10
– Lift the microSD card reader gently with your fingers or a pair of tweezers. Slow and steady wins the race! Keep it straight as you disconnect and remove it from the device.
– When putting it back together, remember to ensure that the press connector beneath the foam pad is snugly attached to the motherboard. Give it a good squeeze! You might find it easier to take off the foam pad before popping the card reader back in place.
Tools Used
Step 11
– Grab your trusty JIS 000 screwdriver or the official iFixit PH 000 driver and let’s tackle those six 3 mm screws that are holding the shield plate snugly to your device. No pressure, just a little twisty-twist and you’ll be on your way!
Step 12
If the foam isn’t coming off easily, no need to stress! Just be gentle and try peeling from different angles to coax it off without any rips. You’ve got this!
– Use your fingers or some trusty tweezers to peel back the foam bit on the top edge near the fan exhaust port. Easy peasy! If you need help, you can always schedule a repair.
Tools Used
Step 13
A hearty layer of pink thermal compound creates a cozy bridge between the shield plate and the copper heat sink below. It’s the secret sauce that keeps your Switch cool and collected.
Feeling a bit of resistance? Don’t worry, that’s totally normal! The shield plate is just a little snug with the heat sink thanks to that thermal paste bonding them together.
– Slide a spudger under the shield plate along the device’s edge and get ready to lift!
– Gently pry up to pop the shield plate off and set it aside like a pro.
– If you’re careful, you can totally reuse that pink thermal compound. Just keep it clean and ensure it makes solid contact between the heat sink and shield when putting everything back together.
– Need a replacement? No problem! Check out our thermal paste guide for tips on removing the old stuff and swapping it out with something like K5 Pro during reassembly.
Tools Used
Step 14
– Gently use the tip of a spudger to lift the battery connector straight up and gently remove it from its socket on the motherboard.
Tools Used
Step 15
Before diving into the repair, make sure to follow these prep steps if you’re using adhesive remover!
– Pop a few drops of adhesive remover or some high-octane (90% or higher) isopropyl alcohol inside the battery well along the top edge to loosen that sticky mess. If you need help, you can always schedule a repair
Tools Used
Step 16
– Gently raise the top edge of your device upwards to let the magic of isopropyl alcohol get under the battery.
– Hold tight for 1-2 minutes to give the isopropyl alcohol some time to soften the adhesive.
Tools Used
Step 17
Be careful not to poke or bend the battery with your tool—a poked or bent battery might release harmful chemicals or cause a hot mess. If you need help, you can always schedule a repair.
– Slide an opening pick into the little space between the battery and the wall of the battery well. It’s like giving your device a little wiggle!
– Gently work the tip of the opening pick underneath the battery and glide it along the edge to start slicing through the adhesive. You’re on your way to a battery break-up!
Step 18
– Keep that opening pick snugly in place and go ahead and add a few more drops of adhesive remover or isopropyl alcohol right into the battery well.
– Next, give the top edge of your device a little tilt upward and chill for about 1-2 minutes while the isopropyl alcohol works its magic on the adhesive.
Tools Used
Step 19
– Keep that opening pick gliding along the top edge of the battery, working it deeper to slice through more of that pesky adhesive lurking underneath.
Step 20
Handle that battery with care—no bending while you pry it out! It’s not a yoga class, after all.
Once you’ve removed the battery, it’s time to say goodbye—don’t even think about reusing it! Grab a shiny new one instead to keep things safe and sound.
If you’re having a tough time prying things apart, don’t hesitate to add a little extra isopropyl alcohol to help things along.
– When you’ve got enough wiggle room, slide a plastic card under the battery and gently nudge it upwards.
– Take out the battery.
Tools Used
Step 21
Got a new battery without pre-installed adhesive? No worries! Check out this guide to lay down some pre-cut adhesive on the bottom of your battery. If you need help, you can always schedule a repair.
– Grab some adhesive remover or isopropyl alcohol, and a microfiber cloth to wipe off any leftover adhesive in the battery well. Now, you’re ready to pop in the new battery! If you need help, you can always schedule a repair.
Tools Used


