How to Replace Sony PlayStation 4 Optical Drive Guide
Duration: 45 minutes
Steps: 27 Steps
Make sure to unplug your PS4 before diving into any repairs!
Ready to give your Sony Playstation 4 some TLC? This guide will walk you through swapping out the optical drive. For the 1XXX series models, keep in mind that the optical drive daughterboard is a buddy of the motherboard. If your daughterboard is on the fritz, you’ll need to swap out the whole motherboard. You can totally replace just the optical drive assembly, but make sure it plays nice with your daughterboard. And remember, safety first! Unplug your PS4 before diving into the repair adventure. If you need help, you can always schedule a repair.
Step 1
– Turn your PS4 over so the back is facing you. Let’s get this party started!
Step 2
– With a bit of finesse, grab your trusty tweezers and peel away the two little stickers in the center of your PS4’s back. Boom! You’ve just uncovered two case screws. Keep it going! And hey, if you want some extra support, feel free to schedule a repair.
Tools Used
Step 4
– Let’s get those four 7.2 mm Torx security screws off the back of your PS4! Grab your trusty screwdriver and get ready to make some magic happen.
Step 5
The lower case is secured by some stubborn plastic clips. It might take a bit of elbow grease to free the lower case.
– Gently use your thumbs to pop the lower case right off your PS4 and reveal its inner awesomeness!
Step 6
If your connector is being a bit stubborn, just grab a trusty spudger and gently nudge it out. If you need help, you can always schedule a repair.
– Grab a trusty pair of tweezers and gently pull the power supply cable straight out to disconnect the power supply unit from the motherboard. You’ve got this!
Step 7
– Let’s kick it off by unscrewing those three 9.7 mm-long TR8 Torx security screws. Time to show ’em who’s boss!
– Next up, remove those two 41 mm-long Phillips screws and their trusty sidekick brackets. You’re doing great!
Step 8
The power supply is snugly secured by prongs on the left side. It might take a few tries to wiggle it free, so don’t get discouraged!
– Gently lift the power supply straight up and out of the PS4, like you’re revealing a hidden treasure!
– When putting everything back together, make sure those prongs are lined up just right, then give the power supply a nice, firm press into place. You’ve got this!
Step 9
– Grab that spudger like a pro and gently pop the antenna cable off the motherboard. If you need help, you can always schedule a repair.
Tools Used
Step 11
– Grab those tweezers or just use your nimble fingers to gently wiggle the antenna cable out from its cozy spot under the optical drive cable. Keep it smooth and steady! If you need help, you can always schedule a repair.
Tools Used
Step 12
– Gently take out the 9.7 mm Torx security screw that’s keeping the antenna in place. If you need help, you can always schedule a repair.
Step 13
– Say goodbye to the Wi-Fi antenna! It’s time to gently detach it and make room for the magic to happen.
Step 14
– Get ready to show that ribbon cable who’s boss! Use your trusty fingernail to give a little press down on the metal release lever sitting proudly atop the optical drive.
– Now it’s time to work your magic – whether with your nimble fingers or a snazzy pair of tweezers, delicately disconnect the ribbon cable by giving a gentle tug on the sleek black tab.
– No need to break a sweat! Remember, you’re a pro now. When it comes to reuniting the ribbon cable, just slide it back in without the need for any extra pressure. Listen out for that satisfying click – that’s your cue that it’s snug as a bug in a rug!
Tools Used
Step 15
– Gently use your fingernail to hop down on that shiny metal release lever for the ribbon cable snuggled with the motherboard.
– With your nimble fingers or trusty tweezers, ease that ribbon cable out by giving a little tug on the black tab.
– Pop that ribbon cable over to the side for when you put it all back together.
– No need for lever action when slipping the cable back in. You’ll know it’s in place with a satisfying click. If things get tricky, schedule a repair anytime.
Tools Used
Step 16
– Gently use your fingers or grab a pair of tweezers to unplug the optical drive cable from the motherboard. You’ve got this!
Tools Used
Step 17
– Grab those nimble fingers or tweezers and gently ease the optical drive cable out from the cable guides keeping it snug. If you need help, you can always schedule a repair
Tools Used
Step 18
– Let’s kick things off by unscrewing those four screws holding the optical drive in place. You’ve got this!
– Keep an eye out for three 9.7 mm Torx screws – they’re your next target.
– And don’t forget about that one sneaky 6.2 mm Phillips screw hiding out. Time to show it who’s boss!
Step 19
– Gently lift the optical drive right out of the PS4’s cozy little spot. If you need help, you can always schedule a repair.
Step 20
If your optical drive came ready to rock with a PCB board and bracket, you’ve struck DIY gold! Feel free to skip ahead to putting it all back together. Need assistance? You can always schedule a repair.
– Say goodbye to those three 6.2 mm Phillips screws holding on the metal bracket! Grab your screwdriver and remove them with confidence.
Step 21
– Gently lift the metal bracket straight up to free it from the optical drive. You’ve got this!
Step 22
– Unscrew the 6.4 mm Phillips screw from the PCB board with care.
Step 23
– Grab your spudger and gently flip open that ZIF connector locking bar. If you need help, you can always schedule a repair
Tools Used
Step 24
– Gently wiggle the ribbon cable out from its snug spot in the ZIF connector.
Step 25
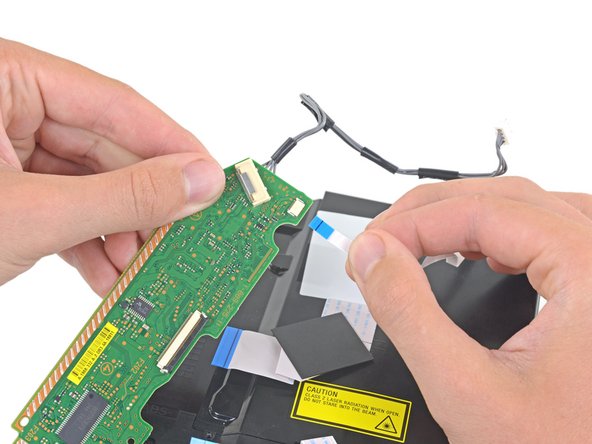
– Grip the PCB with one hand and the lower ribbon cable with the other.
– Carefully pull the lower ribbon cable straight out of its socket.
Step 26
– Grab the PCB with one hand, and with the other, gently hold onto that upper ribbon cable like it’s a precious treasure.
– Now, give that upper ribbon cable a nice, straight pull to disconnect it from the socket. You’ve got this!
Step 27
– Carefully lift out the circuit board like you’re pulling the rabbit from a hat!


