How to Replace the PlayStation 4 Fan Tutorial
Duration: 45 minutes
Steps: 38 Steps
Make sure to give your PS4 a little break by unplugging it before diving into any repairs.
Ready to swap out that noisy fan on your Sony Playstation 4? Follow along and you’ll have it done in no time! Just remember to unplug your PS4 before diving into any repairs. If you need help, you can always schedule a repair.
Step 1
– Hold the PS4 firmly with both hands at the gap in the top cover.
– Use your thumbs to push the glossy side of the top cover until it pops to the side.
– Lift the glossy top cover up and back to remove it from the PS4.
Step 2
– Grab your trusty Phillips screwdriver and unleash its power on that 6.5 mm screw holding the hard drive bracket to the enclosure. If you need help, you can always schedule a repair.
Step 3
Handle the hard drive with care! Its delicate insides are like a house of cards, ready to tumble with a sudden bump. Let’s keep it safe and sound.
– Gently slide that hard drive bracket out of its cozy little enclosure.
Step 4
– Gently flip over your PS4 so the back side is facing you.
Step 7
– Get ready to say goodbye to those pesky four 7.2 mm Torx security screws holding the back of the PS4 in place!
Step 8
The lower case is secured by plastic clips, and you might need to flex those muscles a bit to pop it open. If you need help, you can always schedule a repair.
– Pop that lower case off the PS4 with your thumbs like a pro!
Step 9
If your connector seems a bit stuck, don’t worry! Just grab a spudger and gently coax it out.
– Feeling like a high-tech magician? Use a pair of tweezers to smoothly pull out the power supply cable and disconnect it from the motherboard.
Step 10
– Let’s kick things off by removing three 9.7 mm-long TR8 Torx security screws.
– Next up, say goodbye to two 41 mm-long Phillips screws and brackets.
Step 11
The power supply is snugly secured by prongs on the left side. It might take a few tries to wiggle it free, so don’t get discouraged!
– Gently lift the power supply straight up and out of the PS4.
– When putting everything back together, make sure the prongs are lined up properly, then firmly push the power supply into place.
Step 12
– Gently use the spudger’s tip to unplug the antenna cable from the motherboard – easy peasy!
Tools Used
Step 14
– Grab a pair of tweezers or just use your fingers to gently wiggle that antenna cable out from under the optical drive cable. You’ve got this!
Tools Used
Step 15
– Unfasten the 9.7 mm Torx security screw holding the antenna in place.
Step 16
– Time to bid farewell to the Wi-Fi antenna!
Step 17
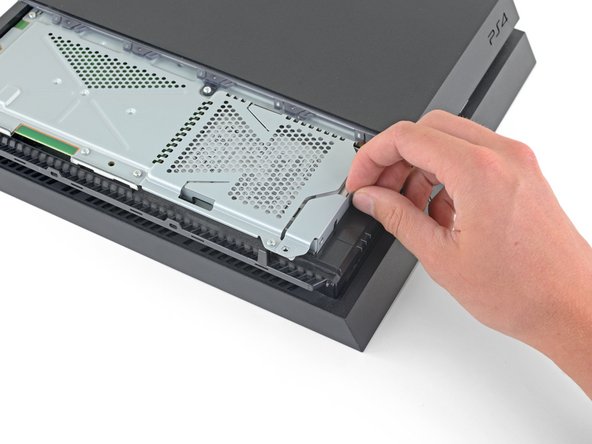
– Give that metal release lever on the ribbon cable a gentle press with your fingernail right on top of the optical drive.
– Now, using your fingers or a trusty pair of tweezers, carefully disconnect the ribbon cable by tugging on the black tab.
– When it’s time to pop the ribbon cable back in, no need to press that metal lever! Just slide it in until you hear a satisfying click, and you’re all set!
Tools Used
Step 18
– Use your fingernail to press down the metal release lever for the ribbon cable connected to the motherboard.
– Use your fingers or a pair of tweezers to disconnect the ribbon cable by pulling on the black tab.
– Set the ribbon cable aside for reassembly.
– You don’t need to press the metal lever when inserting the ribbon cable back in. You’ll hear a click once it’s fully inserted.
Tools Used
Step 19
– Alright tech-saver! Gently pop that optical drive cable off the motherboard — you can use your fingers or grab a set of tweezers. Feeling stuck? No worries, you can always schedule a repair.
Tools Used
Step 20
– Grab your trusty tweezers or use your nimble fingers to gently release the optical drive cable from its cozy spot in the cable guides.
Tools Used
Step 21
– Let’s get those four screws out and free up the optical drive!
– Three of these are 9.7 mm Torx screws – easy peasy.
– And don’t forget the little 6.2 mm Phillips screw. If you need help, you can always schedule a repair!
Step 22
– Gently lift the optical drive straight up and out of the PS4, champ! If you need help, you can always schedule a repair.
Step 23
– Unscrew those two 9.7 mm Torx screws holding the upper case in place. You’ve got this!
Step 24
The upper case is secured by some feisty plastic tabs on the front side. You’ll need to use a bit of muscle to pry them apart.
– Gently lift and tilt the upper case back to remove it from the PS4.
Step 25
– Alright, it’s time to show those screws who’s boss! Take your Torx screwdriver and gently unscrew the twelve 9.7 mm Torx screws holding the upper EMI shield in place. Take your time; you’ve got this! And remember, if things get tricky, don’t hesitate to schedule a repair.
Step 26
Avoid completely unscrewing one side before tackling the other side, or you might end up giving your processor an unwanted workout!
In this step, we’ll guide you on how to expertly unscrew the pressure plate with ease. Let’s get started!
– Start by taking out those two 15.6 mm Phillips screws—easy peasy!
– Now, gently unscrew the pressure plate, giving each screw a half turn at a time. Patience is key!
– Remember to switch it up between the two screws to keep that pressure plate nice and balanced.
Step 27
– Take off the pressure plate.
Step 28
– Take off the upper EMI shield with care.
Step 29
– Insert the flat end of a spudger between the fan cable and the motherboard, like a gentle handshake.
– Give the spudger a little twist to lift the connector straight up and disconnect it from the motherboard.
Tools Used
Step 30
– Gently grasp the edge of the motherboard at the front of your PS4.
– Carefully lift the motherboard until the USB ports are free from the PS4 case.
Step 31
Make sure you slather that new thermal paste on correctly, or your PS4 might just throw a little heat tantrum! If you need help, you can always schedule a repair.
– Gently lift the motherboard out from the PS4, like picking up a piece of awesome tech treasure!
– Before sliding that trusty motherboard back in, slap on a fresh layer of thermal paste on the processor, following this guide right here.
– Start by sliding in the I/O side of the motherboard, then smoothly lower the other side. Easy does it!
Step 32
– Let’s get started by taking out those three 6.2 mm Phillips screws from the lower EMI shield. You’ve got this!
Step 33
– Gently hoist the lower EMI shield and heatsink straight up and out of the PS4. You’ve got this!
Step 34
– Let’s gently spin out those two 6.2 mm Phillips screws from the fan. Got this! If you need help, you can always schedule a repair.
Step 35
– Gently lift the fan straight up out of the PS4 shell like you’re plucking the perfect apple from a tree. If you need help, you can always schedule a repair!


