How to Replace Samsung Galaxy S6 Edge Display Assembly and Frame: Step-by-Step Guide
Duration: 45 minutes
Steps: 27 Steps
Dive into this guide if you’re ready to swap out the display assembly and front plastic frame at the same time!
Get ready to dive into this guide where we’ll walk you through replacing the screen and front plastic frame on your Samsung Galaxy S6 Edge! You’ll learn how to carefully take out all the components from the frame, including the digitizer, OLED display, display frame, and home button. If you’re swapping out the display assembly and front plastic frame together, you’re in the right place! If your new part doesn’t come with a plastic frame, don’t worry—just follow along with this guide. One thing to keep in mind is that we’ll need to remove the rear glass, which means saying goodbye to the adhesive holding it. But fear not! This guide will also show you how to reinstall that rear glass like a pro. If you need help, you can always schedule a repair.

Step 2


Hey there! Just a gentle reminder: steer clear of sticking your tool into the microphone hole, as it could lead to some unwanted damage. Instead, keep your eyes peeled for the outline of the SIM tray.
– Grab a paper clip or your trusty SIM eject tool and gently poke it into the little hole at the top of your phone’s SIM card slot.
– Give it a little push to pop that SIM card tray right out!
– Carefully pull the SIM card tray out from the phone and voilà, you’re all set!
Step 3


Hey there! Just a quick tip for carousel microwaves: Make sure that plate is spinning freely like a pro on the dance floor. If your iOpener decides to take a break and gets stuck, it might get a little too hot under the collar and start burning up. Stay cool and keep things spinning smoothly!
Before diving in, give your microwave a little TLC and clean it up. Any stubborn mess on the bottom could end up making friends with the iOpener, and we don’t want that!
– Pop the iOpener right in the center of the microwave.
Tools Used

Step 4

Hey there, just a quick heads up! Make sure not to overheat the iOpener during your repair adventure. If it gets too hot, it might just pop! Keep the temperature below 100˚C (212˚F).
If your iOpener looks like it’s been working out and seems a bit swollen, give it a break – don’t touch it!
Still feeling the heat? If the middle of the iOpener is too hot to handle, keep using it until it cools down a bit more. A well-heated iOpener should stay cozy for up to 10 minutes. You’re doing great!
Depending on your microwave’s wattage, you might need to adjust the heating time a bit. The iOpener is ready to go when it feels just a tad too hot to handle.
– Warm up the iOpener for 30 seconds.
– When the iOpener starts to cool down, pop it back in the microwave for another 30 seconds to keep things moving.
Tools Used
Step 5

Watch out! The iOpener is going to be hot, hot, hot! Handle it with care and grab an oven mitt if you need some extra protection.
– Carefully take the iOpener out of the microwave, gripping one of the flat ends to keep your fingers away from the hot center.
Tools Used
Step 6


The iOpener gets super toasty, so make sure to handle it by the end tabs only. Stay safe and keep those fingers cool!
No microwave? No problem! Just pop your iOpener into some boiling water to warm it up.
– Fill a pot or pan with enough water to fully dunk that iOpener.
– Crank up the heat until the water boils. Then turn it off.
– Toss that iOpener into the hot water for 2-3 minutes. Make sure it’s fully covered.
– Use tongs to pull the heated iOpener from the water.
– Dry the iOpener thoroughly with a towel.
– Your iOpener is all set! If you need to reheat it, boil the water again, turn off the heat, and dunk the iOpener for another 2-3 minutes.
Tools Used
Step 7


– Place the warm iOpener on the back panel for around two minutes to gently loosen that sticky adhesive clinging to the glass’s edges.
– Move the iOpener to warm up the other part of the panel for another couple of minutes.
You can also use a hair dryer, heat gun, or hot plate to warm things up a bit, but keep an eye on the heat—your phone’s OLED display and internal battery aren’t fans of getting too toasty!
Stay awesome and keep those waterproof seals in mind while you open up your phone. Make sure to have that adhesive ready to go or use some packing tape to hold it all together. Heat it up just right with the iOpener and you’ll be good to go on your phone repair journey! If you need help, you can always schedule a repair
Tools Used
Step 8


If you’re feeling adventurous, once you’ve slipped that pick in, sprinkle in a few drops of isopropyl alcohol into the gap. It’ll help loosen up that stubborn adhesive for the next steps!
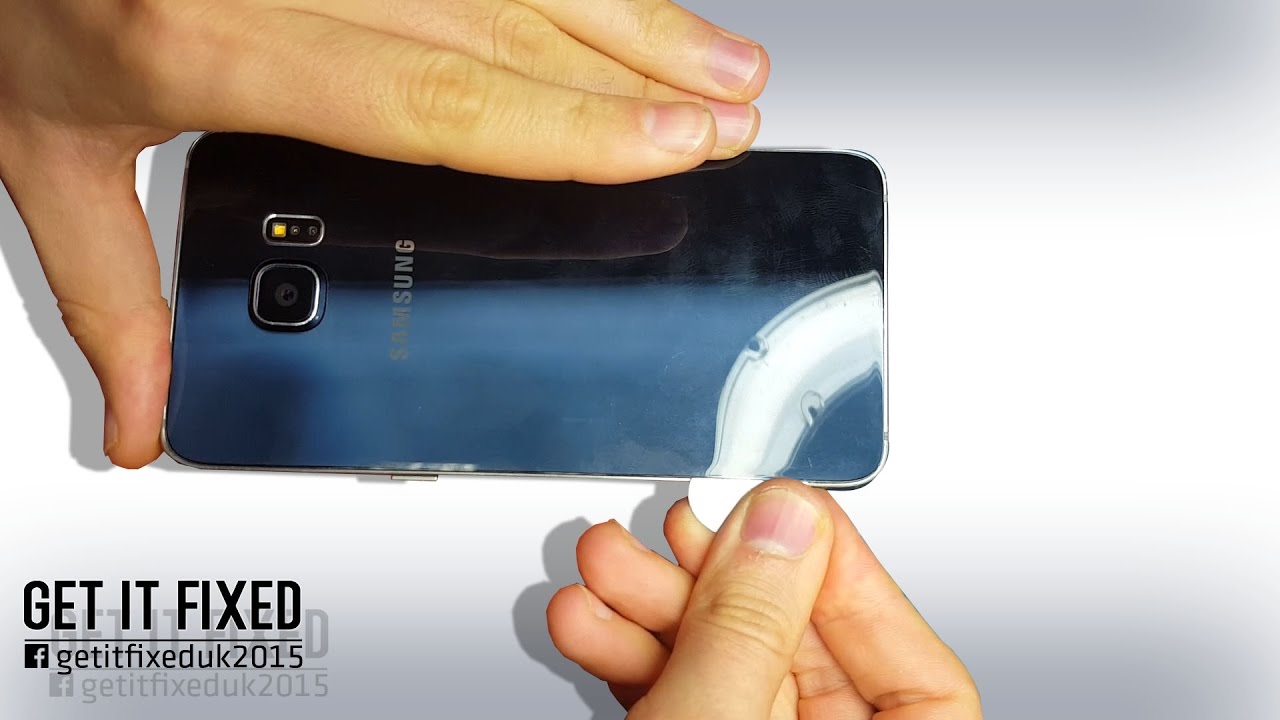
– When the rear glass is warm, place a suction cup near the lower edge of the glass.
– Gently pull the suction cup to create a small gap and slide in an opening pick.
Step 9


To keep things smooth sailing, consider leaving the pick in place while you grab a second one for the next step. This little trick can help stop that pesky glue from sticking back together.
Feel free to reheat the rear glass as needed to keep the glue from cooling off and getting all hard on you.
– Gently glide the pick along the bottom edge of your phone to cut through the adhesive holding the rear glass in place. Remember, you got this!
Step 10


– Time to show those edges who’s boss! Repeat the heating and cutting process for the last three sides of the phone. Make sure to tuck a trusty opening pick under each edge to keep that sticky adhesive from causing trouble again.
Step 11


– Grab your opening pick and show that adhesive who’s boss!
– Time to bid farewell to the rear glass.
Step 12


– Ready to swap out that rear glass? Let’s go!
– If you’re putting the old rear glass back on or working with some adhesive-free glass, check out this guide.
– Grab your tweezers and gently remove any leftover adhesive from the phone’s chassis.
– Time for a little cleaning! Use high concentration isopropyl alcohol (at least 90%) and a lint-free cloth. Remember to swipe in one direction, not back and forth—this helps prep the surface for the new adhesive.
– Peel off the backing from the new rear glass, line it up carefully with one edge against the phone chassis, and give it a solid press to secure it in place.
Tools Used

Step 13

– Take out those thirteen 3.3 mm Phillips #00 screws from the midframe like a pro! You’ve got this!


Step 15


– Grab your trusty spudger and gently use its flat end to unplug that battery ribbon cable from the motherboard. You’ve got this!
Tools Used


Step 17


– Grab your trusty spudger and use its pointed end to gently disconnect those two antenna interconnect cables from the motherboard. You’ve got this!
Tools Used
Step 18


– Pop the display ribbon cable off the motherboard using the flat end of your trusty spudger.
Tools Used


Step 20


Hey there, rockstar repairer! Remember, the motherboard is as sensitive as a kitten playing the piano. Slip on that anti-static bracelet like a pro before getting your hands dirty to keep things smooth and spark-free!
Hold up! Before you lift that precious motherboard, don’t forget about the sneaky ribbon cable hanging out. Give it the attention it deserves by disconnecting it first in this step.
– Grab the motherboard by its top edges like you’re holding a trophy.
– Gently lift the motherboard upwards and away from the display. Just be mindful of the daughterboard ribbon cable—let’s not stress it out too much!
Step 21


– Gently unplug the daughterboard ribbon cable from the bottom side of the motherboard. You’ve got this!
Step 22


– Slide an opening pick under the battery and gently glide it along to loosen the sticky stuff underneath.
Step 23


Once you’ve removed the battery, don’t pop it back in! That could be risky. Grab a new battery instead. Need a hand? schedule a repair
– Give that opening pick a little twist to pop out the battery and set it free!
– Ready to slide in your shiny new battery? Let’s make sure it’s lined up just right:
– First, wipe away any leftover sticky stuff from the phone, and give the glued areas a good clean with isopropyl alcohol and a lint-free cloth.
– Now, gently position the replacement battery in its cozy spot, but hold off on the adhesive for now. Let’s keep moving until we get that motherboard back in (that’s STEP 18, by the way).
– Next up, grab some fresh pre-cut adhesive or double-sided tape and stick it around the edge of the battery compartment on the phone frame—just make sure to leave the rectangular cutout in the center bare, as that’s where the back of the display lives.
– For a quick check, connect the battery connector to the motherboard temporarily to make sure everything’s lined up properly.
– Now, press the battery into place with a little love for 5-10 seconds. Once it’s snug, disconnect the battery and let’s keep reassembling!
Step 24

– Time to bid farewell to those two 2.5mm Phillips #00 screws!


Step 26


– Gently lift the daughterboard up and away from the phone’s body to set it free.
Step 27


Check out your new part compared to the display assembly that’s still hanging out. You might need to move over some extra bits like the display frame or home button. If you need help, you can always schedule a repair.
– Slide the tip of a spudger into the gap in the display frame under the vibrator, and give it a gentle pry to break the adhesive.
– Lift the vibrator out of the display assembly.
Tools Used