Samsung Galaxy S21 Ultra Laser AF module Replacement
Duration: 45 minutes
Steps: 18 Steps
If you’re stuck or need an extra hand, remember you can always schedule a repair.
Ready to swap out the laser AF module on your Samsung Galaxy S21 Ultra? You’ve got this! We worked on the SM-G998B/DS (international) model for this guide, but other models might have an extra antenna cable near the midframe edge. Heads up: if you skip replacing the adhesive seals during reassembly, your device will still work, but it might lose its water resistance. Grab some replacement adhesive to stick those components back together. If you need help, you can always schedule a repair.
Step 1

First things first, make sure your phone is powered off and unplugged before diving in. Safety first, right?
You can use a hair dryer, heat gun, or hot plate to help with the repair, but keep an eye on the heat! Both the display and internal battery are a bit sensitive to overheating, so let’s avoid any drama there.
– Grab your trusty iOpener and place it on the back cover for a solid three minutes. This will help warm things up and loosen that sticky adhesive beneath. You got this!


Step 2


Got a back cover that’s seen better days? No worries! Slap on some clear packing tape to help that suction cup stick like it’s meant to. If you’re feeling adventurous, you can even use some super strong tape instead of the suction cup. And if all else fails, a little superglue can work wonders to attach that suction cup to the cracked cover.
Having a tough time making a gap? Just heat things up a bit more to loosen that stubborn adhesive. Remember to follow the iOpener instructions to keep everything nice and safe from overheating!
– Grab that suction handle and stick it to the bottom edge of the back cover, getting it as close to the edge as you can.
– Lift the back cover with the suction handle, creating a tiny gap between the cover and the frame.
– Slide an opening pick into that gap.
– Move the opening pick to the bottom left corner to slice through the adhesive.
– Keep the opening pick in place so the adhesive doesn’t reseal.
Tools Used

Step 3


– Pop in a second opening pick at the bottom edge of your phone.
– Gently glide the opening pick over to the bottom right corner to cut through that adhesive.
– Keep those opening picks in place to stop the adhesive from sealing back up.
Step 4


If the adhesive is giving you a hard time and feels tough to slice through, it’s probably taken a little chill. Give your iOpener a warm-up session for two to three minutes to get things back on track.
– Pop in a third opening pick at the bottom right corner of your phone.
– Gently glide the opening pick along the right edge of your phone to cut through that sticky adhesive.
– Keep the opening pick in the top right corner to stop the adhesive from sealing back up.
Tools Used
Step 5


When you’re slicing close to the camera assembly, just sneak in the tip of your opening pick (about 4-5 mm) to keep that camera safe and sound. No smudges allowed!
– Slide a fourth opening pick beneath the top right corner of your phone like a pro.
– Gently glide the opening pick along the top edge to cut through that pesky adhesive.
– Keep the opening pick wedged in the top left corner to stop the adhesive from making a comeback!
Step 6


Remember, when delicately slicing near the power button, just pop in the tip of the opening pick (~3-4 mm) to prevent any mischief with the power and volume button flex cable.
– Hey there, friend! You’re on the home stretch! Insert your pick like a pro and follow the edge to slice that sticky stuff. You’ve got this! If you need help, you can always schedule a repair.
Step 7


– Pop off the back cover.
– While you’re putting it back together:
– Now’s a great time to power on your phone and check all the functions before sealing it up. Make sure to power it back down completely before you continue.
– Use tweezers or your fingers to clear out any adhesive bits.
– Wipe away any leftover adhesive with some high concentration (over 90%) isopropyl alcohol.
– If you’re using custom-cut adhesives, follow this guide.
– If you’re using double-sided tape, follow this guide.
Step 8


– Get ready to rock ‘n roll by sliding an opening pick underneath the left bottom end of the NFC antenna and charging coil assembly.
– Gently glide the opening pick along the bottom left edge of the assembly to give it some space from the battery.
Step 9


– Alrighty, techies! Time to get a little hands-on with your gadget’s guts. First up, sneak a super-slim tool under the bottom of that nifty NFC antenna and charging charger-whatsit. Once it’s in place, delicately glide it along the bottom, gently separating it from your phone’s sound blasting speaker. Need a hand? You can always schedule a repair!
Step 10


– Grab your trusty spudger and gently pry up the charging coil connector from its socket. It’s as easy as pie!
Tools Used

Step 11


– Grab a spudger and let’s get groovy! Disconnect the NFC antenna with finesse by gently prying the connector straight up from its socket.
Tools Used
Step 12

– Grab your trusty Phillips screwdriver and let’s get started! Remove those five 3.9mm screws holding down the NFC antenna and charging coil assembly. If you need help, you can always schedule a repair.
Step 13


– Grab a trusty pair of tweezers or just your fingers, and gently lift out the NFC antenna and charging coil assembly. You’ve got this!
Step 14


– Grab your trusty spudger and gently pry the battery cable connector straight up from its socket. It’s like giving it a little lift-off!
Tools Used
Step 15
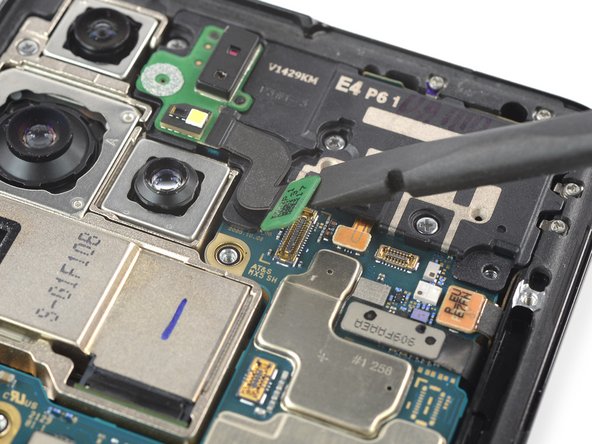

– Grab your trusty spudger and gently lift the laser AF module cable connector straight up from its socket. You’ve got this!
Tools Used
Step 16

You can use a hair dryer, heat gun, or hot plate to help with the repair, but remember to keep it cool! Overheating your phone can lead to some serious heat damage to the display and internal battery. So, let’s keep it chill! If you need help, you can always schedule a repair.
– Grab your trusty iOpener and place it on the screen right where the front-facing camera hangs out. Let it chill there for at least two minutes to help loosen up that stubborn adhesive underneath. You’re doing great!
Step 17


– Gently slide an opening pick under the laser AF module to free it from the earpiece speaker assembly. You’re doing great!
– Now, use that trusty opening pick to lift the laser AF module. Keep it up!
Step 18


– Grab your blunt tweezers and carefully pluck out the laser AF module.
– When putting things back together, make sure to apply fresh adhesive where needed after giving the relevant spots a good clean with isopropyl alcohol (>90%). If you need help, you can always schedule a repair.