How to Replace Samsung Galaxy S21 Loudspeaker Tutorial
Duration: 45 minutes
Steps: 25 Steps
For your safety, make sure to drain that battery down to under 25% before diving into disassembling your phone. It’s always better to play it safe!
Ready to tackle the task of swapping out that loudspeaker in your Samsung Galaxy S21? Awesome! Just a quick heads-up: make sure to drain your battery to below 25% before diving in. It’s all about keeping things safe and sound—lowering the chance of a thermal surprise if things go sideways while you’re working. And if your battery looks like it’s been through a pillow fight, take the necessary precautions. If you need help, you can always schedule a repair.
Step 1

Make sure your device is completely powered off before you get started!
– Warm up your trusty iOpener and place it against the bottom edge of the back cover for a cozy two minutes. Let that heat do its magic!
Tools Used

Step 2


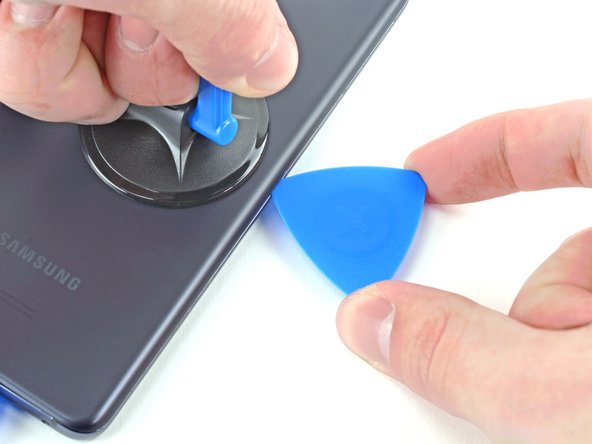
– Grab a trusty suction cup and get ready to stick it on the back of your device, aiming for the center of the bottom edge.
– Give that suction cup a good workout by pulling it up with some solid, steady force. Watch as a magical gap forms between the back cover and the frame.
– Slide an opening pick into the gap like a secret agent on a mission, smoothly and with style.


Step 4

– Warm up the iOpener and give the left edge of the back cover a nice two-minute spa treatment.
Tools Used
Step 5


– Alrighty then, let’s get our hands dirty and make this phone look brand new again! First things first, take a suction cup and stick it to the back of the phone near the top left edge. Now, give it some muscle and pull that bad boy up to create a mini mountain just by the frame. Once that’s done, throw an opening pick right in there – we’ve got to get that back cover off!
Step 6


– Gently slide an opening pick along the left edge, making your way to the bottom left corner to slice through the adhesive. It’s like a little dance move for your device!
– Keep that pick in place to ensure the adhesive doesn’t decide to make a comeback. You’ve got this!
Step 7

– Gently warm up a friendly iOpener on the right edge of the back cover for a couple of minutes.
Tools Used
Step 8


– Grab a trusty suction cup and stick it firmly onto the back of your device, right in the middle of the right edge.
– Give that suction cup a good tug with a solid, even force to pop open a space between the back cover and the frame.
– Slide in a handy opening pick into the gap you’ve created.
Step 9


– Gently slide an opening pick back and forth along the right edge of the back cover to slice through that adhesive like a pro.
– Keep the pick in place to stop the adhesive from making a comeback!
Step 10


To tackle this task, feel free to apply this process to all edges, except for the upper-left corner where the rear camera is positioned.
– Gently maneuver the right-edge opening pick around the top-right corner of your phone like a pro!
Step 11


– Gently slide that top pick right up to the edge of the camera shell—let’s give it a snug fit!
– Now, give the left-edge pick some love and do the same. You’re on the right track!
Step 12

– Warm up your iOpener and let it work its magic on the camera shell for a cozy two minutes.
Tools Used
Step 13


If this approach doesn’t do the trick, don’t sweat it! Just hop on over to the next step for another option; if it does work, feel free to skip the next one!
– Twist that back cover to the left and watch as a little gap opens up between the camera shell and the frame. It’s like magic!
– Slide an opening pick into that delightful gap you just created.
Step 14


Hey there, watch out when you’re doing this step, we don’t want any cracked plastic back covers on our watch!
– With a touch of finesse, gently slide the two picks towards the camera shell, positioning them snugly under the corners of the back cover next to the camera shell.
– Sway the picks back and forth along the bridge connecting the back cover and the camera shell, shimmying until a gap dances into existence between the camera shell and the frame.
Step 15


– Gently slide an opening pick between the camera shell and the frame to carefully break the adhesive seal.
Step 16


Watch out for that sneaky plate on the back cover near the phone’s flash – it loves to play hide and seek with your pick!
– Make sure to slice through the extra adhesive hanging out to the right of the camera.
Step 17


– Align the tip of your trusty opening pick with the flash on your phone.
– Gently slide the pick in, taking care to steer clear of the flash’s plate.
– Carefully slice through the adhesive just to the right of the camera.


Step 19

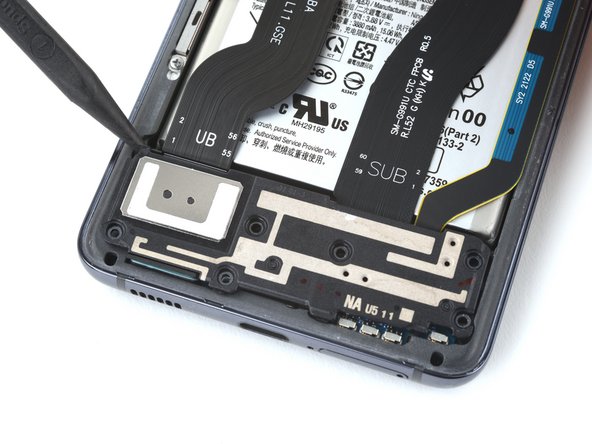
As you dive into this repair adventure, keep an eye on every screw and make sure to return each one to its original cozy spot. You’ve got this!
– Grab your trusty Phillips screwdriver and get ready to tackle those five 4 mm-long screws that are keeping the motherboard bracket snugly attached to the frame. Let’s get to it!
Step 20


Hold your horses, buddy! You ain’t gonna need that bracket to go galloping off just yet. It’s still playin’ tug-of-war with the wireless charging coil, you see!
– Grab a trusty pair of tweezers and gently lift up the motherboard bracket from the frame like you’re unwrapping a surprise gift. It’s easier than you think!
Tools Used

Step 21


– While gently holding the motherboard bracket out of the way with your tweezers or fingers, grab a spudger and carefully pry up that battery press connector. You’ve got this!
– When it’s time to re-attach those press connectors, take your time! Align one side and give it a gentle press until you hear that satisfying click, then do the same on the other side. Just remember, no pressing down in the middle! If it gets misaligned, those little pins might bend and we definitely don’t want that. Keep it cool and steady!

Step 22


– While keeping the motherboard bracket out of the way, grab your trusty spudger and gently pry up to disconnect the wireless charging coil’s press connector. You’ve got this!
Tools Used
Step 23


Securing the wireless charging coil is a breeze with just a dab of gentle adhesive. Just a little touch to keep things in place!
– Gently use your fingers to peel off the wireless charging coil from the phone.
– When putting everything back together, start by securing the screws on the motherboard bracket to make sure the charging coil is in place, then press down firmly on the rest of the coil to stick it back on.
Step 24

– Grab your trusty Phillips screwdriver and take out those six 4 mm screws that are holding the loudspeaker snugly to the frame. You’ve got this!