Samsung Galaxy S21 5G Back Cover Replacement Guide: DIY Tutorial
Duration: 45 minutes
Steps: 16 Steps
Hey there! Looks like we’ve hit a little bump in the road, but don’t worry, we’ve got this under control. Just follow along with our easy steps and you’ll be back up and running in no time. And remember, if you need some extra assistance, you can always schedule a repair with our friendly team. Keep up the good work!
Get ready to tackle the back cover of your Samsung Galaxy S21! Just a heads up: how well you stick that adhesive back on will determine if your device keeps its water-resistant charm, but it’s worth noting that it might lose its IP (Ingress Protection) rating. So, let’s get to it and make this repair a success! If you need help, you can always schedule a repair.
Step 1

Make sure to power down your phone completely before diving in.
– Warm up your iOpener and gently place it on the bottom edge of the back cover for a cozy two minutes.
Tools Used

Step 2


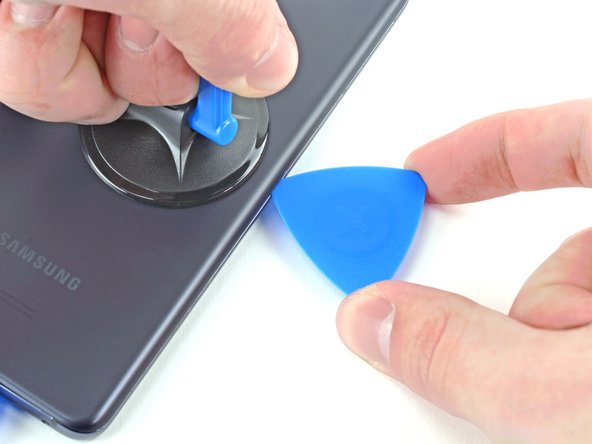
– Hey there! Let’s rock this repair together. First, find a chic little suction cup and stick it near the bottom middle of your phone. Give it a haul to create some room for our tiny ally, the opening pick. Let’s show ’em what we’ve got!


Step 4

– Warm up the left edge of the back cover with a heated iOpener for a cozy two minutes.
Tools Used
Step 5


– Grab a suction cup and stick it on the back of your phone, aiming for the center of that left edge like a pro.
– Give that suction cup a solid pull, steady and strong, to pop open a little gap between the back cover and the frame.
– Slide an opening pick right into that gap and let the magic begin!
Step 6


– Gently glide an opening pick along the left edge towards the bottom left corner to gracefully separate the adhesive.
– Pop the pick in place to keep the adhesive from magically resealing.
Step 7

– Give the back cover’s right edge a little love with a heated iOpener for a solid two minutes.
Tools Used
Step 8


– Let’s start by sticking a suction cup onto the back of your phone, aiming for a spot near the center of the right edge.
– Now, gently pull up on that suction cup with a firm and steady hand—this will help open up a little space between the back cover and the frame.
– Once you’ve got that gap, slide in an opening pick to keep it nice and open.
Step 9


– Wowzers! You’re a total rock star. Now, slide the opening pick and do a little dance along the back cover’s right edge to make that adhesive disappear! Once you’ve made it sick that adhesive, leave the pick in place so it doesn’t come back to haunt you later. If you need help, you can always schedule a repair!
Step 10


Feel free to use this method on each corner, just steer clear of the top-left where the rear-facing camera hangs out.
– Go ahead and gently swirl the right-edge opening pick around the upper-right corner of the device.
Step 11


– Gently slide the top pick right up against the camera shell, giving it a cozy fit.
– Now, let’s do the same for the pick along the left edge. You’re making great progress!


Step 13


If this tip doesn’t do the trick, don’t sweat it! Just hop on to the next step for another approach; if it does work, feel free to skip ahead.
– Twist that back cover to the left just a bit so you can sneak a little gap between the camera shell and the frame.
– Slide an opening pick into that gap you’ve created.
Step 14


– Gently glide an opening pick between the camera shell and the frame to gracefully separate the adhesive.
Step 15


– Carefully align the tip of your opening pick with your phone’s flash.
– Gently slide the pick in, being cautious to steer clear of the flash’s plate.
– Neatly slice through the adhesive just to the right of the camera.