Samsung Galaxy S20+ USB-C Port and Daughterboard Replacement Guide
Duration: 45 minutes
Steps: 26 Steps
Hey there! If you’re feeling stuck, don’t worry, we’ve got your back. Just remember, you can always schedule a repair with us. Stay positive and keep on repairing!
Ready to tackle the USB-C port and daughterboard on your Galaxy S20 Plus? This guide will walk you through removing or replacing them like a pro! Just don’t forget to grab some replacement adhesive to wrap things up nicely. If you need help, you can always schedule a repair!
Step 1

Make sure to unplug and power down your phone before diving in!
– Warm up an iOpener and gently place it on the lower edge of the back cover for a couple of minutes.
Tools Used

Step 2


– Alrighty folks, here’s how you can achieve that phone freedom and make that adorable little screen shine like new! So let’s get ourselves a suction cup right on the back cover, as close to that bottom middle edge as possible. Now pull with all the gusto, making some room between the cover and the frame. And voila! Just slide that trusty old opening pick into that gap. If you need any help, you can always schedule a repair!
Step 3


– Glide the pick gently back and forth along the lower edge to easily cut through the adhesive.
– Keep your trusty opening pick snugly in the crease to prevent the adhesive from sealing back up.
Step 4

– Warm up a heated iOpener and gently press it against the left edge of the back cover for a cozy two minutes.
Tools Used
Step 5


Given the snug fit of the components, you might need to give it a few tries. Don’t worry, you’ve got this!
– Grab a suction cup and stick it onto the back of your phone, aiming for the sweet spot near the center of the left edge.
– Give that suction cup a solid tug! You want to create a little gap between the back cover and the frame, so put some muscle into it.
– Now, take your trusty opening pick and gently slide it into that gap you just made.
Step 6


– Once the pick is snugly under the edge of the glass, give it a little tilt downwards and slide it in a bit more to completely break free the back cover’s adhesive. You’ve got this!
Step 7


– Gently glide the pick along the left edge of your phone to break free the back cover’s sticky grip.
– Keep your pick tucked under the left edge of the glass to stop that adhesive from making a comeback.
Step 8

– Warm up a heated iOpener and gently press it against the right edge of the back cover for a cozy two minutes.
Tools Used
Step 9


– Grab a suction cup and stick it to the back of your phone, aiming for the center of the right edge. You’re doing great!
– Give that suction cup a solid pull—steady and strong! This will help you create a little gap between the back cover and the frame. Keep it up!
– Now, take the point of an opening pick and gently slide it into that gap you just made. You’re on the right track!
Step 10


– Gently glide the pick along the right edge of your phone to break free the adhesive holding that back cover snugly in place.
– Keep your pick tucked under the right edge of the glass near the top of your device. This little trick will help keep the adhesive from sticking back together!
Step 11

– Warm up the top edge of the back cover with a heated iOpener for two minutes to help loosen things up.
Tools Used
Step 12


The glass around the corners of the back cover has a little curve and can be prone to cracking. So, take it easy during this step to keep your back cover safe and sound!
– Slowly glide the pick from the right edge of the device around the top right corner.
– Keep on cutting along the top edge all the way around to the left edge to completely detach the back cover adhesive.
Step 13


– Gently lift the back cover, taking your time. Use those trusty opening picks to glide through any stubborn adhesive that’s hanging on.
– Carefully remove the back cover.
– When putting everything back together:
Step 14

– Grab your trusty Phillips #00 screwdriver and get ready to tackle those six 4 mm-long screws holding the motherboard bracket in place. You’ve got this!
Tools Used

Step 15


– Grab a trusty pair of tweezers and gently coax the motherboard bracket up and away from the plastic midframe.
Tools Used

Step 16


– Give the motherboard bracket a little lift, like you’re giving a high five to the orange battery connector!


Step 18


– Grab your trusty spudger and gently nudge up the wireless charging coil connector to disconnect it. You’ve got this!
Tools Used
Step 19


– Grab a trusty pair of tweezers and gently coax the wireless charging coil away from the device. Be gentle, it’s a delicate operation!
– Now, go ahead and remove that wireless charging coil. You’ve got this!
– As you put everything back together, start by reconnecting the charging coil and battery connectors. Don’t forget to fasten those motherboard bracket screws to keep everything snug and secure. Finally, give that coil pad a firm press to make sure it sticks like it should!
Tools Used
Step 20

– Grab your trusty Phillips #00 screwdriver and get ready to unscrew! Carefully take out those five 4 mm-long screws that are keeping the loudspeaker and lower midframe in place. You’ve got this!
Tools Used


Step 22


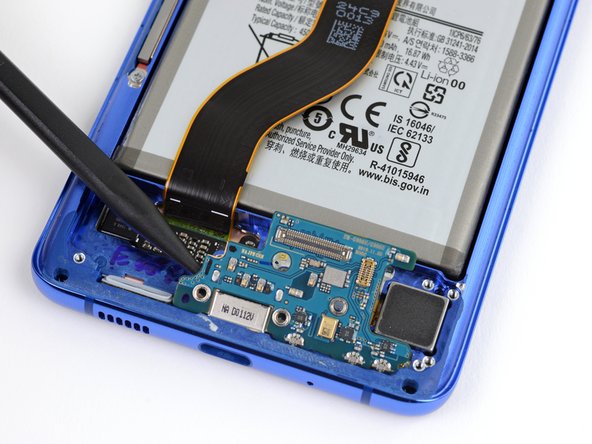
– Got a spudger? Awesome! Time to gently pry up and disconnect the main and auxiliary flex cables from the daughterboard near the bottom of the device. Ready for the next step? Here’s a tip: when re-attaching press connectors like this one, make sure to align it just right and press down firmly on one side until you hear that satisfying click. Then, do the same on the other side. Remember, avoid pressing down on the middle to prevent any mishaps. Keep it steady and you’re good to go!
Tools Used
Step 23


– Employ a trusty spudger to delicately lift and detach the main and auxiliary flex cables from the motherboard.
Tools Used


Step 25

– Grab your trusty Phillips #00 screwdriver and get rid of those pesky 3.4 mm-long screws holding down the USB-C port and daughterboard. Let’s show them who’s boss!
Tools Used
Step 26


– Gently slide the sharp end of your trusty spudger under the left edge of the daughterboard and give it a little nudge to pop it free from its cozy spot.
– Now, grab a pair of tweezers and carefully lift the daughterboard up and away from the bottom of the device. It’s time to say goodbye to that little component!


