How to Replace Samsung Galaxy S20 Plus Battery Guide
Duration: 45 minutes
Steps: 31 Steps
Got a puffy battery? Handle with care and keep the heat away.
Stay safe: Drain your battery below 25% before taking your phone apart.
This guide is all about swapping out your Samsung Galaxy S20 Plus battery! Fear not, strong adhesive is no match for the might of your repair skills combined with some isopropyl alcohol! But hey, if your battery’s all puffed up, be careful out there! Charging it to below 25% before you get started is a smart move to keep those fires at bay. And remember, you’ll need some fresh adhesive to make this all stick together properly! If you need a hand, our pals at schedule a repair are always ready to help you out!
Step 1

Did somebody say phone repair? Let’s do this! Make sure you give your device a nice break first by unplugging and powering it off. You’ve got this! If you need any help, you know who to call, right? Just click here schedule a repair anytime!
– Warm up an iOpener and give some love to the bottom edge of the back cover for a solid two minutes.
Tools Used

Step 2


– Stick a funky suction cup on the back of the phone right at the center bottom edge.
– Give that suction cup some love by pulling it with strong, smooth force to create a gap between the back cover and the frame.
– Slide in a cool opening pick into the gap you’ve created.
Step 3


– Gently glide your pick back and forth along the bottom edge to cut through that sticky adhesive like a pro.
– Keep your opening pick snugly in the seam to stop the adhesive from making a comeback.
Step 4

– Warm up the left edge of the back cover with a heated iOpener for about two minutes.
Tools Used
Step 5


Don’t worry if it takes a few tries, these things can be finicky!
– Grab a suction cup and place it on the back of your phone, as close to the center of that left edge as you can get!
– Give the suction cup a strong, steady tug to create a little gap between the back cover and the frame—you’re doing great!
– Now, take the point of an opening pick and gently slide it into that gap you’ve just made.
Step 6


– Slide the pick under the edge of the glass, give it a little tilt down, and push it in a bit more to break that adhesive seal like a pro!
Step 7


– Glide the pick along the entire left edge of the phone to loosen up the back cover’s adhesive.
– Keep your pick nestled under the left edge of the glass to stop that adhesive from re-sticking.
Step 8

– Heat things up by applying a warmed iOpener to the right side of the back cover for a couple of minutes.
Tools Used
Step 9


– Grab a suction cup and place it on the back of your phone, aiming for the center of that right edge like you’re trying to win a prize!
– Now, give that suction cup a firm tug! Steady and strong, let’s create a little space between the back cover and the frame.
– Once you’ve got that gap, slide in the tip of an opening pick and let’s get this show on the road!
Step 10


– Gently slide the pick along the right edge of the phone to gracefully separate the back cover’s adhesive.
– Keep your pick snug under the right edge of the glass near the top of the device to prevent the adhesive from giving any surprise stickiness.
Step 11

– Get your phone groovin’ by applying a warm iOpener to the top edge of the back cover for a cool two minutes.
Tools Used
Step 12


Hey there! The glass around the corners of the back cover is kinda delicate and can crack easily. So, just take it easy during this step to keep your back cover in tip-top shape!
– Gently glide that pick from the right edge of your device, making your way around the top right corner like a pro.
– Keep slicing along the top edge, all the way to the left edge, until you’ve successfully freed the back cover from its sticky situation.
Step 13


– Hey there! Time to bust a move and gently lift that back cover. Grab some opening picks and get ready to slice through any sticky situations.
– Now, take off the back cover like a boss.
– Remember, when putting things back together: Let’s keep it funky:
Step 14

– Get ready to show those pesky screws who’s boss! Grab your Phillips #00 screwdriver and remove the six 4 mm-long screws holding the motherboard bracket in place.
Tools Used

Step 15


– Grab a trusty pair of tweezers and gently lift up the motherboard bracket from the plastic midframe. You’ve got this!
Tools Used


Step 18


– Gently use a spudger to lift and disconnect the wireless charging coil connector.
Tools Used
Step 19


– Grab your trusty tweezers and carefully peel the wireless charging coil away from your device. Take it slow and steady!
– Now, it’s time to remove that wireless charging coil completely. You’ve got this!
– When it’s time to put everything back together, start by reconnecting the charging coil and battery connectors. Then, secure those motherboard bracket screws to ensure everything lines up perfectly. Finally, give that coil pad a firm press to make sure it sticks like it should!
Tools Used
Step 20

– Hey there! Time to embark on a fun little adventure – removing those sneaky 4 mm screws with a trusty Phillips #00 screwdriver. There are total of five, so once you’ve unclipped ’em, give a little thumbs up! 🙌 If you need help, you can always schedule a repair
Tools Used
Step 21


Step 22


– Grab a spudger, and gently pry up and disconnect the main and auxiliary flex cables from the daughterboard located down low on your device.
– When it comes to re-attaching press connectors like a pro, make sure to align them carefully and press down on one side until you hear that satisfying little click. Then, move on to the other side without touching the middle. Remember, a misaligned connector can lead to bent pins and some not-so-fun permanent damage.
Tools Used
Step 23


– Grab your trusty spudger and gently lift up to disconnect the main and auxiliary flex cables from the motherboard. You’ve got this!
Tools Used


Step 26


– Grab your trusty spudger and gently pry up the main display flex cable to disconnect it from the motherboard. You’ve got this!
Tools Used
Step 27


– Carefully lift and flex the display along with the left 5G antenna cables to clear the path for the motherboard and battery.

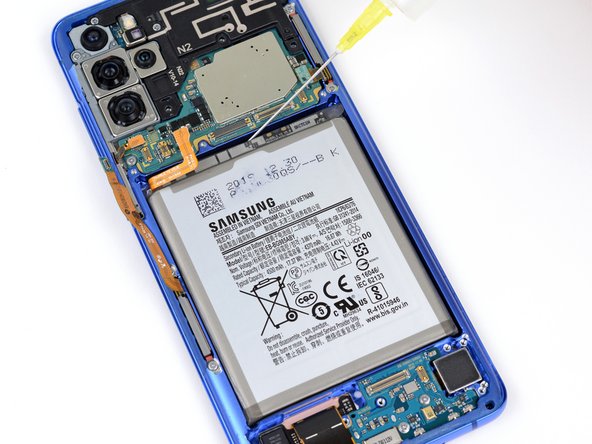


Step 29
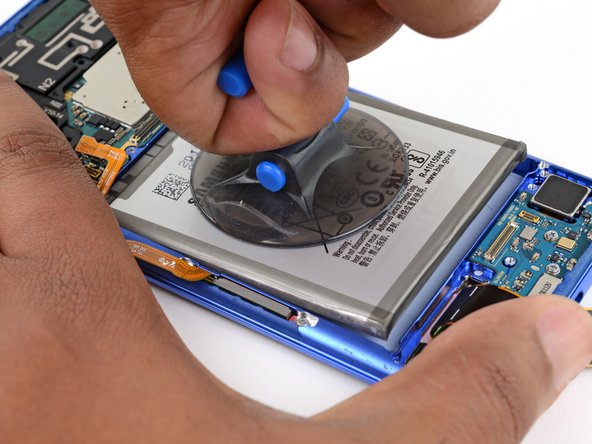

– Get ready to rock n’ roll by applying a suction handle to the battery’s center spot.
– Hold the top and bottom of your device steady against your work surface with one hand, and pull up on the suction handle like you mean it with the other.
– Once that battery starts making moves, it’s time to groove on to the next step.
Tools Used

Step 30
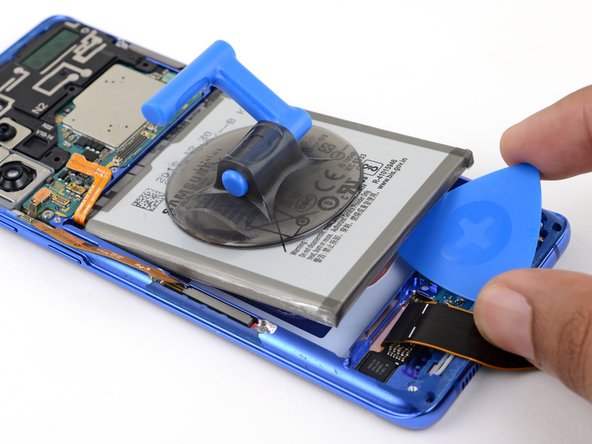

Before you dive into this step, make sure the battery is lifted just enough to slip an opening pick underneath. If it’s still stuck like glue, you might accidentally poke it and create a thermal party that no one wants to attend.
Once the battery is up and away, hold off on the isopropyl alcohol, or it might sneak into the fingerprint sensor and ruin your screen’s day.
– Gently slide an opening pick under the lower edge of the battery and give it a little twist to loosen up the battery adhesive.
Tools Used
Step 31

– Get rid of that battery – it’s time to part ways.
– Pry and peel away any stubborn battery adhesive. Then, give that battery bed a squeaky clean with isopropyl alcohol and a lint-free cloth.
– If you used isopropyl alcohol, hang tight for ten minutes before popping in the fresh battery. Let that alcohol dance off into the sunset.
– When putting things back together, if your shiny new battery is missing its stickiness, slap on some adhesive. Press that bad boy in place like it’s meant to be there.
Tools Used


