Samsung Galaxy S9 Charging Port Replacement Tutorial
Duration: 45 minutes
Steps: 15 Steps
Hey there! Just a quick heads-up: make sure you follow these steps closely to keep everything running smoothly. If you hit a snag or feel stuck, no worries! You can always schedule a repair for some expert help. Happy fixing!
The charging port is where your device gets its juice from. Before you start poking around, check our troubleshooting page to make sure it’s not a software glitch. If it’s a hardware issue, you’ll need to replace the charging port board. Heads up – replacing this part means breaking your phone’s waterproof seal. If you want to keep your phone’s waterproof abilities, you’ll need to replace the seal. If you need help, you can always schedule a repair.
Step 1
Looks like the adhesive on the Samsung Galaxy S9 is as tough as a superhero! If you’re having trouble popping it open with the iOpener, you can bring in some backup like a hair dryer, heat gun, or even a hot plate. Just remember, we want to warm it up, not cook it up! Heat can be a bit much for the AMOLED display and internal battery, so let’s play it cool and not overdo it.
– Alright, let’s get started! First things first, make sure to turn off your phone. Safety first, right?
– Now, grab your trusty iOpener and warm it up. Apply it to one of the longer edges of your phone to help loosen that stubborn adhesive holding the rear glass in place. Give it a solid two minutes—patience is key here!
Tools Used
Step 2
The adhesive is neatly placed on the inside of the back cover, just like in the picture.
– Get ready for some action! In the next few steps, we’ll be cutting through the sticky stuff holding on to that back cover.
– Make your cuts in the areas shown below, and we’ll have that cover off in no time!
Step 3
Hey there! If the rear glass of your phone happens to be cracked, you might find that the suction cup doesn’t want to stick. No worries! You can try giving it a little lift using some sturdy tape, or you can get super crafty and secure the suction cup with a touch of superglue. Just give it some time to cure, and you’ll be back on track in no time.
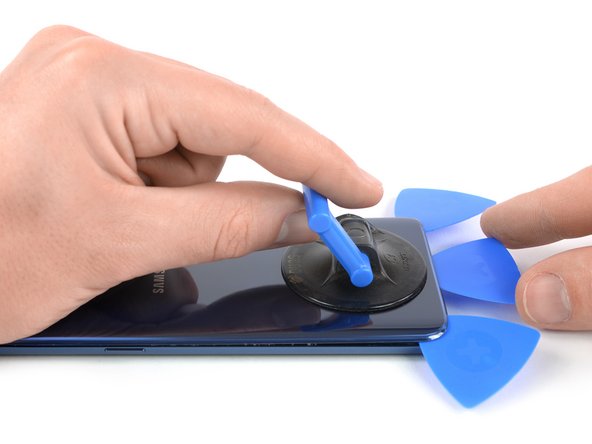
– Start by sticking a suction cup onto the back cover. You’ve got this!
– Gently lift the bottom edge of the back cover with your suction cup to create a little gap between the cover and the frame.
– Slide an opening pick into that gap you just made and glide it over to the bottom right corner.
– Now, grab a second opening pick and slide it over to the bottom left corner.
– To keep things from sticking back together, pop in a third opening pick. You’re doing great!
Step 4
– Gently slide just the tip of your trusty opening pick into the bottom left corner and glide it up the side to the top. You’re doing great!
– Once you reach the top corner, keep that pick in place to stop the adhesive from getting all clingy again. Nice work!
Step 5
Hold your horses! Don’t fully open the phone just yet. That delicate fingerprint sensor cable is still hanging on, connecting the back cover to the motherboard.
– Gently slide the opening pick from the bottom right corner up along the side to the top. You’re doing great!
– Now, slide that pick around the corner and slice through the last bit of adhesive at the top of the phone. Almost there!
Step 6
– Hey there! Let’s cheer on and gives these little digits a little lift up, where the volume buttons hang out. And let’s don’t forget to unwire our buddy the fingerprint sensor, just use a spudger to unhook its flex cable. If you need help, you can always schedule a repair!
Tools Used
Step 7
– Let’s get that rear glass removed, it’s time to make room for the new one! For reassembly, check out our guide, it’ll help you replace that adhesive and put your new glass right back where it belongs, easy peasy. If you want to keep everything looking perfect, follow this guide to swap out the rear camera bezel and fingerprint reader – you’ll be the hero of your device!
Step 8
– Unscrew fifteen of those pesky 4mm screws with your trusty #000 Phillips screwdriver. You’ve got this!
Step 9
– Time to say goodbye to the NFC coil assembly! Gently take it out and set it aside like a pro.
Step 10
– Time to say goodbye to the motherboard bracket! Gently remove it and keep it safe for later. You’ve got this!
Step 11
– Pop off that speaker cover and antenna assembly!
Step 13
If your new charging port didn’t come with those snazzy blue and white cables, no worries! Just gently detach them from your old board so you can hook them up to your shiny new one. You’ve got this!
– Unplug three cables to get things rolling.
Step 14
– Gently coax the headphone jack out of its snug little home using a spudger. A little elbow grease goes a long way!
Tools Used
Step 15
– Time to say goodbye to that charging port board! Carefully remove it and make way for the new one. You’ve got this!


