Nintendo 3DS Teardown
Duration: 45 minutes
Steps: 22 Steps
Nintendo’s 3DS made its Japanese debut on February 26th, even though it didn’t arrive in the United States until March 27th. We managed to snag one of these early models and are excited to dive into what makes the 3DS so unique. Join us as we take apart Nintendo’s boldest handheld device yet and see what’s inside!
Step 1
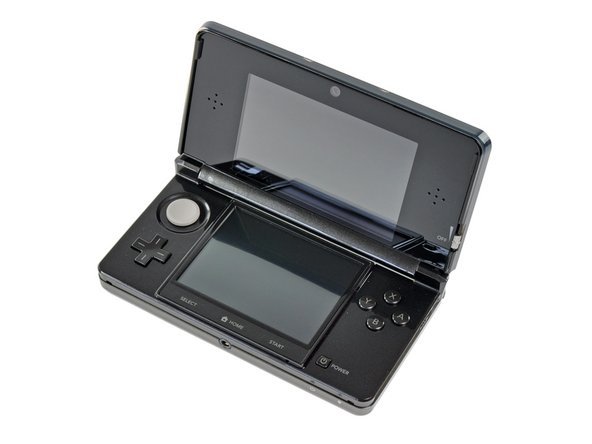

– Straight from Japan, here comes the Nintendo 3DS, and trust us, it’s worth the wait! This device has a solid feel when you hold it, and it’s packed with cool new features.
– Here’s what’s fresh on the outside of this DS model:
– 3D top screen (obviously)
– Dual cameras for 3D photos and gaming
– “Circle Pad” joystick
– IR port for extra fun
– Metal stylus for a premium touch
– Revised Start/Select buttons and a shiny new Home button
Step 2

– Let’s see how it compares to the Nintendo DSi XL. It’s a bit thicker, but trades that for a more compact design.
– Nintendo has made some changes to the top layout on the 3DS compared to the DSi XL.
– The charging port has shifted to the right side, and they’ve added some contacts for what seems like a charging cradle. The stylus hole now lives next to the game cartridge slot, there’s a new IR sensor window, and the holes for the strap have moved to the bottom.
Step 3

The 3D view works for most folks, but there was one case where the screen didn’t quite look ‘3D’ to one user—more like a regular screen with a twist. It’s rare, but if things look a little off for you, no worries! Feel free to schedule a repair if you need extra help.
– Meet the 3D slider! Slide it up or down to fine-tune just how much 3D magic you want to see on your screen.
– The top screen of the 3DS pulls off its 3D trickery using parallax—there’s a layer in the top LCD that shifts the image for each eye as you adjust the slider, so when you’re at the sweet spot distance, the visuals pop in 3D.
– Nintendo’s got a history with 3D gaming, including the quirky, underrated Virtual Boy, which used a different method but aimed for the same mind-bending effect.
Step 4


– Here’s a quirky trick we stumbled on while blasting away dust with canned air: the 3DS reacts to wind like it’s stuck in a storm!
– Blow air on the 3DS mic and watch the menu icons spin around like they’re caught in a mini tornado.
Step 5


– Turns out, snapping a picture doesn’t quite capture the 3D magic—but you can still check out the slick touch-sensitive lower screen and the upgraded metal stylus.
– Our Japanese is a bit rusty, so we’ll really get to dive in once we get our hands on a 3DS in our own language later this month.
Step 6

– Just a couple of Phillips screws stand between you and the good stuff inside. Unlike older DS models, the 3DS’s back cover comes off in one clean piece instead of a small door, giving it a sleeker look. Keep in mind, this means replacing the battery might take a bit more time, but don’t worry — you’re making steady progress. If you need a hand along the way, you can always schedule a repair.
Step 7


– The 3.7V 1300mAh 5Wh Li-Ion battery keeps the party going for just 3 to 5 hours. That sweet 3D action comes at a cost—your battery drains faster than you can say ‘game over.’ Even when playing original DS titles, the 3DS only manages around 5-8 hours on a single charge. To keep you gaming longer, Nintendo includes a handy charging cradle, which charges the battery in about 3.5 hours. The shorter battery life is likely due to the snazzier processor, dual LCD screens for that cool parallax effect, and the hardware-heavy programs running inside. If you need help, you can always schedule a repair.
Step 8


– Check out the snazzy telescoping stylus hiding in its slot just to the left of the game cartridge port.
– Thanks to its metal build, this stylus feels a cut above the old-school plastic ones from earlier DS models.
Step 9


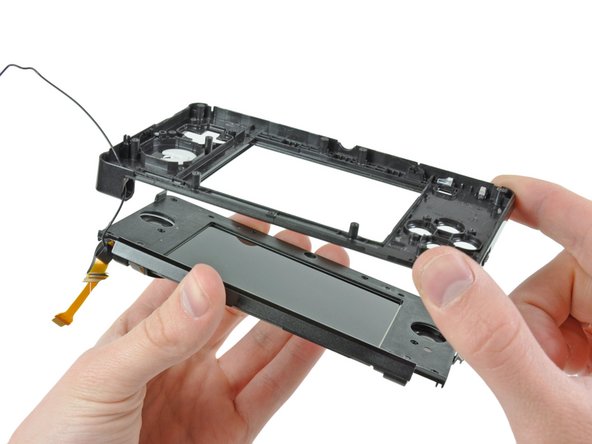
– Using our handy 54-piece bit kit, remove a few Phillips screws to gently lift off the lower case. Once it’s out of the way, you’ll get a clear view of the motherboard and its various connected parts. Having components like the joystick and SD card reader on separate boards makes future replacements more straightforward and cost-effective. If you need any assistance, you can always schedule a repair.
Step 10


– Use a plastic opening tool to carefully detach the Wi-Fi board from the motherboard. It’s a simple move, no sweat.
– Once you disconnect the lone antenna, the Wi-Fi board is completely free from the 3DS, ready to be removed.
– Flip the board over and you’ll see a sticker that says Mitsumi DWM-W028. Underneath, you’ll find an Atheros AR6014 IC, handling the 802.11 b/g connectivity like a pro.
Step 11


– Next up: gently pop off the tiny IR board from the main board. It’s small, but it comes out pretty easily.
– We’re still guessing about what this infrared port will end up doing—maybe some secret 3DS-to-3DS magic across the room.
– The IR controller chip is made by NXP, and you’ll spot these markings:
– S750 0803 TSD031C
Step 12


– The Circle Pad and SD card slot are right next to each other at the bottom, and they both pop out with hardly any effort. No sweat!
– For the first time on a Nintendo handheld, you get extra directional buttons along with the classic D-pad—Sony’s PSP has had an analog joystick since way back in 2004, so Nintendo fans finally get to join the club.
– A 2 GB SD card comes standard with the 3DS, but swapping it out for a bigger one (SD or SDHC) is super easy. Perfect if you’re planning to snap loads of 3D pics or fill up on eShop games.
Step 13


– Time to tackle those last stubborn screws holding the motherboard to the lower case—show them who’s boss!
– Motherboard is nearly free…does this feel like déjà vu, or is it just us?
Step 14

– Here’s a peek at the chips we’ve discovered inside the 3DS motherboard (check out the high-res version here):
– Nintendo 1048 0H ARM CPU
– Fujitsu MB82M8080-07L 128MB FC-RAM
– Toshiba THGBM2G3P1FBAI8 2 GB NAND Flash
– Texas Instruments PAIC3010B 0AA37DW
– UC CTR 041KM73 KG10
– Invensense ITG-3270 MEMS Gyroscope
– ST Micro 2048 33DH X1MAQ Accelerometer Model LIS331DH
Step 15

– Flip the motherboard over and things get a bit calmer:
– Spot the TI 93045A4 OAAH86W hanging out here.
Step 16


– Lift out the lower LCD assembly—no wrestling required.
– Check out the 2.42″ x 1.81″ screen rocking a crisp 320 x 240 pixel resolution and showing off 16.77 million colors.
– Notice that the digitizer here is a bit beefier than what you’d find on most phones, since it’s made for stylus action instead of finger taps.
– You can also pop out the lower microphone from the case at this stage.
Step 17


– Older DS models had four rubber screw covers on the front bezel, but for the newer version, Nintendo decided to go for a cleaner look by sticking a front panel onto the bezel, cleverly hiding the screws underneath.
– A little heat from a heat gun and a plastic opening tool make it a breeze to access the upper display. Easy peasy!
Tools Used

Step 18


– To get started, take out the six Phillips screws holding the rear bezel in place – it’s time to see what’s behind the display!
– Next, carefully separate the hinges – it’s like solving a fun puzzle, and then gently thread those ribbon cables through the hollow hinges. Don’t worry, it might seem tricky, but you’ve got this!
– Now, take a deep breath and carefully thread the upper display and camera cables through that tiny hinge tube. It’s a bit of a challenge, but with a little patience, you’ll be a pro in no time! If this step is giving you trouble, remember, you can always schedule a repair at Salvation Repair.
Step 19


Well, it’s settled—this device has more cameras than we’ve ever seen before!
– All three cameras are linked by a single ribbon cable. Seems like the cool move for compact devices with multiple cameras—easier for all that image data to travel together to the processor.
Step 20

– The stereo speaker assembly delivers punchy bass and clear highs, giving those portable device sounds a lively edge. These speakers do more than just play game noises; the Nintendo 3DS supports MP3 and AAC formats, though it probably won’t dethrone your trusty iPod anytime soon. Plus, the speaker assembly ribbon cable also holds the 3D view adjustment slider and the dual camera indicator LED. If you need help, you can always schedule a repair.
Step 21


– Once you’ve taken out the speakers, the top LCD module should slide right out with ease.
– This LCD has three cable connectors – one for displaying the image and two for the parallax barrier that creates the cool 3D effect in those 3DS games.
– Nikkei Electronics’ Tech-On took a deeper dive into the LCD panel, uncovering six distinct optical elements. Pretty neat, huh?
Step 22


– Nintendo 3DS Repairability Score: 5 out of 10 (where 10 means super easy repairs).
– Swapping out the battery is a breeze—just pop off the back cover and you’re set.
– No need to hunt down fancy tools—just a trusty Phillips #00 will do the job.
– The cables for the top screen are tucked away in a pretty sneaky spot, making them tricky to remove and even more finicky to put back in place when reassembling.
– There are plenty of tiny parts inside the 3DS, so keep an eye on them—losing a piece could lead to a game over for your repair.
– Most connectors are ZIF, and getting every single one properly attached can be a guessing game until you put it all back together and power it up.
– The headphone jack and charging port are soldered right onto the motherboard. If one of these breaks, it’s soldering time. Not feeling brave? You can always schedule a repair.