How to Replace Samsung Galaxy S8 Active NFC Antenna and Charging Coil Assembly
Duration: 45 minutes
Steps: 8 Steps
Hey there! Before you dive in, make sure you’re working in a clean, well-lit space. If things get tricky, you can always schedule a repair. You’ve got this!
Hey there, tech-savvy friend! Let’s team up and conquer this Samsung Galaxy S8 Active fix together. You’ll need to take off the back cover and give the NFC Antenna and Charging Coil Assembly a little makeover. But don’t forget, you’ll need some fancy replacement adhesive to make sure that back cover sticks just right. And, um, maybe charge your battery a bit before diving into this project, just to be on the safe side. We wouldn’t want any fiery explosions happening, right? Once you’ve got all that sorted, you’ll be all set for a smooth and groovey repair experience. If you need help, you can always schedule a repair.
Step 1


– Grab your trusty SIM card ejector tool (or a paperclip if you’re feeling crafty) and gently pop it into the tiny hole on the left side at the top of your phone.
– A little push goes a long way—press gently to release that SIM tray.
– Carefully pull out the SIM card tray from your device; it’s time for a little break.
– When you’re ready to put the SIM card tray back in, make sure the gold contacts are facing up and the notch is at the bottom right. Just press the card gently into the SIM tray slot and you’re all set!
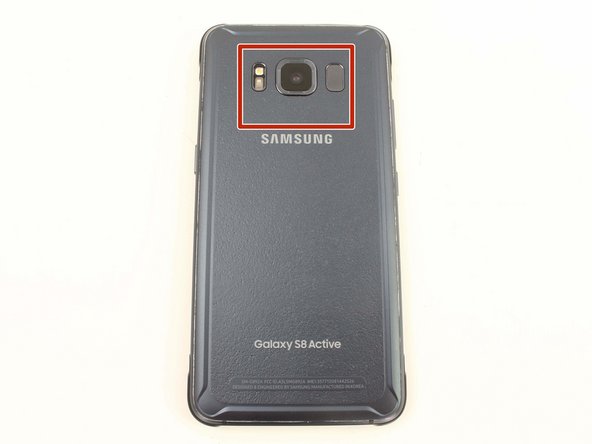
Step 2


Taking off the back cover of your S8 Active is a bit of a slippery slope—it’ll break those waterproof seals! Make sure you’ve got some replacement adhesive ready to go before diving in. If you choose to skip replacing it, just keep your device away from water to avoid any unplanned splashes during reassembly.
– Grab your trusty TR6 Torx Security Screwdriver and unscrew those four black 3mm screws hanging out at the edges of your device, holding the rubber bumpers in place. You’ve got this!
– Now, gently peel off those rubber bumpers from the top and bottom edges of the device. It’s like giving your device a little makeover!
Tools Used

Step 3

– Grab your trusty heat gun and gently warm up the edges of the back cover. This will help soften the adhesive that’s keeping it snugly attached to the frame. A little heat goes a long way!
When using a heat gun, hair dryer, or hot plate, remember things might get a little toasty! Take care when handling the metal frame.
To prevent device meltdowns, go easy on the heat – the OLED display, battery, and other internal parts don’t vibe well with too much warmth. Just around a minute of heat to soften the adhesive should do the trick.
If you’re feeling a bit hesitant about applying heat, no worries! Just remember, you’ve got this. You may use a trusty iFixit iOpener, or even your own hair dryer or hot plate if you feel like getting creative. Don’t forget to maintain that steady pace and stay positive. If you need help, you can always schedule a repair
Tools Used

Step 4


– Slip the Jimmy tool under the edge of the back cover.
– Once the Jimmy tool is snug under the edge, pop an opening pick into the seam to keep it from snapping shut if the Jimmy tool slips or is accidentally removed.
– Carefully cut around the top part of the device, being super careful not to nick the cables for the fingerprint sensor and camera. Avoid prying too deep to keep the fingerprint sensor safe.
– Glide the Jimmy tool along the sides of the device to separate the adhesive.
Tools Used

Step 5

Gently remove the back cover to keep that fingerprint sensor cable safe and sound—it connects up near the front-facing camera! Remember, a little patience goes a long way here. If you need help, you can always schedule a repair.
– Grab that opening pick and slice away any leftover adhesive.
– Lift the back cover just enough to spot the fingerprint sensor flex cable connector. Need a hand? You can always schedule a repair.
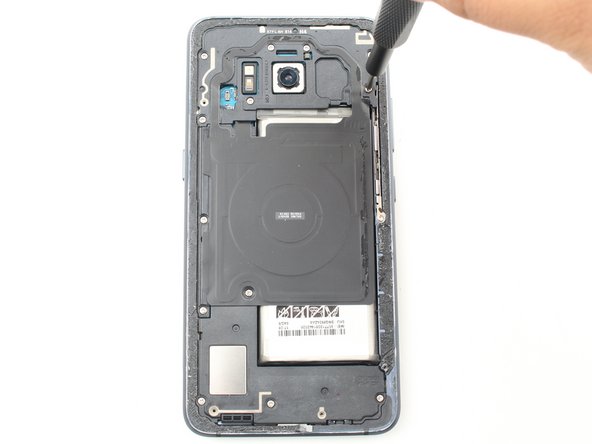
Step 6


– Gently flip that cover and place it right on top of the device like a cozy blanket!
– Using the flat end of your trusty spudger, carefully disconnect the fingerprint flex cable. You’ve got this!
– Time to remove the back cover. Let’s reveal the magic inside!
– When it’s time to reconnect the fingerprint sensor cable during reassembly, just tilt the back cover until the flex cable lines up with its socket. Then, with a gentle press straight down using the flat end of your spudger, snap that cable into place like a pro!
Tools Used

Step 7


– Let’s kick things off by unscrewing eleven 3.5 mm screws with your trusty Phillips #00 Screwdriver. Get ready to conquer that hardware!
– Now, grab your Phillips #00 Screwdriver again and remove two 2mm screws. You’re doing great—keep it up!
Tools Used

Step 8


– Use the flat end of a spudger to pop off the NFC antenna and charging coil assembly. If you need help, you can always schedule a repair.
Tools Used